12V Power Plug
TO REPLACE FUSE:
Undo knurled ring anti-clockwise.
DPS™ DIGITAL POWER SOURCE – Features
USB Port
Under the right hand cover is a single 5V USB port (4) suitable for charging mobile devices
with a maximum rating of 0.5A.
TYRE INFLATION
1. With the On/Off button in Off position, unwind power cord and plug the small end
into the input and the 12V power plug into your vehicle’s 12V power plug socket. Wait
a few seconds until digital display shows zero. Please note - when the On/Off button
is in the Off position, it protrudes from the unit slightly. When in the On position the
button is flush to the unit.
2. Press the bar, psi and kPa button to select desired pressure format.
Lift up the high pressure hose and screw the tyre valve connector onto the tyre valve.
Always connect the 12V power plug before connecting the high pressure hose to the
tyre. Check the tyre pressure shown on the display. If the display reads 0.00 or Err
then refer to the Trouble Shooting guide. When connected correctly the gauge will
display the current pressure in the tyre. If this is the pressure as stated in your vehicle’s
handbook, you can simply remove the tyre valve connector.
3. To start inflating press On/Off button.
4. You will now see the pressure increasing on the display. Due to the sensitive nature
of the tyre pressure measuring system, you may find that when you switch the tyre
inflator off at the required pressure the gauge may drop back slightly. If this happens,
switch back on and inflate to a slightly higher pressure. Switch off and re-check.
5. If you are inflating multiple tyres then follow the procedure stated from 3. to 4. above.
If the 12V power supply is disconnected then always reconnect the 12V power supply
before connecting the high pressure hose to the tyre valve. If there is a power
interruption during the inflation cycle, please follow the reset procedure outlined in
the trouble shooting guide.
Trouble Shooting
Gauge does not illuminate: Check that the plug is fully inserted into 12V socket.
Unit fails to run with switch in ‚On‘ position: Check internal plug fuse (10A glass type).
Your car may require the ignition key to be turned to the accessory position.
Power lead/plug becomes hot: If power lead is coiled, uncoil to full length. Ensure 12V
socket is clean with no debris in it. Ensure 12V plug components are tight and clean.
Gauge appeares to read incorrectly or is unreadable: When the tyre valve connector is
attached before switching the unit on, ensure the gauge is reading your current tyre
pressure.
Gauge reads 0.0 or ‚ERR‘: Disconnect valve connector from the tyre. Remove plug from
power source for at least 5 seconds, reconnect to power. Press and hold yellow reset
button until display shows all the digits. It then returns to 0.0. Connect valve connector
to tyre.
Unit is running but tyre is not inflating: Check that the ryre valve connector is correctly
fitted to the tyre valve.
Gauge does not display when tyre valve is connected: Ensure tyre valve is correctly
connected to the tyre valve connector.
anti-clockwise
knurled ring
knurled ring
fuse
Replace fuse and knurled ring (max. 10A).
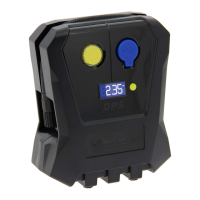
12V MICRO KOMPRESSOR
https://www.helix-automotive.com/qr/62001/userguide/de/
DE: Bedienungsanleitung – FR : MODE D’EMPLOI –
IT: MANUALE D’USO – ES: MANUAL DE USUARIO –
TR: KULLANIM KILAVUZU
Customer enquiries:
We’re at your service. Let us help
you find a better way forward.
Tel: +49 (0) 7131 27588-44
Michelin@helix-automotive.com
Manufactured and distributed under licence by
Helix Automotive GmbH, Fischeräcker 4, DE-74223 Flein
© 2021 Michelin, www.michelin-lifestyle.com
MICHELIN and/or the Michelin Man Device and/or BIBENDUM
are trademark(s) owned by, and used with the permission of,
the Michelin Group.
MICRO COMPRESSEUR 12V
https://www.helix-automotive.com/qr/62001/userguide/fr/
COMPRESSORE MICRO 12V
https://www.helix-automotive.com/qr/62001/userguide/it/
MICROCOMPRESOR DE 12V
https://www.helix-automotive.com/qr/62001/userguide/es/
12V MIKRO KOMPRESÖR
https://www.helix-automotive.com/qr/62001/userguide/tr/
3495_Michelin_12V Kompressor Micro_62001_Anleitung-EN_2.indd 2 19.04.2021 08:54:14
 Loading...