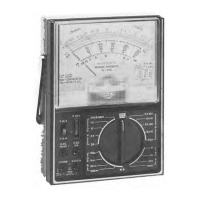
TO
USE
The
fo
l!
owing special markings
are
designed
to
remind
you
of
safety.
&. Ref
er
to
the
followlng operating instructions.
@ To avold eleetrical shock and/or instrument damage
do
no
t connect
th
e
common
input
te
rm
inal
(-jack)
to
any
source
of
more than
500
volts with respect
to
earth/
ground.
Press latch on the front
of
case
to
open.
Remove
banery
cover
and
install
one
AA cell
tnot
sup-
plied).
We
recommend
our
23·582
or
23·552.
Be
sure
to
obserVe
proper
polarity. Close t
he
cover. ·
When
vou
can't adjust the pointer
to
"0"
on OHMS ra
ng«,
it's time for a new
battery.
Never leave a weak
or
de
ad
battery
in
your
uni
t. Even a " lea
k·proof"
battery
may
lea
k damaging chemicals. Also, if
vou
are
not
go
ing
to
use
your
unit
for
a week
or
more, remove the battcry.
Notes:
For
most accurate readings, keep the me
ter
lyi
ng
f
la
t
on
a
non·me
ta
ll
ic surface.
Us
e a range
setting
that
re-
sul
ts
in a r
ead
ing in
th
e
upper
l/3rd
of
the
meter
scale.
Also, l
oo
k
at
th
e scale
from
the
point
where
the
poi
nt
er
and
its mi
rror
r
ef
l
ect
i
on
come
togethar;
ot
herwise y
our
reading
wi
ll
be inaccur
ate
due
to
para
ll
ax.
The poi
nte
r m
ay
shih slightly from
the
"0"
position as
y
ou
ch
ange
the
angle
of
the
meter
section.
-4-
1 f the poi
nte
r does
not
normally rest
cxac
t
fy
over
th
e
"
0"
at
tk
e le
ft
side
of
the
scale,
adjuu
the
plastic screw
in
the
lo
wer
center
of
the
meter
face
to
bring
the
needle
!0 "0
."
Always observe
correc
t
test
lead polaritv
when
making
OC
voltage
and
current
measurements (Black in
to
the8
COM a
nd
Red
into
the0V
·n·A
or
OCSOOV
or
DC1200V
jacks).
CAUTION: THE MAXIMUM INPUT
LIMIT
FOR
VOLTAGE
AND
CURRENT MEASUAEMENT BE·
TWEEN 0
v.n.A
AND
8 COM
IS
600V AC,
300V OC
AND
300mA
OC.
TEST
LEAD
S
Use
only
the
same
type
of
tenlellds atthose
supplie<!
with
your
unit.
These
test
leads are rated for
1200
volts; replace-
ments
are
available from
your
local Radio Shack
store.
OC
VOLTAGE
MEASUREMENTS
WARNING
~
US
E EXTREME CARE WHEN
MAK
·
ING MEASUREMENTS FOR HIGH
VOLTAGE;
DO
NO
T TOUCH TERMI
NA
LS OR
PROBE
EN
DS
.
1. Plug t
he
te
st
leads i
nto
th
e
correct
jacks (Black into 8
COM
and
Red
i
nt
o 0 V
·n
·
AI.
2. Set
the
ra
ng
e switch
to
one
of
the
CCV pos
it
ion
s;
it
is ·
best
to
start
at t
he
top
and
w
ork
do
wn.
lf
you're
unce
rt
aln
about
voltage revel,
stan
with 1
20
0V
range as noted in st
ep
5.
-5-
 Loading...