3
• CD-ROM Drive
• Windows 2000 (SP2), Windows XP (SP1) Home or Pro, Windows Vista
Hardware Setup
Front panel
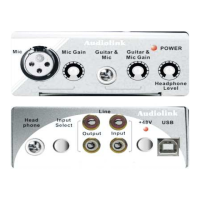
1. XLR MIC Input : This XLR balanced connector accepts a microphone level signal for Channel
1 of the Audiolink.
2. MIC level control: This control regulates the level of the signal going from the MIC input.
3. GUITAR/MIC Input : This 1/4“-IN connector accepts an instrument or microphone level signal
for Channel 2 of the Audiolink.
4. GUITAR/MIC level control: This control regulates the level of the signal going from the
GUITAR/MIC input.
5.Headphone output level control: This control regulates the level of the output signal to the
headphone.
6. Power Indicator: This LED indicator lights when the Audiolink is receiving power through its
USB port.
Rear panel
7. Headphone Output Jack: This 1/4” stereo jack plays back outputs 1 and 2 through the Left and
Right sides of your headphones.
8. RCA input 1 and 2: These RCA input accepts the line level stereo signal. If you are recording a
stereo line-level source, plug the left channel into LINE Input 1 and the right channel into LINE
Input 2.
9. Input select : Switch to select between MIC/INST or LINE input.
10. RCA Output 1 and 2 : These unbalanced RCA outputs the signal which is from your computer
and should be connected to a pair of powered speakers, a mixer or a stereo amplifier.
12. USB Jack: This jack connects the Audiolink to your computer, using a USB 1.1 (or higher)
connection.
Connection and operating devices:
The product case is printed with all relevant information! There is one XLR Mic socket and one
MIC/INSTR. socket with adjustment switches for the input levels next to them. On the front right
side you can find the headphone level control. On the opposite side there is the headphone out, and
4 Phono (RCA) sockets for the Input and Output. Connect the LINE out sockets with a regular
Phono (RCA) cable to an amplifier. All outputs, the LINE out and the headphone out, all provide
the same mix.
USB Connection
The Audiolink communicates with your computer through a USB port. It is also powered by the
same USB connection. Because of this, we recommend that you plug the Audiolink into one of the
built-in USB ports on your computer, not through a keyboard connection or USB hub.
To connect your Audiolink, locate an unused USB port on your computer and connect it to the
Audiolink jack with the included USB cable.Often computers USB jacks will are located on a rear
panel and will probably be marked with a USB symbol. With Windows XP & Vista, the Audiolink
is class-compliant, making driver installation optional — to begin using the Audiolink, you may
simply plug the unit into a USB port . However, choosing to install the driver will allow the
following added functions:
Windows XP and Vista - Device Control Panel and ASIO support with low-latency drivers
Connecting the Audiolink to your computer
Connecting the Audiolink to a computer is very easy! Simply connect your Audiolink, with the
 Loading...