Español Modelo 1007
Para usar con los modelos de herramientas rotativas Dremel
®
400
XPR, 275, 285, 395, 398 y 780, Black and Decker
®
RTX, u cualquier
otra herramienta rotativa con la misma rosca.
Contenidos: 1 cabezal de guía de 22°, 1 cabezal de guía de 30°,
1 cabezal de guía de 45°, 1 una broca para afilar
Advertencia: Siempre use anteojos y mascarilla contra polvo
cuando opere las herramientas eléctricas. Verifique que la broca
no esté dañada antes de usarla, reemplácela si es necesario.
Siempre jale la herramienta rotativa hacia su cuerpo, de lo
contrario, puede quebrar la broca.
Para adjuntar:
1
Quite la tapa de la carcasa de su herramienta rotativa.
2
Inserte la broca provista en su herramienta, dejando
aproximadamente 1/4 pulg. de la espiga expuesta entre el
cabezal de guía y el borde de la broca cortante. La broca
debe estar insertada lo suficientemente lejos en el collarín
para asegurar que la broca no toque el accesorio.
3
Determine qué cabezal de guía encaja mejor en su
herramienta. Gire el accesorio, en dirección a las agujas del
reloj, en el extremo roscado de la herramienta rotativa hasta
que quede totalmente firme en el cuerpo de la herramienta.
Français Modéle 1007
À utiliser avec les outils rotatifs Dremel
®
, modèles 400 XPR, 275, 285,
395, 398 et 780, Black and Decker
®
RTX ou azutres outils rotatifs
dotés du même filetage.
Contenu : 1 tête-guide de 22º, 1 tête-guide en métal de 30º,
1 tête-guide de 45º, 1 tige d’affûtage
Avertissement : Toujours porter un dispositif de protection des
yeux et un masque antipoussières pendant l’utilisation d’outils
électriques. Vérifier l’état de la tige avant l’utilisation. Remplacer
au besoin. Tirer toujours l’outil rotatif vers soi. Le fait de pousser
l’outil rotatif loin de soi peut briser la tige.
Pour fixer :
1
Retirer la capuchon du boítier de l'outil rotatif.
2
Insérer la tige d’affûtage fournie dans l’outil en laissant
approximativement 65 mm (1/4 po) de la queue exposée
entre la tête-guide et le bord du taillant. La tige doit être
insérée assez profondément dans la bague pour s’assurer
qu’elle ne touche pas l’accessoire.
3
Déterminer quelle tête-guide convient le mieux à l’outil.
Serrer l’accessoire, dans le sens des aiguilles d’une
montre, sur la partie filetée de l’outil rotatif jusqu’il
repose fermement contre le corps de l’outil.
321
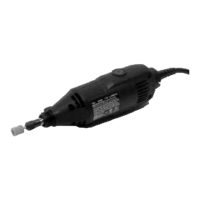
English Model 1007
For use with Dremel
®
rotary tools 400 XPR, 275, 285, 395, 398 and 780,
Black and Decker
®
RTX, or other rotary tools with the same thread.
Contents: 1 22º-guide head, 1 30º-guide head, 1 45º-guide head,
1 sharpening bit
Warning: Always wear eye protection and a dust mask when
operating power tools. Inspect bit for damage before use. Replace
if necessary. Always pull the rotary tool toward you. Pushing the
rotary tool away from you may result in breakage of the bit.
To Attach:
1
Remove the housing cap from your rotary tool.
2
Insert the provided bit into your tool, leaving approximately
1/4 in. of the shank exposed between the guide head and
the edge of the cutting bit. The bit must be inserted far
enough into the collet to ensure the bit does not touch the
attachment.
3
Determine which guide head will best fit your tool. Twist the
attachment, in a clockwise direction, onto the threaded end
of the rotary tool until it seats firmly against the tool body.
Contents • Contenu • Contenidos To Attach • Pour fixer • Para adjuntar
Always the Better Idea.