Do you have a question about the Millenium Q200 and is the answer not in the manual?
Falls from shooting houses can occur after leaving the ground, resulting in serious injury or death.
The user is solely responsible for safe use. Owners must provide instructions to others.
Carry an operable signaling device for emergency assistance, ensuring it is within easy access.
WARNING! statements highlight critical safety information. These messages must be heeded for personal safety.
Thoroughly inspect the product for signs of wear, damage, rot, corrosion, or defects before each use.
Do not remove, modify, or omit any portion. Modifications void warranty and may cause injury or death.
Product is for adult use only. Users under 16 require direct adult supervision to prevent injury or death.
Practice assembly, setup, and use at ground-level before attempting use at heights above ground-level.
Never rely on a tree branch for support while climbing. Failure to follow may result in serious injury or death.
Always inform someone of your hunting location, shooting house site, and expected duration of the hunt.
Inspect all safety devices each time before each use. Do not use if signs of wear, damage, or deterioration are present.
Do not modify, misuse, or substitute parts. This voids warranty and may result in serious injury or death.
Inspect/check expiration dates. Replace ALL straps and suspension seats yearly. Never use expired or damaged straps.
Ensure all chains, cable straps, etc., are tightened. Legs must contact ground and be secured with anchors.
Footrest, armrests, and shooting rail support max 15 lbs. Exceeding this risks serious injury or death.
Do not modify, fix, repair, alter, bend, cut, weld, or heat the shooting house. Unauthorized attachments void warranty.
Never climb with a weapon. Unload and use a tether/pull rope. Lower/raise weapons safely.
Inspect product for wear/damage before use. Protect from sun/heat/cold; store indoors. Do not use if defective.
Do not use if you have heart/back problems, impaired vision, etc., or are taking impairing medication/substances.
Do not leave product installed for more than 14 days. Environmental factors and animals can cause damage.
Strict weight limitations apply to ensure safety. This includes user and equipment. NEVER EXCEED LIMITS.
Do not use during ice, snow, freezing rain, or thunderstorms. Return to ground immediately if inclement weather arises.
Before each use, ensure nuts/bolts are secure. Check hardware/webbing for damage, cuts, or fraying.
Replace any damaged or worn part with original parts. Never store outdoors when not in use.
Wear appropriate footwear with non-slip soles. Tuck boot laces to prevent snagging on components.
Never hunt from heights you are not completely comfortable with. Failure to follow may result in serious injury.
Do not stand on the shooting house seat. Failure to follow these instructions may result in serious injury or death.
A minimum of four (4) adults is required to install and/or remove this shooting house.
Attach and tighten stabilizer straps/devices before climbing to seating/standing platforms.
Check ground for firmness and levelness. Sloping or uneven surfaces can cause tilting or shifting.
Always maintain three-point contact (two feet/one hand or one foot/two hands) when climbing up or down.
Never jump or bounce on a shooting house or its seat. Failure to follow may result in serious injury or death.
Never attempt to hunt from an unlevel platform or level it above ground. Readjust as necessary.
ALWAYS lean forward as you climb the shooting house. Failure to follow may result in serious injury or death.
Lists and illustrates the various components of the Buck Hut Shooting House for assembly.
Warning: Do not place more than fifteen (15) pounds of weight on the shooting rail. Doing so will result in an unsafe condition.
Bolt the 4 platform parts together using specified bolts, washers, and nuts. Loosely tighten.
Install six middle platform braces using specified bolts, washers, and nuts. Loosely tighten.
Attach front/rear platform supports using bolts, washers, nuts. Tighten all platform nuts now.
Attach hand rail supports to the rear of the platform using specified bolts, washers, and nuts. Tighten nuts.
Assemble leg assemblies (A and B) using connector angles, bolts, washers, nuts. Attach adjustable foot.
Assemble cross braces by sliding tubes together and securing with bolts, washers, nuts. Ensure bolt passes through hole.
Assemble three ladder sections using connector angles, bolts, washers, nuts. Snug then tighten all nuts.
Assemble the four roof main frame pieces using socket head screws, washers, and nuts. Tighten all nuts.
Attach front/rear roof ribs to frame and ridge using bolts, washers, nuts. Snug nuts but do not tighten.
Attach end roof ribs to the roof ridge using bolts, washers, nuts. Do not attach ribs to frame yet.
Place platform flat, attach legs (A to A, B to B) using bolts, washers, nuts. Tighten nuts.
Install cross braces between legs with help. Use bolts, washers, nuts. Finger tighten nuts, do not release legs.
Install remaining four braces on the outside of brackets. Tighten all bolts.
Place stand on end, install hand rails onto supports using bolts, washers, nuts. Tighten nuts.
Turn roof assembly upside down, install long uprights using bolts, washers, nuts. Tighten all nuts.
Place shooting rails on long uprights, ensuring correct placement relative to windows. Lock with cam lever.
Install short uprights to the platform using bolts, washers, nuts. Ensure versa buttons face inside. Tighten bolts.
With help, place roof section by sliding uprights together. Insert top uprights first, then align and slide.
Requires at least 4 people to lift the stand from the platform. Secure base to prevent sliding.
Attach the ladder to the platform using bolts, washers, and nuts. Place washers under head of bolts and nuts.
Install the blind cover from inside. Align zipper, wrap fabric, connect snap buckles and bungees.
Connect all bungees to secure the fabric cover to the frame, aligning buckles with uprights and ribs.
Install roof cover using eight buckles. Pull fabric snug around the blind, do not over-tighten.
Do not allow snow to accumulate on the roof. Snow can damage fabric or cause roof collapse.
Hammer four anchor stakes into the ground at a 45-degree angle, one for each leg, for stability.
Do not lean against or prop against utility poles, telephone poles, or man-made structures.
Do not use if you have heart/back problems, impaired vision, etc., or are taking impairing medication/substances.
Never climb with a weapon. Unload and use a tether/pull rope. Lower/raise weapons safely.
Never hunt from an unlevel shooting house. Immediately climb down and readjust if unlevel.
Inspect product for wear/damage before use. Protect from sun/heat/cold; store indoors. Do not use if defective.
Falls from shooting houses can cause serious injury or death. Read manual carefully before use.
The user is solely responsible for safe use; owners must provide instructions to others. Failure may lead to liability.
Carry an operable signaling device for emergency assistance, ensuring it is within easy access.
A minimum of four (4) adults is required to install and/or remove this shooting house.
Never install, set-up, or climb with a weapon. Use a pull up rope for weapons.
Check ground for firmness and levelness. Sloping or uneven surfaces can cause tilting or shifting.
Do not use during thunderstorms or other adverse weather. This includes wind, lightning, rain, snow, sleet.
Product is for adult use only. Users under 16 need direct adult supervision to prevent injury or death.
Do not use during ice, snow, freezing rain, or thunderstorms. Return to ground immediately if inclement weather arises.
Never climb with a weapon. Unload and use a tether/pull rope. Lower/raise weapons safely.
Inspect product for wear/damage before use. Protect from sun/heat/cold; store indoors. Do not use if defective.
Practice assembly, setup, and use at ground-level before attempting use at heights above ground-level.
A minimum of four (4) adults is required to install and/or remove this shooting house.
Never install, set-up, or climb with a weapon. Use a pull up rope for weapons.
Check ground for firmness and levelness. Sloping or uneven surfaces can cause tilting or shifting.
Do not use during thunderstorms or other adverse weather. This includes wind, lightning, rain, snow, sleet.
Footrest, armrests, and shooting rail support max 15 lbs. Exceeding this risks serious injury or death.
Never hunt from heights you are not completely comfortable with. Select minimum height for safe hunting.
Strict weight limitations apply to ensure safety. This includes user and equipment. NEVER EXCEED LIMITS.
Never jump or bounce on a shooting house or its seat. Failure to follow may result in serious injury or death.
Do not modify, fix, repair, alter, bend, cut, weld, drill, or heat the product. Failure may result in injury or death.
Replace any damaged or worn part with original parts. Never store outdoors when not in use.
Wear appropriate footwear with non-slip soles. Tuck boot laces to prevent snagging on components.
Verify legs, ladder, and sections are firmly connected and locked before climbing. Do not use if loose.
Keep adjustable shooting rail above door when entering/exiting. Use only provided handrails.
Exercise caution when entering/exiting due to fabric covering. Pay attention not to trip over the fabric.
Fabric is fire retardant but not fireproof. Keep heat-producing devices away from the fabric covering.
Never attempt use when winds exceed 20 mph. Gusty winds increase the risk of toppling over.
Never attempt use without the legs secured with the provided stakes. Failure to follow may result in serious injury or death.
Always maintain three points of contact when climbing up or down for safety.
You must have four (4) adults to install or remove your shooting house. Failure to follow may result in serious injury or death.
Store shooting house out of direct sunlight and harsh environmental conditions to prevent adverse effects.
Millennium warrants product against defects in material/workmanship for one (1) year from purchase date.
Proof of purchase and return of warranty application card are required for any warranty claim.
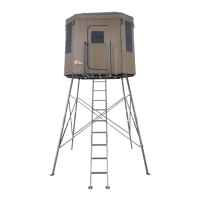
The Millennium Buck Hut Shooting House (Q200) is a robust and versatile elevated hunting blind designed for stability, safety, and comfort. This instruction manual details its assembly, usage, and maintenance, emphasizing critical safety warnings throughout.
The Buck Hut Shooting House provides an elevated, enclosed platform for hunting, offering concealment, protection from the elements, and a stable shooting position. It is designed to be assembled on flat, firm ground and secured with ground stakes to prevent tipping or shifting. The blind features multiple shooting rails and windows for versatile hunting angles. Its elevated design aims to enhance visibility and reduce human scent detection by game.