EasyManua.ls Logo

Miller Edge RBAND User Manual

Miller Edge RBAND
5 pages
To Next Page IconTo Next Page
Page #1 background imageLoading...
Page #1 background image
www.milleredge.com info@milleredge.com 800-220-3343
INSTALLATION INSTRUCTIONS
Model: RB-G-K10
IMPORTANT: THIS DEVICE MUST BE PROFESSIONALLY INSTALLED.
READ AND UNDERSTAND ALL INSTRUCTIONS BEFORE BEGINNING INSTALLATION.
The Miller Edge RBand Monitored Gate Edge Transmitter/Receiver system is intended to provide a wireless
connection between a monitored sensing edge and a motorized operator that controls the associated gate. RBand
meets the 2016 UL 325 requirements for monitored devices and has been certified as a UL 325 Recognized
Component. It is designed for use with operators that comply with 2016 UL 325 using a Miller Edge 10K Sensing
Edge.
1. PARTS LIST
Kit Contents:
1. RBand Edge Transmitter (RB-TX10)
2. RBand Gate Edge Receiver (RB-G-RX10)
3. Receiver antenna
4. (2) 3.6V AA lithium batteries*
5. (4) #6 pan head transmitter mounting screws
*Replacement 3.6V AA lithium batteries can be
purchased at your local electronics store or via
Miller Edge.
Required:
1/8” flat blade screwdriver
1/4” flat blade screwdriver
Miller Edge 10K (T2/blue band) Sensing Edge
Coaxial cable for exterior mounted antenna
Coaxial bulkhead adapter, female/female
Recommended:
Multi-meter capable of reading 10KΩ
Mounting screws for the Receiver
2. RECEIVER: INSTALLATION
2-1. Remove operator cover and turn off the power to the gate operator.
2-2. Determine where to place the external mounted antenna so it is in line of sight with the Transmitter for the
entire range of travel [IMAGE 1]. Prepare the antenna coax as necessary.
2-3. Remove Receiver cover and mount the base inside the operator, positioning it for optimum ease of wiring.
2-4. Connect power to the terminals marked 12/24 AC/DC (polarity sensitive) on the removable 8-pin
connector [IMAGE 2].
2-5. Determine which monitored interface your operator uses. Connect the COM (C1/C2) and the correct output
connections (N.C. = CS1/CS2 or 10K = BS1/BS2) to your operator. There are 2 separate relays (channels):
R1 and R2. The A Test terminals must be used for operators requiring N.C. inputs. Enable with DIP switch 4
[TABLE 1].
2-6. Replace the Receiver cover and turn on power to the operator. Note: it takes ~5 seconds for the Receiver to
initialize.
Note: RBand 10K Gate Edge Receiver is compatible with up to 3 RBand Transmitters on 2 channels (6 total).
RB-G-K10_Install_A4_20170706
IMAGE 1. RBand Transmitter Installation with Gate Edge
RBAND RECEIVER
MOUNTED INSIDE OPERATOR
WITH EXTERNAL ANTENNA
OPERATOR
ANTENNA
WIRING
RBAND TRANSMITTER
MOUNTED NEAR
SENSING EDGE
SENSING EDGE
Question and Answer IconNeed help?

Do you have a question about the Miller Edge RBAND and is the answer not in the manual?

Miller Edge RBAND Specifications

General IconGeneral
BrandMiller Edge
ModelRBAND
CategoryTransmitter
LanguageEnglish

Summary

Receiver Installation

Receiver Installation Step 1

Turn off gate operator power and remove the cover before installation.

Receiver Installation Step 2

Position external antenna for clear line of sight with the transmitter and prepare coax.

Receiver Installation Step 3

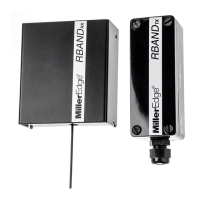
Mount the receiver base inside the operator for easy wiring access.

Receiver Installation Step 4

Connect power to the 8-pin connector, noting polarity sensitivity.

Receiver Installation Step 5

Connect operator interface using COM and correct output terminals (N.C. or 10K).

Receiver Installation Step 6

Replace receiver cover, power on, and allow initialization time.

Receiver Controls and Indicators

LED Indicators

Status of LEDs upon initial power-up, programmed status, or fault conditions.

DIP Switch Settings

Configuration settings for switches 1-3 and switch 4 for N.C. cycle testing.

Removable Connectors

Details for 8-pin and 4-pin connectors for power and relay outputs.

Transmitter Programming and Installation

Transmitter Program Mode

Steps to insert transmitter batteries and enter learn mode for programming.

Transmitter Install & Test

Connect sensing edge cable and test functionality after mounting.

Troubleshooting and Erasing

Troubleshooting RF Signal

Check RF signal strength and interpret LED feedback for communication issues.

Erasing the Receiver

Procedure to erase all programmed transmitters from the receiver.

Specifications and FCC Compliance

Receiver Specifications & Controls

Details on power, dimensions, connections, and indicator lights.

Transmitter Specifications & Controls

Details on frequency, mounting, power source, and indicator lights.

FCC Compliance

Statements regarding FCC rules, interference, and radiation exposure limits.