Do you have a question about the Miller ORLANDO and is the answer not in the manual?
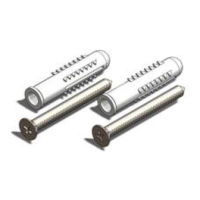
Lists the components provided with the product for installation, including screws and wall plugs.
Provides a step-by-step guide for securely mounting the accessory to the wall.
Recommends cleaning methods and advises on ventilation to maintain the product's finish.
Highlights that provided measurements are for guidance and must be verified on the actual product.
This document provides comprehensive instructions for the installation and care of Miller Orlando bathroom accessories, specifically focusing on a towel rail, model 8206C. It emphasizes crucial steps to ensure proper fitting and longevity of the product, along with general advice applicable to various Miller accessories.
The Miller Orlando accessories are designed to enhance bathroom functionality and aesthetics. The primary focus of this manual is the towel rail, which serves to hold towels, keeping them dry and within easy reach. The accessories are intended for permanent installation on bathroom walls, providing a secure and stylish solution for organizing bathroom essentials. The design prioritizes both practical utility and integration into a fine bathroom interior.
Before commencing any installation, it is imperative to read the "IMPORTANT" section. This section highlights critical safety precautions and preparatory steps. Users are advised to check for buried pipes or cables before drilling, exercising extreme caution when electrical equipment is used near water. This ensures safety during the installation process and prevents damage to existing infrastructure.
A key recommendation is to avoid fixing accessories onto newly papered or painted surfaces. This is because chemical reactions between the product and fresh wall coverings could lead to discoloration of the accessories. Users should refer to the manufacturer's instructions for specific guidance on curing times for paint and wallpaper. For installations on tiled areas, the use of a special drill bit is recommended to prevent damage to the tiles and ensure a clean, precise hole.
The manual outlines a detailed step-by-step process for fixing the accessories. The first step involves establishing the desired position for the accessory, ensuring there is sufficient room for its intended use and surrounding elements. Once the position is determined, the allen key (provided as item 2 in the "SUPPLIED FIXINGS" section) is used to loosen the grub screw in the upright pillar, allowing the wall fixing plate to be removed.
The wall fixing plate plays a crucial role in the installation. It must be held in the required position, with an arrow on the plate pointing 'UP' to ensure correct orientation. The holes on the plate are then marked on the wall using a pencil. If multiple back plates are required, such as for a longer towel rail, the position of the first back plate is marked, and then the distance between the upright centers is carefully measured. A spirit level should be used to ensure the marks are perfectly horizontal, guaranteeing a level installation. Care must be taken during the drilling process to maintain accuracy.
Drilling holes to a depth of 35 mm using a 5.5 mm masonry drill bit is specified. The provided wall plugs are then inserted, ensuring they are flush with the wall surface. A critical note emphasizes that the supplied wall plugs are suitable only for SOLID WALLS. For installations on plasterboard or hollow walls, specialist fixings are required, which can be obtained from a DIY outlet. This distinction is vital for ensuring a secure and lasting installation, preventing the accessory from becoming loose or falling off the wall.
After the wall plugs are in place, the wall fixing plate is secured to the wall using the provided screws. Finally, the upright is replaced onto the fixed plate, making sure the grub screw faces directly downwards before it is tightened. This orientation of the grub screw is important for both aesthetic reasons and ease of future adjustments or removal.
The manual also includes a "PLEASE NOTE" section regarding measurements. It states that the provided measurements are for guidance only and may vary between individual production runs. Therefore, it is crucial that items MUST always be measured prior to fitting. This prevents discrepancies between the manual's figures and the actual product, ensuring accurate installation. For the towel rail model 8206C, a measurement of 350 mm is indicated, referring to the back plate upright centers. Users are explicitly instructed to "PLEASE CHECK THE EXACT MEASUREMENT ON THE PRODUCT YOU ARE FITTING" to avoid any errors during installation.
Proper care is essential to maintain the finish and functionality of Miller Orlando bathroom accessories. The "CARE INSTRUCTIONS" section provides clear guidelines for cleaning. It recommends regular cleaning with a mild soap liquid, followed by drying with a soft cloth. This gentle approach helps to remove dirt and grime without damaging the surface.
A strong warning is issued against the use of abrasive cleaners or bleach, as these harsh chemicals will damage the finish of the accessories. Abrasive materials can scratch the surface, while bleach can cause discoloration or corrosion, compromising the aesthetic appeal and integrity of the product.
Beyond cleaning, the manual also emphasizes the importance of proper bathroom ventilation. It states that the bathroom should be ventilated to prevent condensation. Condensation, if left unaddressed, can contribute to moisture buildup, which can potentially affect the long-term condition of bathroom fixtures, including the accessories. Good ventilation helps to keep the bathroom dry, reducing the risk of mold, mildew, and potential moisture-related damage to the accessories and the bathroom environment as a whole.
The product comes with a "Miller LIFETIME GUARANTEE" for "Fine Bathroom Interiors." This guarantee covers defects affecting the product's use that are due to faulty workmanship or materials. The guarantee is strictly limited to domestic users. In the event of a claim, the product should be returned to the dealer with proof of purchase. Only the original purchaser is eligible to claim under this guarantee. This lifetime guarantee underscores the manufacturer's confidence in the quality and durability of their products, offering peace of mind to the consumer.
For further details on the guarantee and other product information, customers are directed to visit the Miller Bathrooms website at www.millerbathrooms.co.uk. This online resource serves as a comprehensive hub for customer support and additional product information.
| Brand | Miller |
|---|---|
| Model | ORLANDO |
| Material | Brass |
| Finish | Chrome |
| Number of Handles | 2 |
| ADA Compliant | Yes |