Do you have a question about the MiniMax ME 25 and is the answer not in the manual?
Defines the manual's purpose and intended audience for safe, correct use of the machine.
Details the identification plate on the machine and its components.
Provides recommendations for maintenance, repairs, and qualified personnel use.
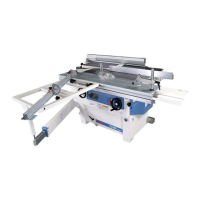
Describes the edge banding machine's design and main components.
Details intended use, prohibited materials, and essential connections like dust extraction.
Lists detailed technical specifications and dimensions of the machine.
Details the safety devices installed on the machine, emphasizing their importance.
Details the safety devices installed on the machine, emphasizing their importance.
Describes the operator positions for loading and unloading the workpiece.
Provides measured noise emission levels and factors affecting exposure.
Outlines general safety rules for machine operation, maintenance, and handling.
Outlines general safety rules for machine operation, maintenance, and handling.
Lists residual risks that may persist despite safety measures, emphasizing user responsibility.
Lists residual risks that may persist despite safety measures, emphasizing user responsibility.
Explains various safety and information signals applied to the machine.
Provides instructions for safely lifting and moving the machine using appropriate equipment.
Specifies requirements for the installation area, including space, power, and lighting.
Describes how to unpack the machine and release locked parts.
Details how to block or unblock the operating units for safe handling.
Explains how to lock/unlock the glue spreader roller oscillation for transport.
Guides the re-installation of machine parts that were disassembled for shipping.
Instructions for mounting the reel holder support and pins.
Details how to position and fix the work surface extensions.
Provides instructions for electrical connection, emphasizing qualified electricians.
Provides instructions for electrical connection, emphasizing qualified electricians.
Warns about potential hazards and damages from incorrect electrical connections.
Explains how to connect the pneumatic system, including air pressure requirements.
Details the connection of the dust extraction system and its importance.
Details how to adjust the pneumatic system pressure for optimal machine operation.
Explains how to adjust the entry guide based on the edge thickness for correct feeding.
Explains how to correctly fit the edge strip onto the panel, ensuring proper alignment.
Explains how to correctly fit the edge strip onto the panel, ensuring proper alignment.
Provides specific setup instructions for using the optional wood loader.
Explains how to adjust the feeder height using indicators for correct panel feeding.
Guides the adjustment of presser roller units for thicker wooden edges.
Explains how to adjust the end trimmer for panel start/end edge excess.
Details how to adjust trimmers for rounded or sharp edge finishing.
Details how to adjust feeler pins for the trimmer to control edge removal.
Explains how to adjust edge scraper feeler pins for vertical removal control.
Details how to adjust the incidence of the upper and lower brush units.
Explains the procedure for replacing tools, emphasizing safety precautions.
Instructions for replacing the reel cut shear knife, including tightening screws.
Guides the replacement of the end trimmer blade, including loosening lock nuts.
Guides replacement of upper/lower cutter blades, emphasizing correct assembly and safety.
Explains how to replace edge scraper inserts, ensuring correct orientation and fit.
Guides the replacement of brushes, including loosening the lock nut.
Details how to adjust the glue quantity based on wood density and panel porosity.
Describes the functions of the machine's control panel buttons and indicators.
Provides step-by-step instructions for starting the machine and entering standby mode.
Explains how to stop the machine, either for a cycle or to end work.
Details how to use the emergency stop button and reset the machine.
Guides setting and modifying glue temperatures for standby and operation.
Explains how to set the standby time, affecting glue temperature.
Guides preparation for machining and performing test runs for correct setup.
Provides specific instructions for edge banding small-sized panels using a pusher.
Offers advice for achieving good edge banding results, covering panels, glue, and machine setup.
Provides specific instructions for edge banding small-sized panels using a pusher.
Offers advice for achieving good edge banding results, covering panels, glue, and machine setup.
Provides specific instructions for edge banding small-sized panels using a pusher.
Offers advice for achieving good edge banding results, covering panels, glue, and machine setup.
Provides specific instructions for edge banding small-sized panels using a pusher.
Offers advice for achieving good edge banding results, covering panels, glue, and machine setup.
Provides specific instructions for edge banding small-sized panels using a pusher.
Offers advice for achieving good edge banding results, covering panels, glue, and machine setup.
Provides instructions for using heat-fusible glues, including checking spread and changing glue.
Explains how the machine is registered for specific edge types and the procedure for test runs.
Emphasizes using original parts for replacement and proper disposal of old parts.
Details the procedure for replacing the end trimmer belt, including opening covers and loosening tensioner.
Details checking and replacing the trimmer belt, including tensioner adjustment.
Provides instructions for replacing the feeder belt, involving removing covers and loosening tensioners.
Instructions for disassembling the driving pulley, including removing Seeger, dowels, pinion.
Instructions for disassembling the driven pulley, including removing Seeger and pin.
Details how to adjust the tension of the feeding belt for optimal operation.
Provides instructions for general cleaning of the machine, including safety precautions.
Provides detailed instructions for changing the glue, including safety and emptying procedures.
Explains how to lubricate the glue spreader roller unit, specifying frequency and grease type.
Advises on checking tool sharpness and replacing them if necessary.
Details periodic checks for safety devices like microswitches and emergency stop.
Outlines procedures for safely discarding the machine according to regulations.
Lists common machine problems, their causes, and recommended solutions.
Addresses issues where the panel does not slide correctly due to incorrect presser or guide settings.
Addresses issues where the reel edge is not fed, caused by incorrect panel insertion or dirty feed roll.
Discusses problems with the wooden slat loader, typically due to misadjusted wood stop.
Addresses issues where the reel edge is not fed, caused by incorrect panel insertion or dirty feed roll.
Discusses problems with the wooden slat loader, typically due to misadjusted wood stop.
Addresses issues where wooden edges do not adhere properly due to presser or guide settings.
Covers edge adhesion problems caused by panel shape, glue application, dust, or temperature.
Addresses issues where the rear edge trimming blade is misaligned with the panel feeler.
Discusses edge trimming quality issues related to panel characteristics and feeler adjustments.
Addresses edge trimming faults where the edge profile matches diagrams in Figure 16, requiring feeler adjustment.
Discusses edge trimming quality issues related to panel characteristics and feeler adjustments.
Addresses the problem of the glue not reaching the set temperature, usually due to faulty resistances.
| Frequency | 50/60 Hz |
|---|---|
| Input Voltage | 230V |
| Cooling Method | Air-cooled |
| Protection Class | IP21 |
| Phase | 1-Phase |