The simultaneous lighting of two LEDs indicates that the camera is working with an
intermediate time between the two speeds highlighted by the LEDs.
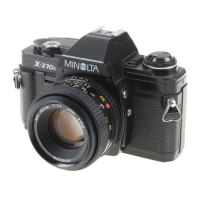
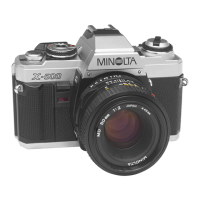
Manual exposure: turning the selector to shutter speeds, the working times are set from
1" to 1/1000" with whole values and bulb. To unlock the selector from position [A],
press the black button next to the selector itself. . The reference is placed between the
selector and the right side of the pentaprism. The set speed is indicated in the
viewfinder with the intermittent lighting of the reference LED. The light meter remains
active and suggests the correct exposure with the lighting of 1 LED, or 2 if the
suggested speed is an intermediate value. The difference between the suggested
exposure speed and that actually set on the shutter selector highlights the under / over
exposure value.Times that can be set using the selector located to the right of the
pentaprism from 1” to 1/1000” with full increments and exposure (B). Syncroflash at
1/60” or longer.
Measurement: Full aperture TTL with integrated average reading, using a silicon cell
mounted in the rear of the pentaprism for ambient light measurement. For TTL
measurement with flash light there is another silicon cell, mounted with an optical unit
next to the mirror compartment.
Mirror: with multiple coatings that improve the degree of reflection by 11%, with rapid
return, oversized, mounted on a system that allows it to absorb vibrations during the
movement of the mirror.
Viewfinder: pentaprism fixed at eye level. Focusing Fresnel screen with horizontal
image split center and microprism circular crown. The focusing screen is worked with
the Acute Matte system (Minolta patent) which allows exceptional sharpness. There
are 2,500,000 microscopic cells of regular shape. The viewfinder provides 95% view of
the 24x36mm format. and 0.9x magnification with 50mm lens. focused on infinity. On
the right side of the viewfinder you can see the shutter speeds from [1000] to [1] and
the corresponding 11 red bar-shaped LEDs. Two triangular-shaped LEDs placed
beyond the shutter speeds indicate over / under exposure. In the lower part a [B]
indicates the setting of the prolonged exposure function. And at the top a red [A] lights
up in aperture priority mode or a red [M] when manual exposure is set. When using the
flash, with Minolta dedicated flashes (for example AUTO 360PX, AUTO 280PX, Auto
132PX, Auto 80PX), the red led of the [60] flashes at low frequency (2 Hz.) To indicate
the "flash ready”, While blinking with a faster frequency (8 Hz.) After shooting to
indicate the correct exposure. In the lower part, in the center, the working aperture
actually set on the lens is visible.
Shutter button: located in the center of the shutter speed dial. Double function
electromagnetic: by simply touching the light meter is activated, which remains active
for 15 seconds even after removing your finger from the button, while lowering it by
about one millimeter the shutter is released.
Main switch This is located to the left of the pentaprism on the top cover. It is made up
of a slider in knurled black plastic; if backward you have [Off], if partially advanced you
will find [On] and if fully advanced, in [A] mode, you have the [On)))] function. The On)))
position activates the function of an acoustic signal when the shutter speed drops
below 1/30" or when the self-timer is activated.
Advancement of the film: by means of the loading lever located on the upper carter at
the extreme right between the speed selector and the exposure counter. The
advancement of the film is obtained with a rotation of the loading lever of about 130°
with a dead stroke of about 30°. The complete advancement of the film also involves
arming the shutter and increasing the numbering of the exposure counter. The AUTO
WINDER G and the MOTOR DRIVE 1 are available as optional accessories, which
allow the advancement of the film respectively with a maximum cadence of 2 and 3.5
frames per second.
Self-timer: by moving the dual-function switch that is present, on the front, above the
red self-timer LED, in the ST [Self Timer] position, the self-timer setting is activated
which is activated by pressing the shutter button. The delay is 10" and is highlighted by
 Loading...