Do you have a question about the Minwax PATIO TABLE and is the answer not in the manual?
Create a full-size pattern board on MDF for tabletop geometry and joinery.
Measure, cut, and dry-fit segments for the outer ring, including spline slots.
Use a trammel and router to cut the inner and outer edges of the ring.
Cut and shape tabletop slats, including angles and tongue joints.
Cut and miter hub sections, rout for splines, and shape the central component.
Guidance on applying and using finishes to protect wood from water damage.
Thompson's WaterSeal Advanced Tinted Wood Protector for optimal protection.
Thompson's WaterSeal Waterproofer Plus for enhanced water resistance.
Covers flammability, vapor hazards, first aid, long-term exposure effects, and safe disposal.
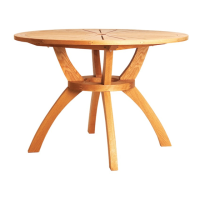
This document outlines the construction and finishing of a "Patio Table" as an advanced woodworking project, part of the "Minwax Woodworks: Advanced Project 2009-2010" series. The table is designed to be a durable and aesthetically pleasing outdoor furniture piece, suitable for a patio, porch, or sunroom.
The patio table serves as a sturdy and attractive outdoor dining or gathering surface. Its 44-inch diameter top is designed to comfortably seat four people. A key feature is the integrated center hole, which accommodates an umbrella canopy, providing shade for users. The robust base construction ensures stability, and the design includes ample space beneath the table for an umbrella counterweight, enhancing its practicality for outdoor use. The project emphasizes advanced woodworking techniques, making it a challenging yet rewarding endeavor for experienced hobbyists.
Overall Dimensions:
Material Recommendations:
Fasteners:
Cutting List (Key Components):
Recommended Finish:
The patio table is designed for comfortable outdoor use, seating four people. Its sunburst radial top design adds a decorative element, while the center hole allows for the integration of an umbrella, providing essential shade. The sturdy construction ensures durability and stability, making it suitable for various outdoor environments like patios, porches, and sunrooms. The choice of wood (pine or cedar) allows for customization based on desired aesthetics and weather resistance. The finishing products recommended are specifically chosen to protect the wood from water damage, mildew, and UV radiation, ensuring the table's longevity and maintaining its appearance in outdoor conditions.
Finishing and Protection:
General Care:
The detailed instructions for construction and finishing aim to ensure the table's structural integrity and aesthetic appeal are maintained over time, even with exposure to outdoor elements.
| Brand | Minwax |
|---|---|
| Model | PATIO TABLE |
| Category | Indoor Furnishing |
| Language | English |