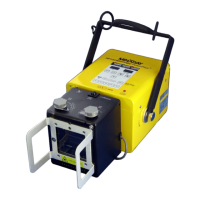
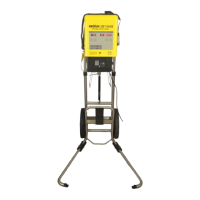
The MinXray HF120/60HPPWV PowerPlus™ is a mono-block type high-frequency portable X-ray unit designed for diagnostic imaging. It can be used with conventional diagnostic film or solid-state digital radiographic sensors. The unit is supplied with an X-ray tubehead/collimator, a detachable AC power cord, and a detachable exposure cord with a 2-stage exposure switch. It is designed for use with the MinXray XGS MKIV LW or equivalent stand, which provides secure, stable support for proper positioning during radiographic imaging.
Important Technical Specifications
Rating:
- Line Voltage: AC, single-phase, 100-260V, 50/60Hz.
- Line Voltage Regulation: 4.80%.
- Input Current: Standby: 0.165A, Momentary: 29A.
- Maximum Output Power: 120kVDC, 20mA, 1.68 kW @ 120 kVDC, 14 mA.
- Protection against electrical shock: Type B, Class I.
- Mode of Operation: Continuous operation with intermittent loading.
- Duty Cycle: 1:60 (1 sec. On, 60 sec. Off).
- Degree of protection against the ingress of water: Ordinary.
- Degree of safety of application in the presence of a FLAMMABLE ANAESTHETIC MIXTURE WITH AIR or WITH OXYGEN OR NITROUS OXIDE: Equipment not suitable for use in such environments.
- Fuse: 30 A @ 125V.
X-ray Generator:
- Output Range:
- 60 mA (0.01-0.1sec), 42 mA (0.11 – 5.0sec) @ 40 - 50 kVDC
- 50 mA (0.01-0.1sec), 35 mA (0.11 – 5.0sec) @ 52 - 60 kVDC
- 45 mA (0.01-0.1sec), 31.5 mA (0.11 – 5.0sec) @ 62 - 70 kVDC
- 38 mA (0.01-0.1sec), 26.6 mA (0.11 – 5.0sec) @ 72 - 80 kVDC
- 33 mA (0.01-0.1sec), 23.1 mA (0.11 – 5.0sec) @ 82 - 90 kVDC
- 30 mA (0.01-0.1sec), 21 mA (0.11 – 5.0sec) @ 92 - 100 kVDC
- 20 mA (0.01-0.1sec), 14 mA (0.11 – 5.0sec) @ 102 - 120 kVDC
- Timer Range: 0.01-5.0 sec., 82 total steps.
- Maximum Deviation from Fixed Factors: Tube potential ±10%, Tube current ±20%, Exposure time ±10%+1 msec.
- Leakage Technique Factors: 0.22 mA @ 120kV (maximum rated continuous current for 14 mA with duty cycle 1:60).
- Inherent Filtration: 2.2 mm Al equivalent.
- Total Filtration: 3.8 mm Al equivalent (with collimator).
- High Voltage Circuit Output: 40 kHz high frequency inverter system with neutral ground circuit.
- Electromagnetic Compatibility (EMC): Complies with IEC60601-1-2, 1993.
X-ray Tube:
- Manufacturer: Superior X-ray Tube Company.
- Type: SXR-130-15-1.2.
- Focal Spot: 1.2 mm.
- Anode Heat Storage: 65 KHU.
- Available Focal Spot Sizes: 1.2 mm.
- Beam Coverage: 14°.
- Anode Construction: Vacuum cast copper with tungsten target.
- Cathode Construction: Vacuum tube nickel with tungsten filament.
- Max. Tube Operating Voltage: 130 kVp Full wave rectified.
- Tube Current (mA): Large spot 4.5mA continuous up to 50mA.
- Inherent Filtration/Window Material: 2.0 mm/Glass.
- Cooling Method: High dielectric transformer oil.
Collimator (Beam Limiting Device):
- Manufacturer: Collimare.LLC.
- Type: CP-100-12-C or equivalent.
- Filtration: See collimator specifications.
Dimensions and Accessories:
- Equipment Dimensions: 11.5" (29.2 cm) W x 8.81" (22.4 cm) H x 17.83" (45.3 cm) L.
- Weight: 39.5 lbs (17.94 kgs.).
- Exposure Switch: Two-stage, deadman with RJ11 connector, 25 feet (7.6 m) cord.
- Detachable Power Cord: 20 feet (6.1 m), Listed and CN, 16 AWG 3 conductor, TWO-POLE SOCKET-OUTLET WITH HOSPITAL GRADE PLUG WITH GROUND PIN.
- Stand: Fits MinXray XGS MKIV LW or equivalent (optional).
Environmental Conditions for Transport and Storage:
- Ambient Temperature Range: -40℃ ~ 70℃.
- Relative Humidity Range (including condensation): 10% ~ 100%.
- Atmospheric Pressure Range: 500hPa ~ 1060hPa.
Environmental Conditions for Use:
- Ambient Temperature Range: 10℃ ~ 40℃.
- Relative Humidity Range (including condensation): 30% ~ 85%.
- Atmospheric Pressure Range: 700hPa ~ 1060hPa.
Usage Features
Installation:
The unit should be unpacked carefully, checking for any shipping damage. If damage is found, it must be reported to the carrier. The HF120/60HPPWV PowerPlus™ attaches to a suitable stand (like the MinXray XGS series) according to the stand's instructions. The AC power cord connects to the socket on the back of the unit, ensuring the correct rated voltage is used. The exposure cord connects to the RJ11 telephone-type socket on the back.
Operation:
- Power On: Ensure the main power switch is OFF before connecting to a grounded electrical outlet. Turn on the main power switch; the kV and sec LED displays will light up. The unit automatically compensates for input voltage variations to maintain consistent kV and mA.
- kV Selection: Select the desired kV output (40 to 120 kV) using the arrow buttons below the kV display. mA output is automatically selected based on the kV setting.
- Exposure Time/mAs Selection: Set the exposure time (0.01 to 5.0 seconds) using the arrow buttons below the sec. display. The display can be toggled between mAs and sec. by pressing the shift switch (#) and the down arrow (▽) below the kV display.
- Positioning: Use the retractable tape measure on the collimator to set the proper source-image distance (SID).
- Collimator Light: Press the button on the collimator to turn on the light, which stays on for approximately 30 seconds. Adjust the collimator shutters using the two knobs to define the radiation field, ensuring it stays within the image receptor dimensions.
- Patient Positioning: Align the collimator's crosshair with the anatomical point of interest and the center of the image receptor.
- Exposure Switch: The 2-stage exposure switch pre-heats the filament (first stage, "READY" indicator lights after 2.5 seconds) and initiates the X-ray exposure (second stage, "X-RAY" indicator lights, audible signal sounds). Both stages must be held down until the exposure terminates. Releasing the buttons immediately terminates the exposure as a safety feature. Simultaneous depression of both buttons results in a 2.5-second delay before exposure.
- Memory Storage: Up to five technique settings can be stored. To store a setting, press the Memory Storage button (MR), then a Memory Recall button (M1-M5). To recall, simply press the desired M1-M5 button.
- Battery for Memory Storage: The Memory Storage function uses two AA alkaline batteries in a compartment on the back of the unit. Open the compartment by turning the lid counterclockwise 90° with a coin. Insert batteries with the + end toward the lid, then reattach and lock the lid by turning it clockwise 90°.
- Shutdown: After use, turn off the main power switch, disconnect the AC power cord and exposure cord, and store the unit and stand.
Maintenance Features
Safety Precautions:
- Operators must stand as far as possible from the patient, wear a lead apron, or stand behind a lead shield during exposure.
- Operators must not stand in the primary X-ray beam.
- A monitoring dosimeter should be worn, not covered by a lead apron.
- X-ray exposure should be kept as short as possible.
- Keep the equipment away from sources of radio frequency (RF) or electromagnetic radiation.
Regular Checks (Before Each Use):
- Labels: Ensure certification and identification labels are in place.
- Screws: Check for loose or missing screws.
- Leaks: Check for oil leaks.
- Physical Damage: Inspect for any physical damage.
- kV Adjustment: Verify proper operation of kV adjustment.
- Timer: Verify proper operation of the timer.
- Collimator Shutters: Check for proper operation.
- Collimator Light Bulb: Check for proper operation.
- Cords and Connections: Inspect all cords and connections.
- Exposure Buttons: Ensure exposure terminates if buttons are released during an exposure.
Indicators:
- X-RAY Indicator: Check for proper operation when both exposure buttons are depressed and held.
- Audible Signal: Ensure the audible signal operates during an exposure.
- ERROR Indicator: If the ERROR INDICATOR is on, the unit has malfunctioned and X-rays cannot be generated. If it remains lit after releasing the exposure switch, turn off the main power switch, wait 3 minutes, then restart. If the error persists, contact MinXray for service.
- Low Line Voltage Indicator: Illuminates when line voltage is less than 90V during X-ray exposure.
Scheduled Maintenance:
- Every Six (6) Months:
- Check collimator light field to X-ray field alignment (refer to collimator instruction manual).
- Check the kV output (refer to page 11 - Peak Tube Potential).
- Check the mA output (refer to page 12 - Tube Current).
- Check the timer accuracy (refer to page 10 - Exposure Time).
- MinXray or its service personnel must perform these checks.
- Every Two (2) Years:
- Check for Leakage Radiation by qualified personnel.
Warm-up and Cooling Procedures:
- Warm-up: If transported or stored under -30°C, the equipment must warm up for 12 hours at 10℃~40℃ before any exposure.
- Cooling: If transported or stored above 70°C, the equipment must cool down for 12 hours at 10℃~40℃ before any exposure.
Cleaning:
Clean the HF120/60HPPWV PowerPlus™ as needed with a damp sponge or cloth and mild soap.