Chain
Chain
Chain
Fix with screws
⑧Wiring-out position and wiring connection
Electrical installation work must be performed according to the installation
manual by an electrical installation service provider qualied by a power
provider of the country, and be executed according to the technical
standards and other regulations applicable to electrical installation in the
country.
Be sure to use an exclusive circuit.
Use specied cord, fasten the wiring to the terminal securely, and hold the
cord securely in order not to apply unexpected stress on the terminal.
Do not put both power source line and signal line on the same route. It may
cause miscommunication and malfunction.
Be sure to do D type earth work.
For the details of electrical wiring work, see attached instruction manual for
electrical wiring work.
1. Remove a lid of the electrical box (2 screws).
2. Hold each wiring inside the unit and connect to a terminal block surely.
3. Fix the wiring by clamps.
4. Install the removed parts back to original place.
⑩Check list after installation
Check if Expected trouble Check
The indoor and outdoor units are xed securely? Falling, vibration, noise
Inspection for leakage is done? Insufcient capacity
Insulation work is properly done? Water leakage
Water is drained properly? Water leakage
Supply voltage is same as mentioned in the model name plate?
PCB burnt out, not working at all
There is mis-wiring or mis-connection of piping?
PCB burnt out, not working at all
Earth wiring is connected properly? Electric shock
Cable size comply with specied size?
PCB burnt out, not working at all
Any obstacle blocks airow on air inlet and outlet?
Insufcient capacity
Check the following items after all installation work completed.
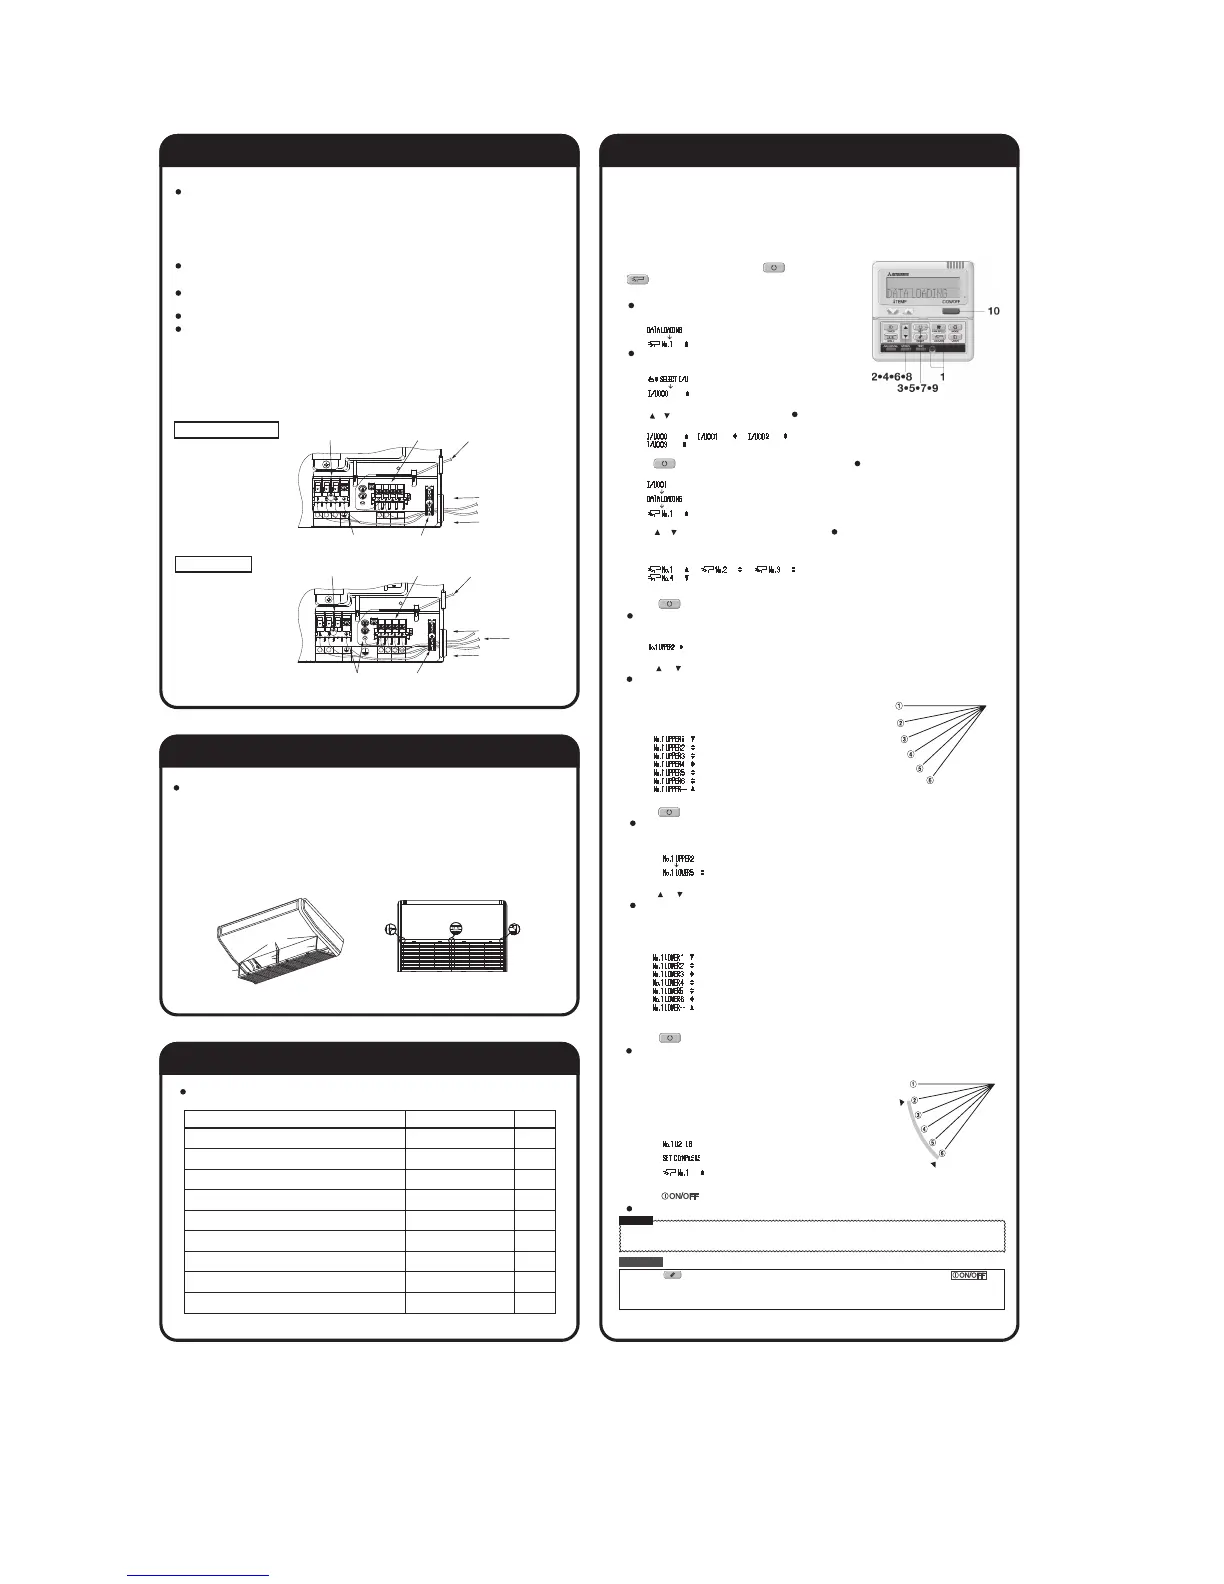
⑪How to set the airflow direction
It is possible to change the movable range of the louver on the air outlet from
the wired remote controller. Once the top and bottom position is set, the louver
will swing within the range between the top and the bottom when swing
operation is chosen. It is also possible to apply different setting to each louver.
Note:This function is not able to be set with wirelessremotecontrollerorsimpleremotecontroll
(RCH-H3).
1. Stop the air conditioner and press SET button and
LOUVER button simultaneously for three seconds or
more.
The following is displayed if the number of the indoor units
connected to the remote controller is one. Go to step 4.
The following is displayed if the number of the indoor units
connected to the remote controller are more than one.
2.
Press or button.(selection of indoor unit) Select the indoor unit of which the louver is set.
3.
Press SET button.(determination of indoor unit) Selected indoor unit is xed.
4. Press or button.(selection of louver No.) Select the louver No. to be set
according to the right gure.
5. Press SET button.(Determination of louver No.)
The louver No. to be set is conrmed and the display shows the upper
limit of the movable range.
6. Press or button.(selection of upper limit position)
Select the upper limit of louver movable range.
“position 1” is the most horizontal, and “position 6” is the most downward.
“position --” is to return to the factory setting.
If you need to change the setting to the default
setting, use “position --”.
7. Press SET button.(Fixing of the upper limit position)
The upper limit position is xed and the setting position is displayed for
two seconds. Then proceed to lower limit position selection display.
8. Press or button.(Selection of lower limit position)
Select the lower limit position of louver.
“position 1” is the most horizontal, and “position 6 ”is the most downwards.
“position --” is to return to the factory setting. If you need to change
the setting to the default setting, use “position --”.
9. Press SET button.(Fixing of the lower limit position)
Upper limit position and lower limit position are xed, and the set
positions are displayed for two seconds, then setting is completed.
•
After the setting is completed, the louver which was
set moves from the original position to the lower
limit position, and goes back to the original position
again. (This operation is not performed if the indoor
unit and/or indoor unit fan is in operation.)
10.Press button.
Louver adjusting mode ends and returns to the original display.
When plural remote controllers are connected, louver setting operation
cannot be set by slave remote controller.
⑨Attaching the air return grille
The air return grille must be attached when electrical cabling work is completed.
1. Fix the chains tied to the air return
grille onto the indoor unit with
screws supplied as accessories (4
pieces).
2. Close the air return grille.
This completes the unit
installtion work.
Single split (PAC) series
VRF(KX) series
L
N X Y A B
Power cable Earth
Signal cable for
remote controller
Signal cable
Signal line
(shielded cord)
Indoor power
source line
Remote controller
line
Power source side
terminal block
Signal side
terminal block
Earth Wiring clamp
1
2 3 X Y
Interconnecting wiring Earth
Signal cable for
remote controller
Remote controller line
Wiring between indoor
and outdoor unit
Power source side
terminal block
Signal side
terminal block
Earth
Wiring clamp
Wireless
receiver line
Wireless
receiver line
(downwards)
(horizontal)
the position of the louver
Lower
position
Movable
range
Upper
position
“ ”
“ ”
“ ”
“ ”
[EXAMPLE]
“ ”
(displayed for two seconds)
“ ”
“ ”
[EXAMPLE] If No.1 louver is selected,
“ ” kcurrent upper limit position
“ ” (the most horizotal)
“
”
“ ”
“
”
“ ”
“
” (the most downwards)
“
” (return to the default setting)
[EXAMPLE]
“ ” “ ”“ ”
“ ”
(the most horizontal)
(the most downwards)
(return to the default setting)
[EXAMPLE]
(shows cur rent setting)
(displayed for two seconds)
Caution
If the upper limit position number and the lower limit position number are set to the same
position, the louver is xed at that position auto swing does not funtion.
ATTENTION
If you press RESET button during settings, the display will return to previous display.If you press
button during settings, the mode will be ended and return to original display, and the settings that have not been
completed will become invalid.
[EXAMPLE]
“ ”“ ”
“ ”
”“
[Example]
(displayed for two seconds)
 Loading...