The MIXX AC10 Action Cam is a compact, black action camera designed for capturing videos and still photos, featuring Wi-Fi connectivity and recording in 1080p. It comes with a variety of multi-purpose accessories for different mounting scenarios.
Technical Specifications:
- Display: 2.0" TFT (176x220)
- Viewing Angle: 120°
- Glass Layer: 4P
- MIC: Built-in
- EV: -2.0~+2.0
- Video Format: AVI
- Video Resolution:
- 1080p 1920x1080 @30fps
- 1080p 1440x1080 @30fps
- 720p 1280x720 @30fps
- WVGA 840x480 @30fps
- VGA 640x480 @30fps
- Photo Format: JPEG
- Photo Resolution: 12M/10M/8M/5M/2M
- Photo Time-lapse: 3s/5s/10s/20s
- SD Card Type: 8GB-32GB, class 10 above (Micro SD card not included)
- Dimensions (device): 59x41x24.5mm
- Weight (with battery): 49g
- Battery: 900mAH
- Language: English, German, French, Spanish, Portuguese, Chinese, Russian etc.
Components and Features:
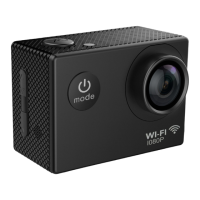
The AC10 Action Cam features a user-friendly design with clearly labeled buttons and ports.
- Front: Camera Lens (5), Power / Mode button (6) with "mode" label, and Wi-Fi 1080P indicator.
- Top: Shutter / Select Button (1).
- Side (Left): Microphone (2), Micro SD Slot (3), Micro USB port (4).
- Side (Right): Up / Wi-Fi button (7), Speaker (8), Down button (9).
- Back: Display screen (10).
- Bottom: Charging Status Light (11), Battery Door Latch (12), Battery Door (13).
Included Accessories:
The AC10 Action Cam comes with a comprehensive set of accessories for various mounting and usage scenarios:
- Waterproof Housing
- Handlebar / Pole Mount
- Mount Adapter 1
- Mount Adapter 2
- Adhesive Mounting Pads
- Helmet Mount
- Velcro Straps
- Tripod Mount
- USB Charge Cable
Usage Features:
Storing Videos & Images:
To store videos and images, a Micro SD card (not included) must be inserted into the Micro SD Slot (3). Ensure the card is correctly oriented; if it doesn't insert easily, flip it over. Only use known branded SD cards, as unbranded ones may not function correctly.
Installing the Battery:
To install the battery, press the Battery Door Latch (12) with a fingernail to open the Battery Door (13). Insert the battery, aligning the +/- symbols and arrows inside the door. Close the battery door. To remove, open the latch and take the battery out.
Charging the Camera:
Charge the camera using the supplied Micro USB cable. Connect it to a USB wall charger, power outlet, or computer. A wall charger is recommended for optimal charging speed. The camera can be used and recordings made while charging.
Power On / Off:
Press and hold the Power / Mode button (6) for 5 seconds to turn the camera on or off.
Mode Selection:
Short press the Power / Mode button (6) to cycle through the following modes: VIDEO MODE -> STILL PHOTO MODE -> PLAYBACK MODE -> MENU.
Recording a Video:
- Short press the Power / Mode button (6) to select video mode (a yellow symbol will appear in the upper left corner of the screen).
- Press the Shutter / Select button (1) to start recording. The yellow symbol will flash during recording.
- To stop recording, press the Shutter / Select button (1) again.
Taking a Still Picture:
- Short press the Power / Mode button (6) to select photo mode (a camera symbol will appear in the upper left corner of the screen).
- Press the Shutter / Select button (1) to take a still photo.
Playback:
- Short press the Power / Mode button (6) to select Playback mode.
- Use the Up / Down buttons (7/9) to select a photo or video on the display screen (10).
- Use the Shutter / Select button (1) to start or stop playing a video.
Exporting Files to Your Computer:
- Connect the camera to your computer using the USB cable.
- Select 'Mass Storage' mode on the screen using the Up / Down buttons (7/9). The camera will appear as an external disk drive.
Alternatively, eject the Micro SD card (3) by pushing it in and releasing it. Connect the Micro SD card to your computer using a standard SD card reader and Micro SD adapter (not included).
Wi-Fi Connectivity to a Mobile Device:
- Install the 'GoPlus Cam' app from your Android or Apple smart device's app store.
- After installation, select a recording mode (Video or Photo) and press the Up / Wi-Fi button (7). The camera will display a Wi-Fi logo, then the SSID and password.
- On your smart device, go to Wi-Fi settings and connect to the camera's Wi-Fi SSID using the password shown on the camera screen.
- Open the GoPlus Cam App on your smart device to control the camera remotely, view live preview, playback photos, and share content.
- Short press the Power / Mode button (6) until you reach the settings menu. This menu allows adjustment of settings such as record resolution, photo image size, date and time, and Micro SD card formatting.
- Use the Up / Down buttons (7/9) to navigate through the menus.
- Use the Shutter / Select button (1) to enter an option or make a selection.
- Press the Power / Mode button (6) to exit the menu.
Maintenance Features:
- Ensure the product is correctly connected using original manufacturer accessories.
- Keep the product out of reach of children and animals.
- Do not drop, short circuit, disassemble, or continue to use if damaged.
- Do not puncture, crush, or damage the battery, as this may lead to fire or personal injury.
- CAUTION: The product contains a recyclable lithium battery. Incorrect disposal may result in an explosion.
- Do not crush, puncture, or incinerate the camera or USB charging cable. Only use a certified or the device manufacturer's charging cable.
Recycling:
This product is recyclable and should not be disposed of with normal household waste. Take it to a designated collection point for recycling electronic devices. Consult your local authority for more information on return and collection points.