SpeedDome SD-330
This guide is for quick installing and connecting the MOBOTIX MOVE SD-330 Network PTZ Camera. You can find
detailed information on the installation and connections in the Camera Manual (PDF, available on www.mobotix.com >
Support > Download Center > Documentation > Manuals).
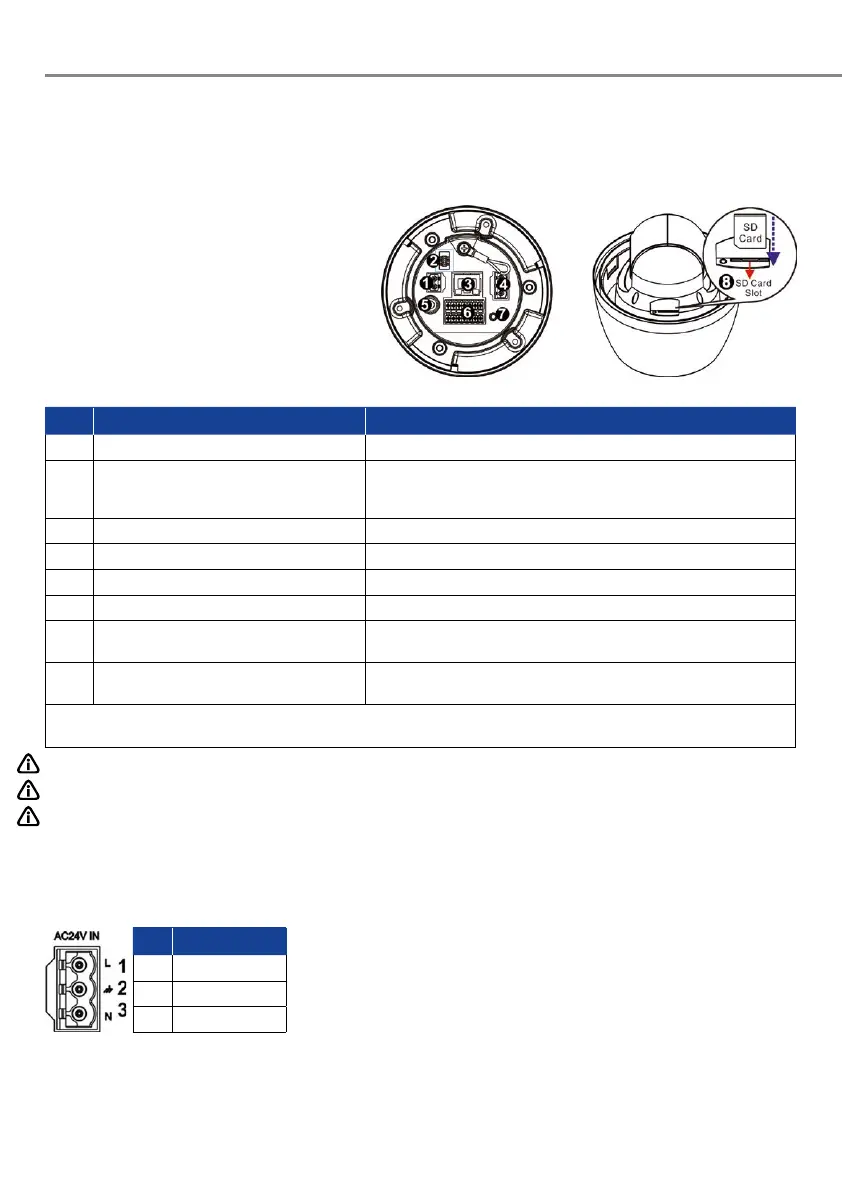
Camera’s Connectors
No. Connector Definition
1 Power Connector (DC12V) DC12V power connection
2 Console Connector This connector is used to burn firmware into the camera when the
camera is returned for repair/maintenance. Please contact the camera
manufacturer for further information.
3 RJ-45 Port For network and PoE+ connections
4 Power Connector (AC24V) AC24V power connection
5 BNC* For analog video output (available only with max. 2 activated streams)
6 Audio/Alarm I/O & RS485 Connector** Audio/Alarm I/O & RS485 connection
7 Reset Button Press the button with a proper tool for at least 20 seconds to restore the
system.
8 SD Card Slot Insert the SD card into the card slot to store videos and snapshots. Do
not remove the SD card when the camera is powered on.
*Please contact the manufacturer for the compatible BNC cable.
**Do NOT connect external power supply to the alarm I/O connector of the camera.
NOTE: To purchase power adaptor, please contact the camera manufacturer for further information.
NOTE: DC12V power jack and AC24V power connector cannot be used at the same time in case of unexpected damage.
NOTE: It is not recommended to record with the SD card for 24/7 continuously, as it may not be able to support long
term continuous data read/write. Please contact the manufacturer of the SD card for information regarding
the reliability and the life expectancy.
Power Connection
To power up the camera, connect the DC12V or AC24V power adaptor to the
power connector of the camera and the power outlet. Refer to the diagram
and pin definition below for AC24V power connection.
Alternatively, users can use an Ethernet cable and connect it to the RJ-45
port of the camera and a PoE+ switch (Class 4).
Pin Definition
1 AC24V L
2 GND