CAUTION — TIPS FOR REMOVAL OF OLD FAUCET:
Always turn water supply OFF before removing
existing faucet or disassembling the valve. Open faucet
handle to relieve water pressure and ensure that complete
water shut-o has been accomplished.
CARE INSTRUCTIONS
To preserve the nish on the metallic parts of your Moen fau-
cet, apply non-abrasive wax, such as car wax. Any cleaners
should be rinsed o immediately. Mild abrasives are accept-
able on Platinum and LifeShine® nishes.
PRECAUCIÓN — CONSEJOS PARA CAMBIAR LA
LLAVE MEZCLADORA Siempre CIERRE la toma de
agua antes de quitar la llave existente o demontar la válvula.
Abra la llave para liberar la presión, y asegúrese de que esté
bien cerrada el agua.
INSTRUCCIONES DE CUIDADO
Para conservar el acabado que cubre las partes metálicas de
su llave mezcladora Moen, aplique cera que no sea abrasiva,
como una cera para autos. Si usa algún tipo de limpiador,
deberá enjuagarlo inmediatamente. Los abrasivos suaves
son aceptables en acabados Platinum y LifeShine®.
ATTENTION SUGGESTIONS POUR ENLEVER
L’ANCIEN ROBINET : Toujours couper l’alimentation
en eau avant d’enlever ou de démonter le robinet. Ouvrir le
robinet pour libérer la pression d’eau et pour s’assurer que
l’alimentation en eau a bien été coupée.
DIRECTIVES D’ENTRETIEN
Pour préserver le ni des pièces métalliques du robinet
Moen, appliquer une cire non abrasive comme une cire à voi-
ture. Rincer immédiatement le robinet après l’avoir nettoyé
avec un agent nettoyant. Les nis Platinum et LifeShine®
peuvent être nettoyés à l’aide de produits abrasifs doux.
HELPFUL TOOLS
For safety and ease of faucet replacement, Moen
recommends the use of these helpful tools.
HERRAMIENTAS ÚTILES
Para que el cambio de la llave sea fácil y seguro, Moen le
recomienda usar estas útiles herramientas.
OUTILS UTILES
Par mesure de sécurité et pour faciliter l’installation, Moen
suggère l’utilisation des outils suivants.
2
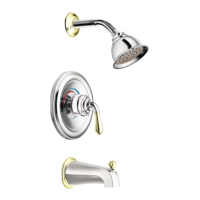
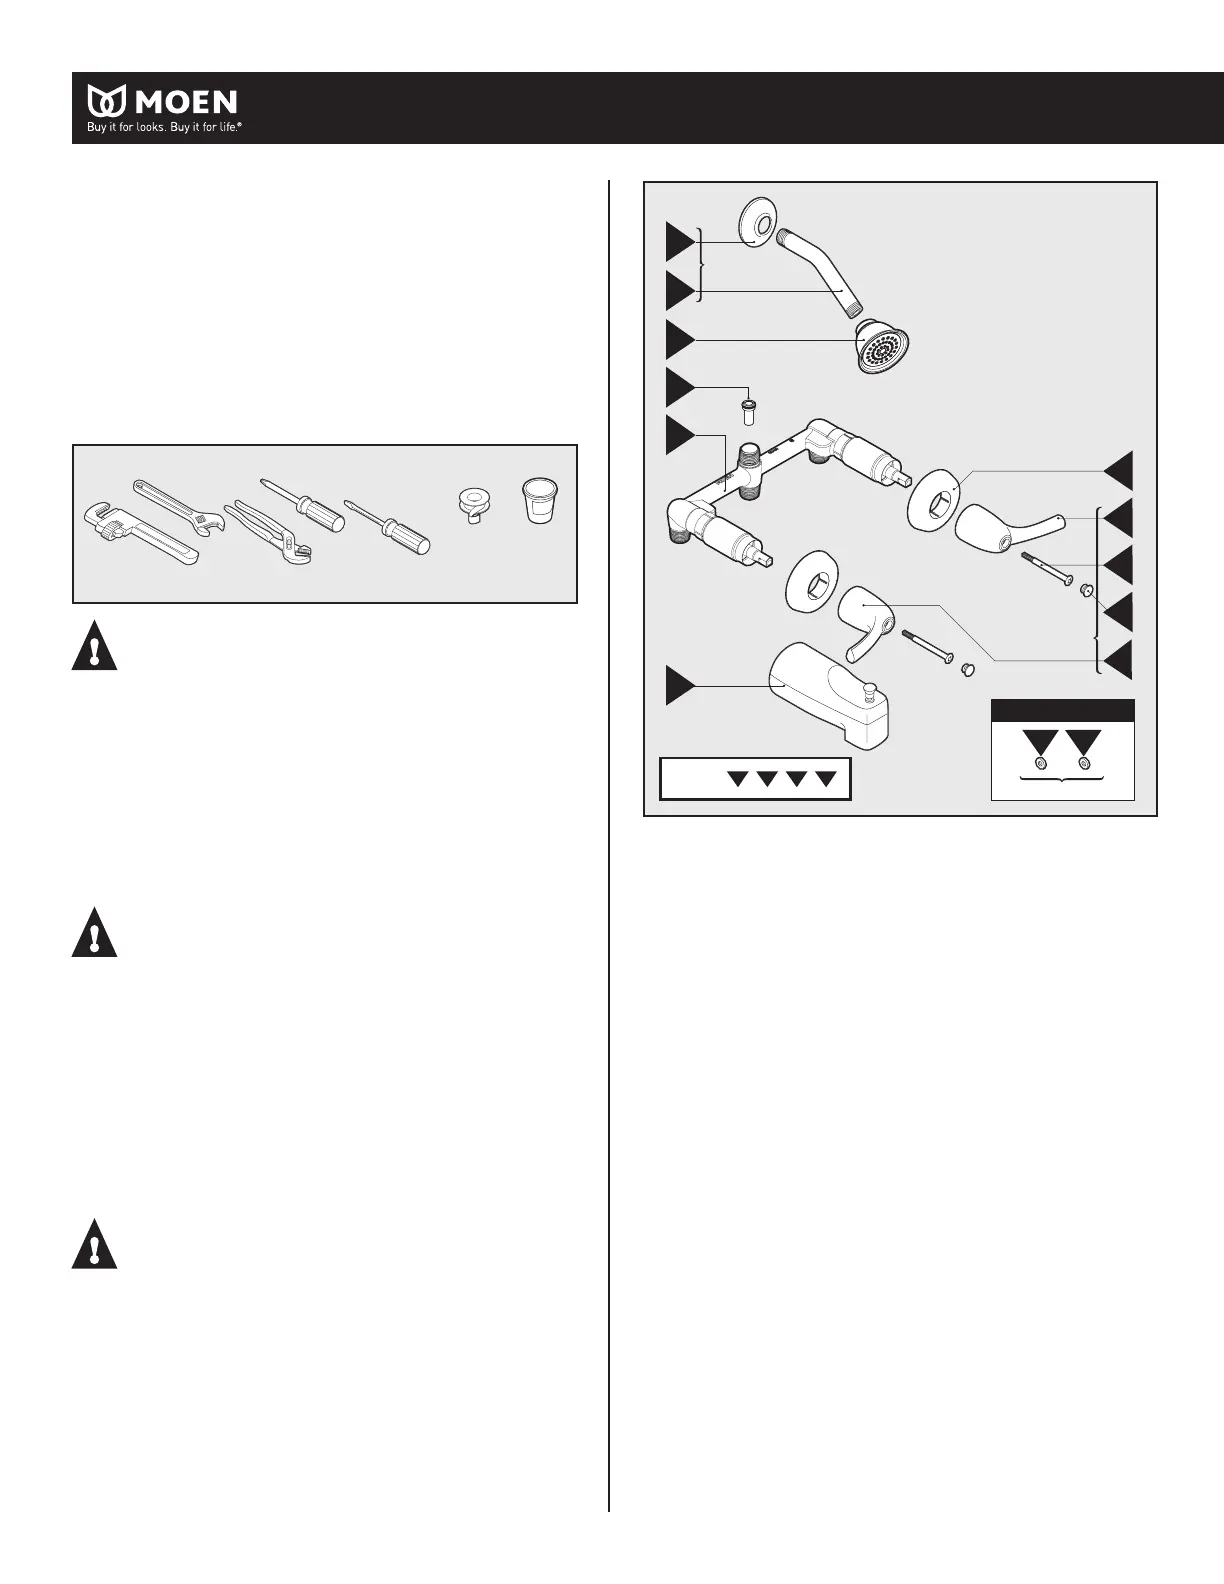
A. Shower Arm Flange
B. Shower Arm
C. Shower Head
D. Flow Director
E. Valve Body
F. Wall Tube Escutcheon
G. Cold Handle
H. Handle Screw
I. Handle Cap
J. Hot Handle
K. Tub Spout
L. Hot Temp Indicator (red)
M. Cold Temp Indicator
(blue)
Lista de piezas
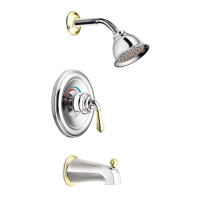
A. Shower Arm Flange
B. Shower Arm
C. Shower Head
D. Flow Director
E. Valve Body
F. Wall Tube Escutcheon
G. Cold Handle
H. Handle Screw
I. Handle Cap
J. Hot Handle
K. Tub Spout
L. Hot Temp Indicator (red)
M. Cold Temp Indicator
(blue)
Liste des pièces
Parts List
A. Shower Arm Flange
B. Shower Arm
C. Shower Head
D. Flow Director
E. Valve Body
F. Wall Tube Escutcheon
G. Cold Handle
H. Handle Screw
I. Handle Cap
J. Hot Handle
K. Tub Spout
L. Hot Temp Indicator (red)
M. Cold Temp Indicator (blue)
K
G
H
I
J
F
C
D
E
B
A
X2
X2
X2
L
M
Option/Opción/Option
Red
Rojo
Rouge
Blue
Azul
Bleu
97274
L
M
I
I
115034 = +++
Thread seal tape
Cinta para sellar roscas
Ruban pour joints filetés
Sealant
Sellante
Mastic