EasyManua.ls Logo

Moen DN7064 User Manual

Moen DN7064
4 pages
To Next Page IconTo Next Page
Page #1 background imageLoading...
Page #1 background image
Instructions for the Tool-Free Shower Chair
Directives pour la chaise de douche avec installation sans outil
Instrucciones para ensamblar la silla de baño sin herramientas
WARNING: PLEASE FOLLOW THESE AS-
SEMBLY INSTRUCTIONS CAREFULLY.
ASSEMBLER ASSUMES RESPONSIBIL-
ITY FOR PROPER ASSEMBLY. FAILURE
TO FOLLOW CORRECT ASSEMBLY
PROCEDURES CAN RESULT IN SERIOUS
INJURY.
MISE EN GARDE : SUIVRE AT-
TENTIVEMENT CES DIRECTIVES
DINSTALLATION. LINSTALLATEUR
EST RESPONSABLE DASSEMBLER
CORRECTEMENT LARTICLE. IL EST
IMPÉRATIF DE SUIVRE À LA LETTRE
LES DIRECTIVES D’INSTALLATION AU
RISQUE D’ENTRAÎNER DE GRAVES
BLESSURES.
ADVERTENCIA: SIGA CON DETEN-
IMIENTO ESTAS INSTRUCCIONES.
UNA INSTALACIÓN ADECUADA ES
RESPONSABILIDAD DEL INSTALADOR.
NO RESPETAR EL PROCEDIMIENTO DE
INSTALACIÓN PUEDE CAUSAR LESIO-
NES SERIAS.
1
Remove chair
components from box
Retirer de la boîte
les composants de la
chaise.
Saque las partes de la
silla de la caja.
2
Snap front legs into front leg holes. Align grooved rib on the legs
to the notch in the leg holes
Enclipser les pieds avant dans les trous de
pieds avant. Aligner les parties cannelées
des pieds avec l’entaille dans les pieds
Encastre las patas delanteras en los
agujeros delanteros. Alinee el borde
estriado sobre las patas con la ranura en los
agujeros de la pata.
Note: Legs and seat are both marked “front” or “rear” for easy locating
Remarque : Les pieds et le siège portent la marque « avant » ou « arrière »
pour en faciliter le repérage
Nota: Las patas y el asiento tienen las marcas “front” (parte delantera) y
“rear” (parte trasera) para facilitar la ubicación.
DN7064
Question and Answer IconNeed help?

Do you have a question about the Moen DN7064 and is the answer not in the manual?

Moen DN7064 Specifications

General IconGeneral
BrandMoen
ModelDN7064
CategoryWheelchair
LanguageEnglish

Summary

Unpack Shower Chair Components

Component Removal from Box

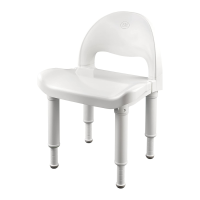
Instructions for removing and identifying chair components from the shipping box.

Attach Front Legs

Front Leg Installation Procedure

Snap front legs into front leg holes, aligning the grooved rib to the notch.

Important Assembly Warnings

Safety Instructions for Assembly

Follow all assembly instructions carefully to prevent serious injury.

Attach Rear Legs

Rear Leg Installation Procedure

Snap rear legs into rear leg holes, aligning the grooved rib to the notch.

Position and Secure Seat

Seat Placement and Locking

Stand the seat on its legs and slide it into grooves until it locks.

Adjust Seat Height

Seat Height Adjustment Guide

Turn leg extension clockwise to increase height, counterclockwise to decrease.

Leg Extension Alignment

Align numbered groove on leg extension to the bottom of the leg for stability.

Product Warranty and Safety Information

General Safety and Usage

Information on weight limits, professional consultation, and product modification.

Limited Lifetime Warranty Details

Details on product replacement for defects and warranty limitations.

Compliance with Standards

Confirmation that the shower chair meets or exceeds ADA requirements.