EasyManua.ls Logo

moll Joker User Manual

Default Icon
36 pages
To Next Page IconTo Next Page
Page #1 background imageLoading...
Page #1 background image
Joker
Classic
56
5
9
6
3
6
6
6
9
7
2
7
5
79
8
2
5
6
5
9
6
3
6
6
6
9
72
7
5
79
8
2
5
6
5
9
6
3
6
6
6
9
7
2
75
7
9
8
2
5
6
5
9
6
3
6
6
6
9
7
2
75
7
9
8
2
07. 2018
Montageanleitung
Assembly instructions
Instrucciones de montaje
Notice de montage
Istruzioni per il montaggio
Инструкция по монтажу
组装说明
+ 超大抽屉
+ Riesenschublade
+ Giant drawer
+ Cajón de gran tamaño
+ Tiroir géant
+ Cassetto gigante
+ Выдвижной ящик
Question and Answer IconNeed help?

Do you have a question about the moll Joker and is the answer not in the manual?

moll Joker Specifications

General IconGeneral
Brandmoll
ModelJoker
CategoryIndoor Furnishing
LanguageEnglish

Summary

Joker Desk Overview

Product Features and Options

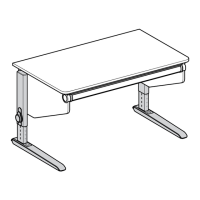
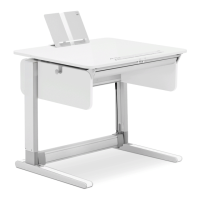
Highlights include the 'Giant drawer' and other accessories.

Safety Instructions

Assembly Safety

Ensure assembly by qualified persons and proper use.

Child Safety Warning

Warning for small parts and choking hazard for children under 3 years.

Preparation and Parts Check

Unpack and Verify Contents

Ensure all components are present before starting assembly.

Assembly Tools and Fasteners

Fastener Sequence

Instructions on the order of using screws.

Included Tools and Hardware

Visual guide to included screws and allen key.

Assembly Part 1: Base Structure

Step 1: Assemble Base Frame

Connect side panels to the base.

Step 2: Attach Brackets

Secure brackets to the base frame.

Step 3: Assemble Front Panel

Assemble the front decorative panel.

Step 4: Attach Left Leg Assembly

Connect the left leg structure to the base.

Step 5: Attach Right Leg Assembly

Connect the right leg structure to the base.

Assembly Part 2: Attaching Feet

Step 6: Attach Feet to Legs

Connect the feet to the leg assemblies.

Assembly Part 3: Support Beams

Step 7: Attach Right Support Beam

Secure the right support beam.

Step 8: Secure Right Support Beam

Fasten the right support beam.

Step 9: Attach Left Support Beam

Secure the left support beam.

Step 10: Secure Left Support Beam

Fasten the left support beam.

Assembly Part 4: Drawer Slides

Step 11: Attach Side Panels

Connect side panels to the main structure.

Step 12: Install Drawer Slides

Mount the drawer runners onto the desk frame.

Step 13: Secure Drawer Slide Mechanism

Fasten the drawer slide components.

Step 14: Lock Drawer Slide Mechanism

Engage the locking mechanism for slides.

Step 15: Secure Drawer Slides

Final securing of drawer slides.

Step 16: Insert Drawer Protectors

Attach side protectors to the drawer.

Drawer Assembly and Installation

Step 1 & 2: Assemble Drawer Front

Attach the drawer front panel.

Step 3 & 4: Prepare Drawer Slides

Detach and attach outer slide parts.

Step 5 & 6: Attach Inner Slides

Mount inner slide components to the drawer.

Step 7: Insert Drawer

Slide the assembled drawer into the desk.

Final Drawer Checks and Options

Drawer Lock Check

Verify the drawer is firmly locked in place.

Maximum Load Capacity

The drawer can hold up to 6 kg.

Assembly Part 5: Attaching Desk Top

Step 1: Attach Support Arms

Connect support arms to the desk top.

Step 2: Mount Desk Top

Position the desk top onto the leg assemblies.

Step 17: Secure Desk Top

Fasten the desk top to the structure.

Step 18: Attach Top Brackets

Mount additional brackets to the desk top.

Step 19: Mount Desk Top

Final mounting of the desk top.

Step 20 & 21: Secure Desk Top

Final steps to secure the desk top.

Final Assembly Steps and Checks

Step 22: Adjust Drawer Mechanism

Fine-tune the drawer's operation.

Step 23: Final Checks and Disposal

Perform final checks and dispose of packaging.

Product Usage and Adjustments

Operating the Desk

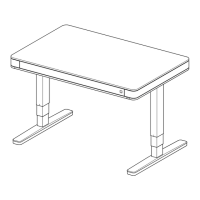
Instructions for using the desk's features.

Height Adjustment

How to adjust the desk's height.

Tilting the Desk Top

Instructions for tilting the desktop surface.

Sliding Mechanism Operation

How to operate the sliding parts.

Desk Leveling and Stability

Leveling Feet Adjustment

Adjust the feet to ensure the desk is level and stable.

Height Adjustment Guide

Height Adjustment Chart

Recommended desk heights based on user's height.

Height Adjustment Mechanism

Detailed steps for adjusting the desk height.

Optional Giant Drawer

Giant Drawer Installation

Check and install the optional giant drawer.

Optional Pen Holder

Pen Holder Installation

Check and install the pen holder accessory.

Color Element Replacement

How to Change Color Elements

Steps to replace decorative color elements.

Cleaning and Care

Cleaning Instructions

Recommended methods for cleaning the desk using damp cloth and mild cleaner.

Care and Maintenance Advice

Advice on regular care and avoiding abrasive materials.

Spare Parts Information

Spare Parts Identification

Diagram showing part numbers for replacement.

Spare Parts List

Detailed list of all available spare parts.

Important Documentation

Keep Assembly Instructions

Advice to retain the manual for future reference.

Related product manuals