EasyManua.ls Logo

mompush T629 - User Manual

mompush T629
13 pages
Print Icon
To Next Page IconTo Next Page
Loading...
www.mompush.com
www.mompush.com
support@mompush.com
T629
Question and Answer IconNeed help?

Do you have a question about the mompush T629 and is the answer not in the manual?

Overview

The Mompush T629 is a versatile stroller designed for comfort, safety, and ease of use, suitable for a single child from birth up to 15kg in an upright or reclined position. In bassinet mode, it accommodates a baby up to 9kg who cannot sit up unaided, roll over, or push themselves up on their hands and knees. The product is intended for domestic use and is not for commercial purposes.

Important Safety Warnings:

  • Always read instructions carefully before use and keep them for future reference to avoid injury or death.
  • Follow the manufacturer's instructions at all times.
  • Always apply the brakes when the stroller is stationary.
  • Never leave the child unattended.
  • Secure the child in the harness at all times.
  • Do not carry extra children or bags on the stroller, as this can affect stability.
  • Ensure children are clear of any moving parts when adjusting the stroller to prevent injury.
  • Check that the pram body or seat unit attachment devices are correctly engaged before use.
  • The product is not suitable for running or skating.
  • When using the stroller, always ensure your hand is positioned in and around the tether strap, which is a compulsory safety feature.
  • Do not add another mattress on top of the provided or recommended mattress.
  • Be aware of the risks of open fire and other significant heat sources (e.g., radiators, electric bar fires, gas fires) in the vicinity of the stroller.
  • It may be unsafe to use accessories other than those approved by the manufacturer.
  • Keep plastic packaging away from children to avoid suffocation.
  • Take extra care in windy conditions.
  • Ensure all locking devices are engaged before lifting the stroller. Only carry the stroller if folded and locking or storage latches are engaged. Apply the storage latch if it doesn't engage automatically.
  • Never leave a raincover, hood, or apron on the product indoors, in a hot atmosphere, or near a heat source, as the child may overheat. Remove the raincover before folding the pram to prevent damage.

Technical Specifications & Load Limits:

  • Child Weight Capacity (Stroller Mode): Up to 15kg.
  • Child Weight Capacity (Bassinet Mode): Up to 9kg.
  • Basket Load Capacity: Maximum 2kg.
  • The stroller will become unstable if the manufacturer's recommended load is exceeded.
  • Any load attached to the handle, backrest, or sides will affect the product's stability.
  • Excessive weight or adding package-carrying accessories may create hazardous unstable conditions.

Parts List:

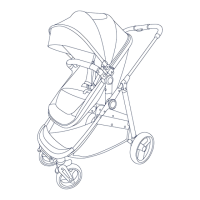
The Mompush T629 includes the following components:

  • Chassis (x1)
  • Front Wheels (x2)
  • Rear Wheels (x2)
  • Bumper Bar (x1)
  • Seat Unit (x1)
  • Canopy (x1)
  • Apron (x1)
  • Raincover (x1)

Assembly & Usage Features:

Chassis Assembly:

  1. Unfolding: Release the chassis from its locked folded position by lifting the folding latch. Lift the handle to open the chassis. A "click" indicates it's locked into place.
  2. Rear Wheels: Push each rear wheel into the axle until a "click" is heard. Tug to ensure security. To remove, pull out the metal latch underneath the axle.
  3. Front Wheels: Insert each front wheel pin into the socket until a "click" is heard. Tug to ensure security. To remove, press the button at the back of the wheel socket and pull down.

Bassinet Mode:

  1. Preparation: On the rear of the seat unit, fasten the hook and loop panels, ensuring the fabric covers the metal bracket.
  2. Attachment: Attach the seat unit to the chassis by aligning connectors and pressing downwards. A "click" confirms correct assembly.
  3. Removal: Push the buttons on both sides of the seat connectors to remove the seat unit.
  4. Bumper Bar: Insert the bumper bar into the seat unit slots until a "click" is heard. Ensure release buttons are on the outside. To remove, press the release buttons and lift.
  5. Apron: Fasten the apron by zipping it around the side and attaching hook and loop fasteners over the bumper bar.
  6. Canopy: Attach the plastic canopy clips to their respective sides, ensuring they sit over the small plastic guides. Secure the canopy to the frame with the zip, starting from the right side (when facing the seat).
  7. Suitability: Suitable from birth up to 9kg or until the child can sit up unaided, roll over, or push themselves up.
  8. Warning: Never use in bassinet mode with the seat unit forward-facing.

Stroller Mode:

  1. Seat Unit Removal: Press buttons on both sides of the seat connectors to remove the seat unit from the chassis.
  2. Webbing Belts: Fasten the webbing belts on the rear side of the seat unit footrest. A "click" indicates secure buckles.
  3. Re-attachment & Recline: Re-attach the seat unit to the chassis. Locate the backrest adjustment mechanism at the rear of the seat unit. Squeeze the clip on the reclining harness and gently pull up the backrest. Press buttons on both sides of the seat connectors to adjust the recline. A "click" confirms the seat engages at the desired position.
  4. Warning: The seat unit is not suitable in stroller mode for children under 6 months.
  5. Reversible Seat: The seat unit is reversible and can be forward or rearward facing. To re-attach, align connectors with the chassis housing and press downwards until a "click" is heard.

Harness:

  1. Assembly: Slide the shoulder strap buckle onto the housing of the waist strap buckle. Insert the completed buckle into the buckle housing until it engages securely ("click"). Repeat for the opposite side.
  2. Release: Press the center button to release the child from the harness.
  3. Adjustment: To adjust shoulder straps, move the slides. There are 3 shoulder height positions. Undo the harness, remove shoulder pads, and remove the harness strap from webbing holders to adjust height, then redo the harness.
  4. Warning: Always adjust the harness to fit your child correctly for comfort and safety. A loose-fitting harness can be very dangerous. Always adjust the shoulder strap height according to baby height.

Canopy Adjustment:

  1. Opening/Closing: Pull the canopy forward or backward on the canopy rim.
  2. Ventilation: The canopy features a mesh window for ventilation and to keep an eye on the baby in a forward-facing position.

Swivel Wheels:

  1. Locking: To lock the front swivel wheels for straight travel, twist the top of the wheel socket so the notch faces the front.
  2. Swivel Mode: To return to 360° swivel mode, twist the top of the wheel socket so the notch faces the back.

Brakes:

  1. Engage: Press down on the brake pedal until a "click" is heard, indicating the brake is locked.
  2. Disengage: Push the brake pedal upwards.
  3. Warning: Always apply the parking brake when the stroller is not moving, when placing or removing the child, and when making adjustments (e.g., changing seat direction).

Raincover:

  1. Attachment: Locate the raincover (H). Pull it down over the stroller, starting at the top of the canopy and pulling down towards the footrest.
  2. Compatibility: The raincover fits in both stroller and bassinet modes.

Folding:

  1. Preparation: If folding with the seat unit attached, it must be forward-facing. If rearward-facing, either remove the seat unit or change it to forward-facing before folding. Always fold the canopy before folding.
  2. Swivel Wheels: If the swivel wheels are locked, twist the top of the wheel socket so the notch faces the back. This ensures wheels can move and don't touch the bar when the chassis is folded.
  3. Folding Mechanism: Located on the handle, slide the folding lock button across to the right. Simultaneously, push up the safety lock. Push the handle downwards.
  4. Locking: The locking catch will engage automatically.
  5. Warning: To avoid injury, ensure your child is kept away when unfolding and folding the product.

Care and Maintenance:

  • Regular maintenance is required for correct and safe performance.
  • All assembly fittings should be tightened properly.
  • Regularly check the stroller for loose screws, worn parts, torn material, or stitching. Replace or adjust parts as needed.
  • Lubricate moving parts regularly, especially the wheels.
  • Wipe metals and plastics clean with a damp cloth.
  • Sponge clean fabrics with warm soapy water. Rinse well with clean water to avoid staining. Dry in the shade.
  • Do not bleach, iron, or dry clean.
  • Do not use abrasive pads, bleach, or strong household cleaners.

mompush T629 Specifications

General IconGeneral
Brandmompush
ModelT629
CategoryStroller
LanguageEnglish