
C
Cynthia SmithAug 12, 2025
What to do if Monarch Scooter throttle fault?
- NngreenAug 13, 2025
If a throttle fault is indicated on your Monarch Scooter, ensure that the throttle is in the neutral position before switching on the scooter.
What to do if Monarch Scooter throttle fault?
If a throttle fault is indicated on your Monarch Scooter, ensure that the throttle is in the neutral position before switching on the scooter.
Why Monarch Scooter has high battery voltage?
An excessive voltage detected in Monarch Scooter is usually caused by a poor battery condition or poor battery connections. Check the condition and connections of your battery.
What to do if Monarch Scooter charger connected?
If the charger is connected, the controller is being inhibited from driving your Monarch Scooter. Disconnect the charger.
What to do if Monarch Scooter control system fault?
If a control system fault is indicated on your Monarch Scooter, make sure that all connections are secure.
How to fix Monarch Scooter motor wiring fault?
If there is a motor wiring fault in Monarch Scooter (the motor has a short circuit to a battery), check all connections and leads between the motor and the battery.
What to do if Monarch Scooter motor disconnected?
If the motor is disconnected in your Monarch Scooter due to a bad connection, check connections and leads between the motor and the controller. Also, check the freewheel switch.
What to do if Monarch Scooter electromagnetic brake fault?
If the park brake has a bad connection on your Monarch Scooter, check the electromagnetic park brake and motor connections.
How to fix Monarch Scooter freewheel switch fault?
If there is a freewheel switch fault in Monarch Scooter because the freewheel switch is activated or the manual brake disengagement mechanism is operated, check the position of the switch or lever and all connections between the switch and the controller.
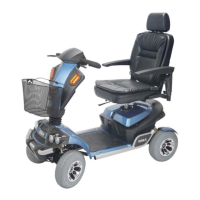
The Monarch Tesla II scooter is a battery-operated mobility vehicle designed for user-friendliness and maximum maneuverability, even in tight spaces. This owner's manual provides comprehensive instructions and suggestions for safe operation and maintenance.
The Monarch Tesla II is designed to provide personal mobility for individuals. It is powered by batteries and controlled via a tiller and throttle levers. The scooter features a motor braking system for controlled stopping and a freewheel mode for manual pushing when the motor is disengaged. It is equipped with various safety features and comfort adjustments to enhance the user experience.
Control Panel: The scooter's control panel is designed for easy readability. It includes a backlit battery gauge, two green horn buttons, yellow indicator buttons, and a white button to control the headlight and tail-lights. A red button activates the warning flashers.
Delta Tiller Handle: The tiller features cushioned handrests and dual throttle control levers, allowing for easy operation with either the right or left hand.
Slide Seat Mechanism: The seat can slide forward or backward, providing easier access to the tiller and control panel, and enhancing user comfort.
Adjustable Armrests: The armrests are adjustable in width, height, and angle, allowing users to find the most comfortable position for operation and making transfers easier.
Tyres: The scooter is equipped with non-marking, non-scuffing pneumatic tyres.
Seat Swivel: The seat can swivel to the left or right, facilitating easy transfers and allowing the user to sit more comfortably at a table or desk.
Off-board Charger: The charging port is conveniently located on the tiller, protected by a cover.
Tiller Adjustment: The tiller offers infinite adjustment with an angle adjustment lever, allowing it to be positioned without leaning forward.
Automatic Tiller Lock: When folded down completely, the tiller automatically locks to prevent it from swinging during transport.
Headlights and Tail Lights: Standard LED headlights and taillights provide bright, long-lasting illumination. Brake lights automatically activate when the throttle is released.
Auto Corner Speed Reduction: The scooter automatically slows down when cornering or when starting off if the front wheels are not facing directly forward, enhancing safety.
Front, Rear, and Side Bumpers: All-round bumper bars protect the scooter from accidental bumps.
Before operating, ensure the power is off and the freewheel handle is engaged. Position the seat for safe mounting, place one foot on the deck, and sit comfortably. Fasten the seat belt if equipped.
Speed Adjustment Dial: This dial allows you to preselect the maximum speed. Turn it counterclockwise for the lowest speed and clockwise to increase. It is recommended to select a speed setting that feels comfortable and safe.
On/Off LED: This LED lights up when the power is on and is used for diagnosing operational problems.
Horn Button: Press either horn button to sound the horn.
Headlight / Tail Light Switch Button: Press once to turn on headlights, press again to turn them off.
Left/Right Indicator Switches: Press once to activate the corresponding indicator and warning sound; press again to turn off.
Emergency Indicators: Press once to activate both left and right indicators and warning sound; press again to turn off.
Key Switch: Turns the scooter on and off.
High / Low Speed Switch: Allows switching between high and low-speed modes.
For first-time use, practice on a level surface. Ensure the freewheel lever is engaged. Pull up the seat rotate lever to position the seat for easy mounting, then lock it forward. Insert the key and turn it to the "On" position.
Basic Driving: Start with the speed control dial at its slowest setting. Place hands on handgrips. Pull back on the right throttle lever (or push the left) for forward motion. Pull back on the left throttle lever (or push the right) for reverse. Release the throttle to stop. Practice these functions until comfortable.
Steering: Turn the tiller to the right to go right, and to the left to go left. Maintain sufficient clearance for rear wheels when turning. Avoid sharp turns at high speeds to prevent tipping.
Steering in Tight Spots: For tight maneuvers, stop the scooter, set the speed to the lowest, and turn the tiller in the desired direction.
Steering in Reverse: Requires attention. Use the throttle control levers as described for forward motion, and turn the tiller to steer in reverse. Reverse speed is 50% of the dial-set speed.
Ramps and Curbs: Lean forward when driving up ramps or inclines for stability. Drive straight up or down inclines. Avoid traversing inclines. If stopping on an incline, accelerate gently when restarting. Drive down ramps at the slowest speed. Approach curbs head-on at a 90-degree angle. Never negotiate inclines or curbs by traversing them.
Freewheel Mode: To push the scooter manually, disengage the motor by moving the freewheel lever. Do not sit on the scooter in this mode.
Motor Braking System: The motor aids in braking when the key is in the "On" position and the freewheel is engaged. It also provides resistance in freewheel mode to prevent the scooter from moving too quickly.
Charge the scooter every night after use for at least 6 hours. Consult the charger's specific instructions.
The scooter's PG S-Drive electronic controller continuously monitors operating conditions. Problems are indicated by flashes of the On/Off LED on the dashboard. Count the flashes to identify the error.
For any technical problems, contact your local dealer. Attempting self-repair will void the warranty and may damage the scooter.
| Motor | Brushless DC motor |
|---|---|
| Battery | Lithium-ion |
| Foldable | Yes |
| Max Load | 120 kg |
| Suspension | Front spring suspension |
| Tires | Pneumatic tires |
| Category | Electric Scooter |