19
• Always provide enough, but safe, distance between the child and the
tray.
• Be careful when adjusting the position of the tray, the footrest and
when unfolding or folding the chair, as there is a risk of pinching your
fingers.
• Use the tray always in combination with safety belts! The tray is not
intended to protect the child from falling.
• Never lift, move, fold, adjust or repair the seat when there is a child in
it. This can injure the child.
• Always before use, check the functioning of the locking mechanisms.
• Before placing the child in the seat, make sure that it is fully unfolded
and locked in the open position and that all locking mechanisms are
tightly closed! This will prevent the child from being injured by sudden
folding of the chair.
IMPORTANT! The diagrams and figures in this instruction are illustrative and
indicative only. Check the securing of the fixation after each operation.
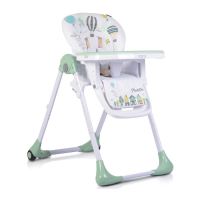
ASSEMBLY PARTS – ILLUSTRATION A 1. Seat – 1 pcs; 2.Two layers food tray
– 1 pcs; 3.Support tubes– 2 pcs. (front and rare); 4. Legs upper part of the
frame) – 2 pcs. (left and right); 5.Backrest – 1 pcs; 6.Upholstery of the seat– 1
pcs; 7.Iron bar– 1 pcs; 8. Parts, helping the assembly: Cover and screws
ASSEMBLY AND EXPLOITATION – ILLUSTRATION B
1. ATTACHING THE SUPPORTING TUBES - Look figure 1:
Take the left or right supporting tube and press the red button on the back.
Unfold the leg itself and release the red button.
Take the other tube and repeat the procedure. Look at figure 1 and assemble
the legs to the seat, as shown on the figure.
2. ASSEMBLING THE BASIS: – Look Figure 2:
Turn back the highchair. Please, note that each of the four legs is equipped
with spring buttons. Align one tube with spring button with the basis, on which
the button fixing opening is located. Press down well, until the spring button
is fixed on its place in the basis opening. Repeat this action for the other legs
too.
3. PLACING THE SEAT PAD– Look figure 3:
 Loading...