21
To protect your child! The extra pad provides your child with the support they need while he or she is even smaller.The
extra padding is used to provide extra comfort for very small babies.
Attention! Please use the extra pad attached to this car seat model until your child reaches a height of 75 cm (approx. 3
months). The newborn inlay may be removed after the baby is 60 cm to provide more space for the child. To remove the
newborn inlay open and remove the shoulder pads. Then remove the newborn inlay and place the shoulder pads back on
the shoulder belts.
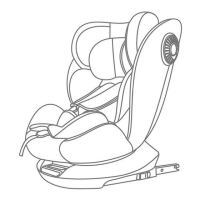
Press the roation button to rotate the child seat to 180° или 360°. The seat is rotatable in both directions. By fixing in
required position (car seat FORWARD facing or REARWARD facing) you will hear a click sound. For reference see figure H:
• Figure A: shows the Forward installation method.
• Figure B: after rotating the seat to 180° it will be into Backward installation method.
• Figure C: after rotating the seat respectively to 90° and 270° it will be in the baby holding position.Attention! The
function is only active when the vehicle is not in movement.
Pull the lever for recline and set the seat un required position as follows (see Figure I for reference):
• Rearfacing seat: 4 possible recline positions for the seat as shown in Figure I.3.
• Forward-facing seat: 4 possible recline positions as shown in Figure I.2.
Class for use as group 0+ (0-13 kg): installation with three-point vehicle belt and seat belt harness – Figure J.1.
Use the car's three-point seat belt to ensure the child's safety and secure the car seat.
1.Place the child seat on the car seat in the opposite direction of traffic.
2. Pull out the entire car seat belt.
3. Pass the diagonal belt between the backrest and headrest and lap belt through the belt guides on the bottom of
child’s seat. Make sure that the both parts of the car belt are under the harness of the child seat.
4. Buckle the shoulder and lap belt into the buckle.
5. Place the child in the seat. Check the height of the shoulder belts. Make sure the straps are not twisted. Fasten the
seat belts, making sure they are well placed, and pull the strap in the center of the seat and tighten it. For added
comfort and safety when used by a newborn, you can place the soft seat cushion that comes with the car seat on the
bottom of the seat.
Class for use as group 0+ (0-13 kg): installation with ISOFIX + Top tether + 5-point safety harness – Figure J.2
Use the chair's 5-point safety harness to ensure your child's safety.
1. Install ISOFIX attachment.
2.Place the car seat tightly on the car seat in rearward facing position, fix the top tether.
3.Place the child in car seat, put and lock the 5-point safety harness.
Class for use as Group 1 (9-18 kg): installation with ISOFIX OR three-point vehicle belt + top tether and seat belt on
the seat (forward facing position).
The car seat can be installed with both the ISOFIX system and the vehicle's three-point seat belt + top tether.
To install the seat using the vehicle's three-point seat belt and top tether, follow the steps shown in Figure K.
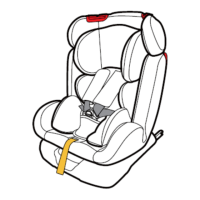
Class for use as Group II (15-25 kg) and as Group III (22-36 kg): forward facing.
When using the seat for Group 2 and 3, the five-point seat belt on the seat, the buckle cushion and the additional
padding must be removed.
Installation with ISOFIX and 3-point safety belt (forward facing) – Figure L.1
1.Install ISOFIX attachments to ISOFIX slots at vehicle.
2.Place the child in the car seat and set the height of head support based on the child’s height.
3.Pull the 3-point safety belt of vehicle.