1.
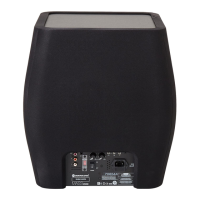
Crossover Frequency Control
The
crossover frequency control only operates when connectec to the stereo inputs.
It
does not
have
any
effect when connectec to the
LFE
input. This control feature
is
used
to
set the upper frequency limit (low
pass) of the Apex AW-12. The crossover control should be set
in
accordance with the size
or
bass
output of the main/satellire speakers. Refer to the following chart
as
a guide to setting the crossover
frequency control to the ,iptimum position. Much will depend on the correct l
ow
frequency response
of
the main speakers
ancl
their position within the room. Experimentation
is
advisable.
2.
Phase Control Switch
The Phase Control
is
usEd
to synchronise any delay between the Apex AW-12 and main/satellite
speakers. When the Ape< AW-12
is
in
phase with the main/satellite speakers the sound should be full
bodied. Sit
in
a normal
li
stening position whilst adjusting the phase switch. Help from another person
may be required. When
,et
correctly the location of the subwoofer should be almost undetectable.
Experimentation
is
recommended
in
order to achieve optimum results. However it should be noted
that
in
most cases the phase control switch should be set
to
O degrees, especially when using a
digital
AV
processor or
P.:,
✓
receiver amplifier.
3.
Power Mode Switch with On-Auto Facility
The Power Mode Switch has two positions: 'O
n'-
'Auto'. With the switch
in
the 'On' position, the
subwoofer
is
permanentl, switched on under
all
conditions and will need to be manually put into
Standby mode. While
in
Standby mode, the W-12 may be woken by pressing the
EQ
button.
In
the
'Auto' position the subwoofer will automatically wake once an input signal
is
received and will remain
on while still recaiving a
~ignal.
The Apex AW-12 will switch into standby mode following a period of
20 minutes without an
LFE
signal. Refer
to
page 8 for further information.
4.
12
Volt Trigger Input - Centre
Pin
= + 12Vdc
For external power control from
AV
amplifier/ receiver to the W-12. Monitor Audio recommend using
this function and a lead i
,;
supplied. This 12 volt signal
is
generated by the
AV
amp/receiver and tells
the W-12 to turn on from standby mode. This allows a more accurately controlled auto on/off function,
and
is
far more anergy efficient.
When using the 12v trigger, the Power Mode Switch
(3)
must be
in
the AUTO position, for it to
function correctly.
5.
USS Connector
This
is
provided
to
update the firmware within the W-12.
6.
RCA
Line
Level Inputs (Stereo Left & Right)
For connection
to
a 2 ch:mnel/ stereo amplifier system. Connection should be provided by a pair of
high-quality signal cable,. from the pre-out section of an amplifier.
Note:- cable lengths should not exceed 1 O metres to avoid interference from other electrical
appliances.
7.
RCA Line Level Outputs (Stereo Left & Right)
To
be used to
fe<;id
additional sub-woofers to the W-12 by 'daisy chain' type connection. The outputs
are link out only connections and do not provide any form of filtering.
8.
LFE
Input
(RCA
Type)
This
input
is
to be usec wren connecting
the
W-12 to
an
AV
amplifier/
receiver.
When using the
LFE
input,
the
crossover control
is
not used. This
is
due to the crossover function being controlled and set by the
AV
amplifier/ processor when it's set up procedure
is
run.
9.
LFE
Output/ Link
(RCA
Type)
To
be used
to
fe<,d additional sub-woofers tu
t11e
W-12
by 'daisy chain· type connection. The output
is
a link out only connection and does not provide any form of filtering.
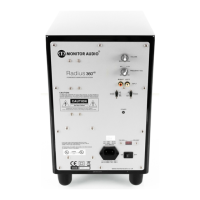
10. Mains Power Switch
The Mains Power Switch should be switched to the 'Off' position when the Apex AW-12 will not be
used for extended perioc,
s.
The switch must be
in
the 'On' position for the subwoofer to function.
WARNING: Due
to
the mains switch being located on the rear panel, the apparatus must be located
in
the open area with no obstructions to access the mains switch.
11 .
IEC
Mains Power Connector/ Fuse Location
The Apex AW-12
is
supplied with a two-pin mains input socket for connection
to
the mains supply.
Use
ONLY
the appropriate
IEC
mains lead provided with the product. Also fitted
is
an
ex1ernal
mains
fuse. If a fuse blows during operation a spare fuse
is
provided within the fuse holder for replacement.
If
you wish
to
change
thE
fuse, you can
do
this by removing the
IEC
mains lead and carefully levering
out the original
fLJse
from its holder below the
IEC
mains input socket
(11
a).
If
the fuse blows again it
is
advisable to
Sf!ek
help from an authorised service agent.
DO
NOT attempt to re-fit a further fuse
as
this could result
in
serious damage
to
the amplifier unit.
12. Volume Control
This control allows the level
or
volume
to
be adjusted
in
order to achieve a balanced overall sound.
To
use this facility you will need
to
play a selection of familiar music
or
film
excerpts. Start with the
volume at minimum and increase the level control until a balanced sound
is
established.
If
using
an
AV
processor or
AV
receiver amplifier, the system can adjusted by the test tone function within the set-up
features. (Refer to the set up section
in
the
AV
processor or
AV
receiver amplifier user guide.) When
the AW-12
is
correctly set-up, you should not be able to identify its location easily
in
the room.
13.
EQ
Button
This button has multiple functions, these
are:
Wake the Subwoofer from standby with a single press;
When operational, it cycles through three different
EQ
profiles.
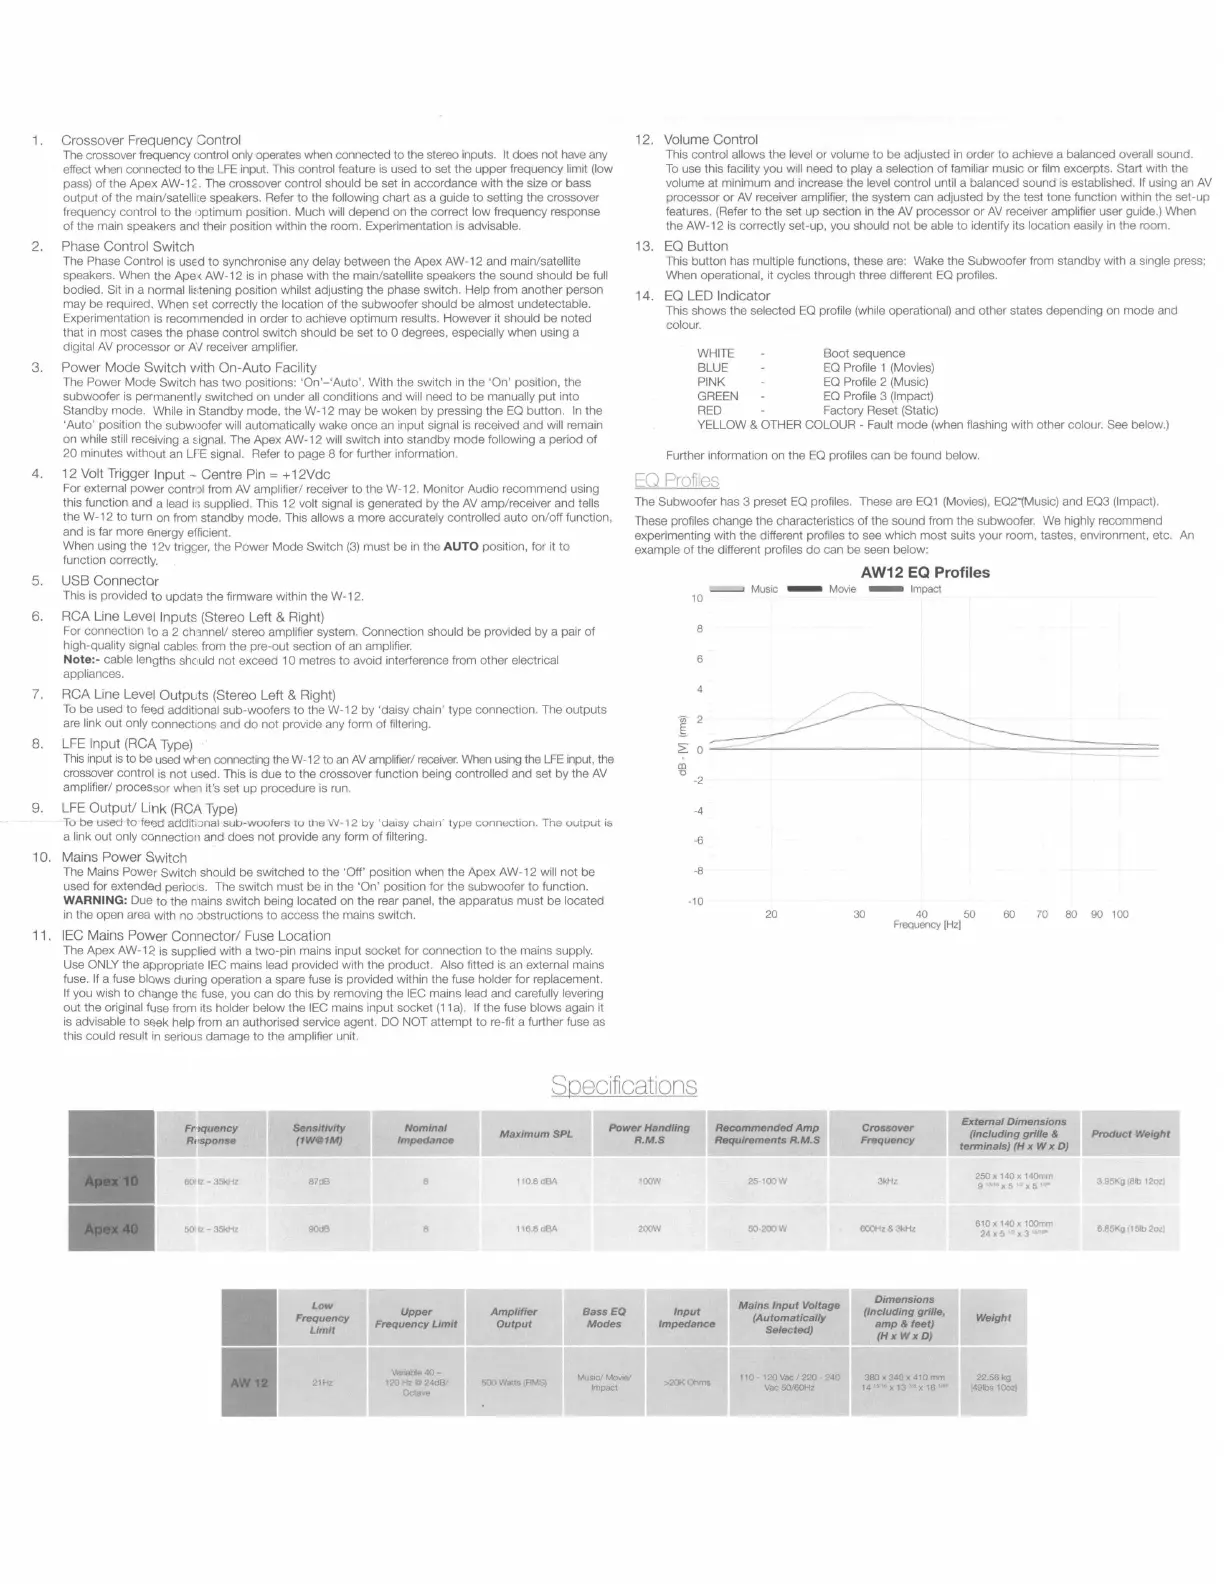
14.
EQ
LED
Indicator
This shows the selected
EQ
profile (while operational) and other states depending on mode and
colour.
WHITE Boot sequence
BLUE
EQ
Profile 1 (Movies)
PINK
EQ
Profile 2 (Music)
GREEN
EO
Profile 3 (Impact)
RED
Factory Reset (Static)
YELLOW &
OTHER
COLOUR - Fault mode (when flashing with other colour. See below.)
Further information on the
EQ
profiles can be found below.
EO
Profiles
The Subwoofer has 3 preset
EQ
profiles. These
are
EQ1
(Movies}, EQ2"(Music) and
EQ3
(Impact).
These profiles change the characteristics of the sound from the subwoofer.
We
highly recommend
experimenting with the different profiles to
see
which most suits your room, tastes, environment, etc.
An
example of the different profiles
do
can be seen below:
ui'
E
-=-
~
~
AW12 EQ Profiles
--'
Music - Movie - Impact
10
2
0
-2
-4
-6
-8
-
10
20
30
40
50
Frequency
IHzJ
60
70
80 90 100
SQeciflcations
Fr
,
tquency
Nominal
Power
Handling
Recommended
Amp
Crossover
External
Dimensions
MaximumSPL
(including grille &
Product
Weight
Rosponse
Impedance
R.M.S
Requirements
R.M.S
Frequency
tenninals) (H x w x
DJ
601
lz
- 35kHz
87dB
110.8
dBA
100W
25-100W
3kHz
250
X
140
X 140mm
3.95Kg
(Bib
12oz)
9
~Hlx5
'2
x5
1
•
50llz-35kHz
90dB
116.SdBA
200W
50-200W
600Hz
& 3kHz
610
X
140
X 100mm
6.85Kg (15Ib 2oz)
24x5
ri
x3'
~
Low
Mains
Input
Voltage
Dimensions
Upper
Amplifier
BassEQ
Input
(Including gr/lie,
Frequency
Frequency
Limit
Output
Modes
Impedance
(Automatically
amp&feet)
Weight
Limit
Selected)
(HxWxD)
Variable40
Music, Movie/ 110
120
Vac,
220
240
380
x
340
x
410
mm 22.56 kg
21Hz
120
Hz C
24d8/
5UU Watts (RMS)
>20KOhms
Octave
Impact Vac
50/60Hz
14
'
15
x13l--1x16a•
(491bs
10oz)
 Loading...