The MO-MC-L6 Full Moon Backlight LED Clock is a versatile and aesthetically pleasing device designed to serve as both a clock and a nightlight, offering a range of features to enhance your living space.
Function Description
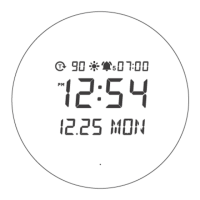
This LED clock is designed to mimic the bright full moon in the night sky, providing a soothing ambiance. It operates in three distinct modes: Clock, Nightlight, and a combination of Nightlight & Clock. Users can choose from three nightlight colors and control their brightness, allowing for the creation of various atmospheres. The device offers two types of standing options: it can be used as a wall clock or a desk clock, making it adaptable to different environments. Its modern interior design is complemented by a sophisticated wooden stand. The LED display features four levels of brightness control, including an auto-brightness function, ensuring optimal visibility in any lighting condition.
For convenience, the clock includes a choice of weekday or weekend alarms. A unique "Sunrise Nightlight" feature allows for a refreshing wake-up experience, accompanied by various melodies and nature sounds. Additionally, a "Timer Nightlight" function supports an auto-off feature for up to 120 minutes, perfect for winding down before sleep. The device is designed for simple operation, with control options available directly on the main body or via a remote control. It also boasts memory functions for time, alarm, nightlight, and display settings, ensuring your preferences are retained even after power interruptions.
Important Technical Specifications
- Rated Input: DC 5V 2A
- Nightlight Color Temperature: 2000K, 4000K, 5500K
- Number of LEDs: 79
- LED Lifespan: Approximately 30,000 hours
- Luminous Flux: 23lm
- Power Consumption: Max. 2W
- Material:
- Main body: PVC, MDF, ABS, PS
- Wooden stand: Solid wood (Oak tree)
- Weight:
- Main body (excluding cable): Approximately 877g
- Wooden stand: Approximately 208g
- Remote control: Approximately 15g
- Size:
- Main body: Φ 295 X 30mm (W X D)
- Wooden stand: 100 X 95 X 50mm (W X D X H)
- Remote control: 40 X 86 X 7mm
- Components: Main body (including CR2032 battery for time memory), Remote control (including CR2025 battery), Wooden desk stand, Adaptor (5V 2A), 5m USB cable, Manual.
- Power: 5V 2A power adaptor (included)
- Cable Length: 5m
- Operating/Storage Temperature: 0°C~40°C / 10°C~30°C
- Manufacturer: Mooas Inc.
Usage Features
Initial Setup:
Upon connecting the included USB cable to the power port and then to the adaptor, the LED display will illuminate. Settings can then be adjusted using buttons on the back of the product or the remote control. Before first use, remember to remove the protective film from the coin battery at the back, which is essential for time setting and memory retention. To initialize settings, simultaneously press the "SET" (time setting) and "ALARM" (alarm setting) buttons on the back for 3 seconds. The included 2-pin USB cable should be handled gently; avoid pulling it with excessive force and always pull from the front port using your thumb and index finger to remove it.
Time and Date Setting:
- 12/24H Mode: A short press of the "SET" button toggles between 12-hour and 24-hour modes.
- Setting Time/Date: A long press of the "SET" button initiates the setting process, causing the relevant numbers to blink. Use the "UP" and "DOWN" buttons to adjust numbers, with a long press enabling continuous adjustment.
- Navigation: After setting a value, a short press of the "SET" button moves to the next step in the sequence: Hour -> Minute -> Year -> Month -> Day -> Language. The default time is 00:00.
- Confirmation: Once all settings are complete, press the "SET" button to confirm and return to time display mode. If no operation occurs for about 15 seconds, the current settings will be automatically confirmed.
Alarm and Sunrise Nightlight Setting:
- Alarm ON/OFF/Weekday Alarm: A short press of the "ALARM" button cycles through Alarm ON, Weekday alarm, and OFF.
- Setting Alarm: A long press of the "ALARM" button starts the alarm setting, with numbers blinking. Use "UP" and "DOWN" buttons to adjust numbers, melodies, and sunrise time. Long press for continuous adjustment.
- Sequence: After setting, a short press of "ALARM" moves through: Hour -> Minute -> Melody -> Sunrise time setting. Default alarm is 7 a.m. with a 30-minute sunrise time.
- Melody Sequence: Beep -> Melody 1 -> Melody 2 -> Bird sound -> Rain sound.
- Sunrise Time Sequence: 30 minutes -> 20 minutes -> 10 minutes -> OFF.
- Confirmation: Press "ALARM" to confirm and return to time display. An alarm icon and set alarm time will be displayed when activated. Settings are confirmed after 15 seconds of no operation.
- Turning Off Alarm: When the alarm rings, press any button on the back or remote control to turn it off. If no button is pressed, the alarm rings for 2 minutes and then stops, repeating at the same time the next day.
Nightlight Setting (On Product):
- ON/OFF and Brightness: Press the nightlight button to turn the nightlight ON/OFF and control brightness.
- Short Press: Cycles through brightness levels: ON / 100% (Max) -> 70% -> 40% -> 20% (Min) -> Repeat.
- Long Press: Turns the nightlight OFF.
- Color Change: When the nightlight is ON, short press the nightlight button twice to change color.
- Sequence: Warm white (2700K) -> Natural white (4000K) -> Cool white (5500K).
Nightlight Setting (Remote Control):
- ON/OFF and Color: Press the nightlight button to turn ON/OFF and set the color.
- Short Press: Cycles through: Nightlight ON / Warm white (2700K) -> Natural white (4000K) -> Cool white (5500K) -> Repeat.
- Long Press: Turns the nightlight OFF.
- Brightness Control (when nightlight is ON): Use the brightness adjustment button.
- Sequence: 100% (Max) -> 70% -> 40% -> 20% -> Repeat.
- Default: Warm white (2700K) at maximum brightness. Previous settings are remembered.
Nightlight Timer Setting:
- Timer ON/OFF: Short press the nightlight timer button.
- Setting Timer Time: Long press the nightlight timer button.
- Adjustment: While setting, numbers blink. Use "UP" and "DOWN" buttons to increase or decrease.
- Sequence: 30 minutes -> 60 minutes -> 90 minutes -> 120 minutes -> 10 minutes -> 20 minutes.
- Default: 30 minutes.
- Confirmation: Press the nightlight timer button to confirm and return to display mode. Settings are confirmed after 15 seconds of no operation.
- Note: When the nightlight is turned off, the timer also turns off.
Display Setting:
- Brightness Control: Short press the display button to control brightness.
- Sequence: Level 4 (Brightest) -> Level 3 -> Level 2 -> Level 1 (Dimmest) -> OFF -> Repeat.
- Default: Level 4 (Maximum brightness).
- Turning On Display: If the display is OFF, press any button to turn it on at maximum brightness.
- Auto Brightness Control: Long press the display brightness button until the display blinks twice to activate auto brightness control.
- In this mode, brightness is automatically adjusted by the illuminance sensor.
- Default: Auto brightness control OFF.
Maintenance Features
- Remote Control Issues: If the remote control is not operating properly, separate both the battery and cable at the back of the product and reassemble them.
- Cleaning: Keep the clock and power cable free from foreign materials.
- Storage: When not in use for a long time, pull out the power cord before storage.
- General Care: Keep out of reach of children. Do not remove or disassemble screws.
- Damage/Malfunction: Do not disassemble, repair, or modify the product if it is damaged or not functioning properly.
- Product Specifications: Product specifications may be changed without notice to improve performance.
Precautions:
- Use only the included adaptor and cable.
- Do not touch the power cord with wet hands; keep it away from water or moisture.
- Avoid bending the USB cable forcefully or pulling it when tied up. Do not extend or process the power cable.
- Do not disassemble or modify the product.
- Do not use the product in highly humid areas, as this may cause malfunction.
- Do not install the clock near flammable objects, heating machines, or areas with direct sunlight.
- Do not use the product for purposes other than its intended use.
- Avoid using the product in unstable or tilted areas, as this poses a risk of injury or damage.
- Watch out for shock and fire.
- Do not place the product in areas exposed to direct sunlight.