SETTING UP THE PUMP
1 Install 2 new “C” size alkaline batteries (Duracell ProCell)
or connect Battery Pack, or AC adapter to port at bottom
of pump.
2 Prepare IV bag and attach a new administration set.
3 Eliminate all air from the bag and the administration set
(see PRIMING THE SET).
4 Install set and close pump door.
5
Attach set to venous access device using agency protocol.
NOTE: If a Check Valve Adapter is provided with your
administration set, remove it from the package and
connect it to the distal end of the set.
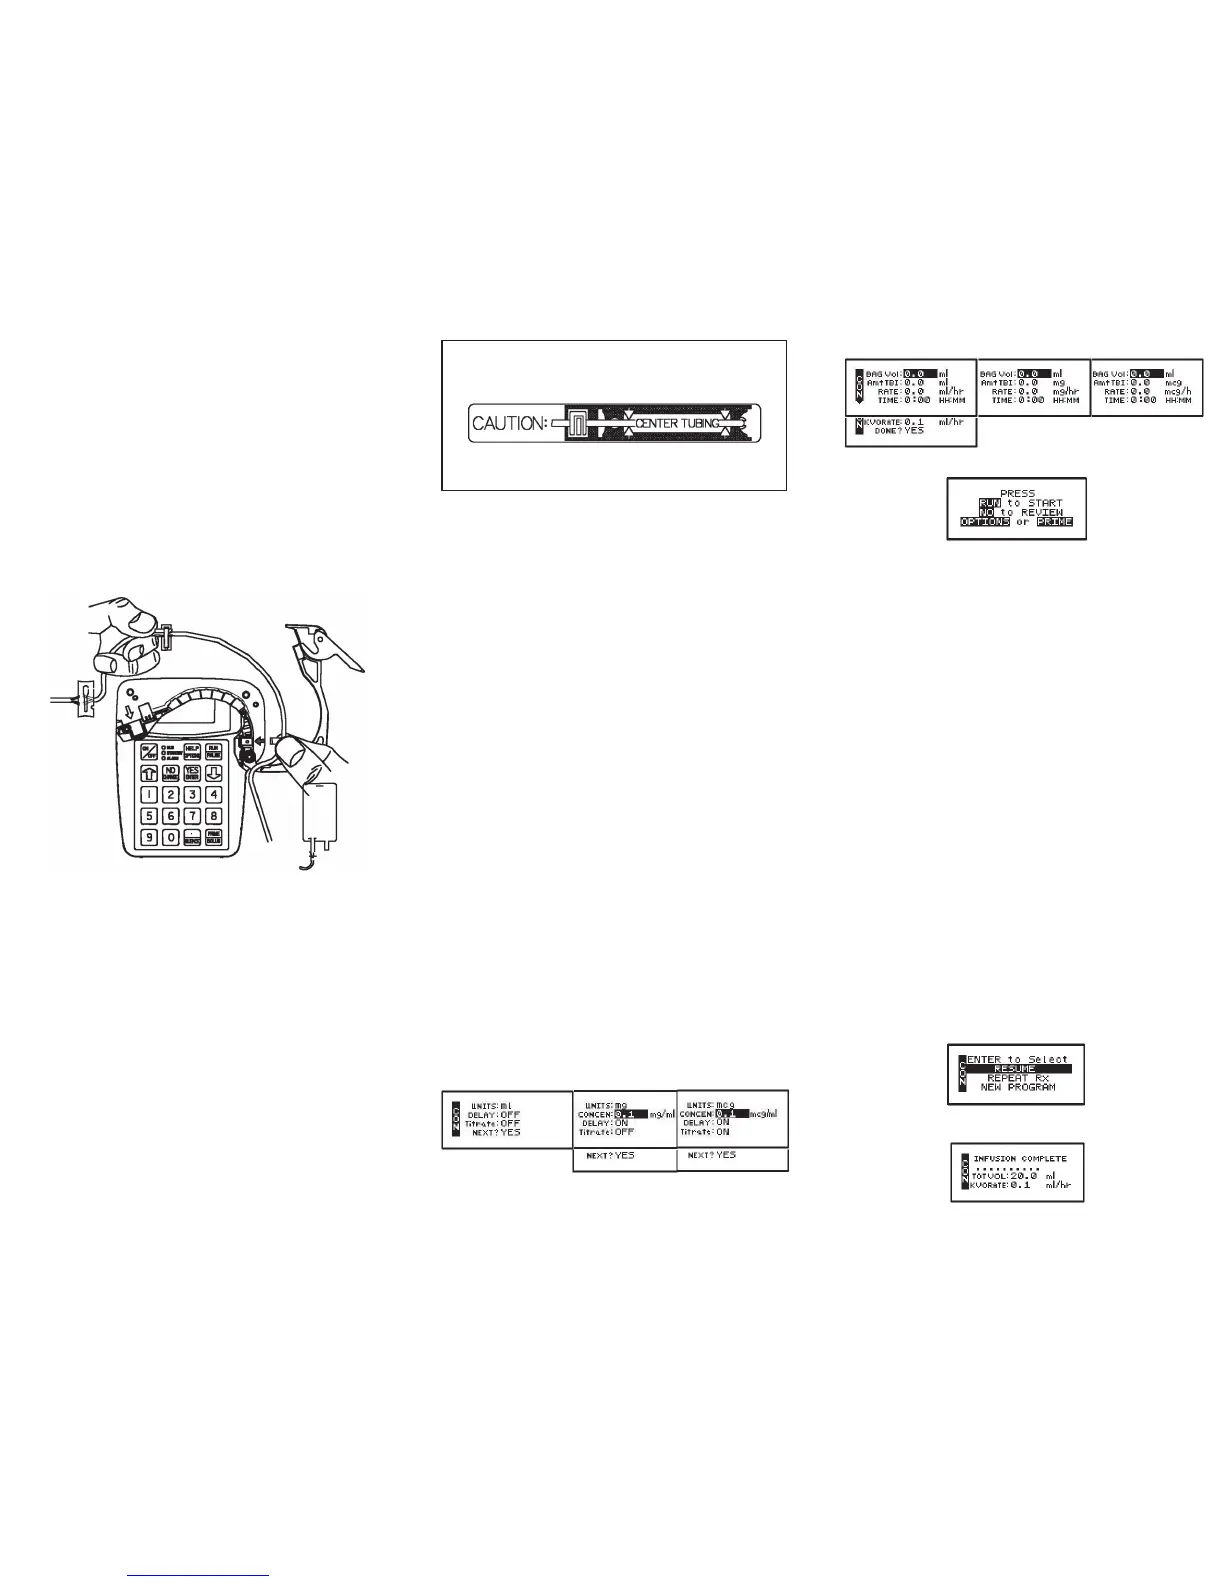
INSTALLING THE ADMINISTRATION SET
1 Fully open the door of the pump.
2 Close the slide-clamp on the administration set.
3 Activate the Integral “Flow-Stop” by twisting and removing
the breakaway tab.
4 Insert the blue tubing guide into the receptacle on right
side of pump in the direction of the blue arrow, positioning
the tubing in front of the door hinge.
5 Center the tubing in the middle of the pumping ngers,
covering the yellow dot.
6 Holding the yellow Integral “Flow-Stop” by the handle,
insert it on an angle into the receptacle on the left side of
the pump in the direction of the yellow arrow.
CAUTION: Do not press down on the top of the
Integral “Flow-Stop” when inserting it into the
receptacle. This action could inadvertently open the
Integral “Flow-Stop” and allow uid to ow through
the tubing.
7 Open the slide-clamp on the administration set.
8 Push the tubing slightly into the black Air Detector slot.
9 Fully close the door of the pump and latch it securely.
ImportantNotication
A lack of compliance with proper positioning of the
tubing could result in infusion inaccuracies.
Please center the tubing in the pumping area when
installing the administration set.
PROGRAMMING FOR CONTINUOUS THERAPY
USING MANUAL MODE
1 Turn the pump on.
2 Observe the self-test, the LED lights, and the power
source screen.
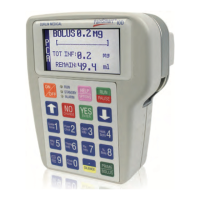
3 Select PROGRAM from the rst selection menu.
4
Select NEW PROGRAM to program a new therapy manually.
5 If multiple therapies are available, select CONTINUOUS
from the therapy selection menu.
6 Complete the pre-prescription menu:
NOTE: Press YES at each eld to conrm each value.
7 Then complete the prescription menu:
8 Select from the Run/Options menu:
Press NO to review prescription, OPTIONS to view options
menu, PRIME to prime set, or press RUN key to start infusion.
PRIMING THE SET
CAUTION: Disconnect set from patient’s access site before
priming. Sets with in-line ASV must be primed on the pump.
By Gravity:
1 Twist and remove breakaway tab from “Flow- Stop”.
2 Squeeze “Flow-Stop” between thumb and forenger to
allow uid to ow through tubing.
By Pump:
NOTE: Set must be installed into the pump.
1 Release any clamps on the administration set.
2 Press and release PRIME key from “Run Options” menu
3 Press and hold the PRIME key until set is free of air;
release key to stop (each prime cycle allows up to 6 mL
of uid).
4 When prime is complete, press YES/ENTER to exit the
prime screen.
Once pump is infusing
While CONTINUOUS infusion is running, the display will
alternate between various information screens.
To interrupt or pause an infusion, press RUN/PAUSE key.
Select from the pause menu: Select RESUME to continue
therapy without interruption. Select REPEAT Rx when hang-
ing a new bag.
9 When the infusion is complete, the following screen
displays:
10 To stop a therapy, press PAUSE then turn pump off.
PROGRAMMING FOR CONTINUOUS THERAPY
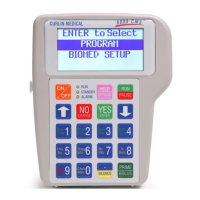
USING PROTOCOL LIBRARY
1 Turn the pump on.
2 Select LIBRARY.
3 Select NEW PROGRAM to choose a therapy.
4 Select CONTINUOUS from the therapy selection menu.
5 Select specic drug protocol.
6 Accept YES.
7 Press YES on screen that says: Alert Rx PROGRAM,
press YES to erase Rx.
8 Note advisory if any.
9 Accept or adjust pre-programmed prescription values
per order to complete the menu.
10 Make selection from the Run/Option menu: Press NO
to review prescription, OPTIONS to view options menu,
PRIME to prime set, or press RUN key to start infusion.
NOTE: Press YES at each eld to conrm every value.
 Loading...