INSTRUKTION / INSTRUCTION
2
Rev. 002 – 12.10 . MA nr 1003298
2
Mora Rexx Shower system
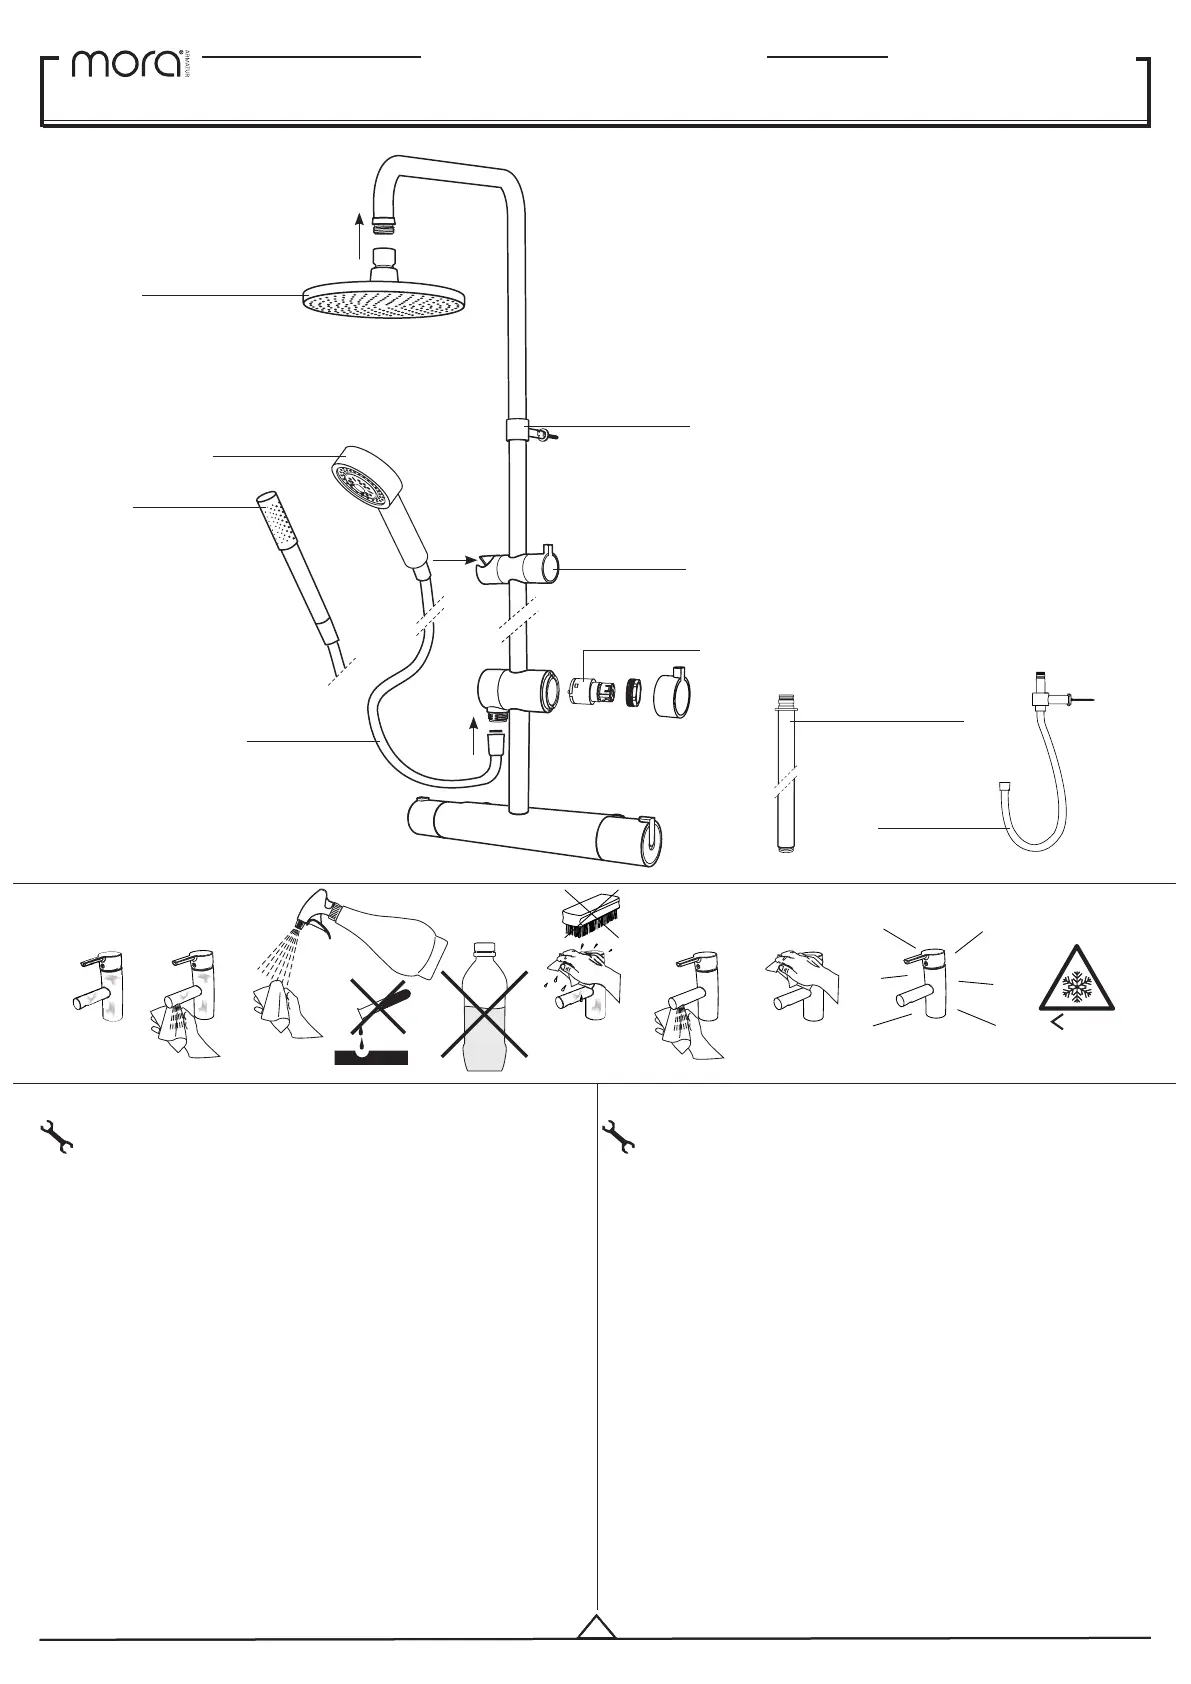
MONTERING
A Om Mora Rexx/Inxx/Cera termostatblandare med utlopp upp demontera
utloppsnippeln på duschblandaren [1]. Montera korta röret på blandaren [2]. Drag
fast röret [3]. Om utvändig gänga på blandare används övergångskoppling A:2.
B Tryck fast omkastaren [1]. Lås den i önskad position genom att dra åt låsskruven [2].
C Borra hål i vägg 775 mm över omkastaren och montera väggkonsoll. Om röret
kapas, grada rörändan och anpassa måttet så hålet hamnar i skarven mellan långa
röret och taksilsröret.
OBS: Täta med silikon.
D Tryck in expansionskoppling, håll den fixerad och dra åt med insexnyckel 8 mm [1].
Trä över gliddel [2]. För att försäkra vredets position på gliddelen i fast läge dra åt den,
om nedåt vänd på gliddel. Trä över väggfäste [3]. Skruva fast taksilsrör [4]. Montera rör
på väggkonsoll [5].
E Tryck in överrör i omkastaren [1]. Lås med låsskruv [2]. Tryck fast vredet [3] på
omkastaren. Lås vredet med låsskruven [4].
Ett visst efterdropp kan förekomma. För att minska efterdroppet kan omkastaren
efter dusch lämnas i mellanläge (45°).
Uttjänta produkter kan återlämnas till Mora Armatur för återvinning.
ASSEMBLY
A If the Mora Rexx/Inxx/Cera thermostatic mixer has an outlet on top, remove the
outlet nipple from the shower mixer [1]. Fit the short pipe to the mixer [2]. Tighten the
pipe [3]. If the mixer has an external thread, use the adapter A:2.
B Slide on the diverter [1]. Lock it in the desired position by tightening the locking
screw [2].
C Drill a hole in the wall 775 mm above the diverter and fit the wall bracket. If the
pipe has to be cut, deburr the end of the pipe and adjust the length so that the hole is
level with the joint between the long pipe and the spray head pipe.
NOTE: Seal with silicone sealant.
D Press in the expansion coupling, hold it in place and tighten with an 8 mm Allen key
[1]. Slide on the slider [2]. Tighten the knob on the slider to check its position when
locked. If it points downwards, reverse the slider. Slide on the wall mounting [3]. Screw
the spray head pipe into place [4]. Fix the pipe to the wall bracket [5].
E Fit the upper pipe into the diverter [1]. Fix with locking screw [2]. Fit the knob [3] to
the diverter. Fix the knob with the locking screw [4].
There may be a slow drip. To reduce dripping after showering, leave the diverter in the
midway position (45°).
Products can be returned to Mora Armatur for recycling at the end of their life.
SVENSKA ENGLISH
13 03 56 (S5)
13 11 92 Ø220
13 99 06
13 03 57
13 98 35
20 95 34 (S6)
40 94 17
ALCOHOL
SOAP
(pH 6-9)
0°C
13 03 66 400 mm
13 03 67