The Morningstar ML5 is a MIDI-controlled audio loop switcher designed to integrate non-MIDI-capable effects pedals into a MIDI controller setup, providing comprehensive control over a user's rig. It features five audio loops, each controllable via dedicated switches, allowing users to engage or bypass individual effects as part of their signal chain.
Front Panel Features:
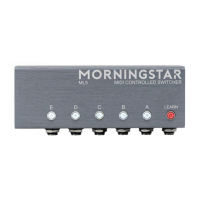
The front panel of the ML5 includes five switches labeled A through E, corresponding to the five audio loops. When a switch is illuminated, the associated loop is engaged, meaning the effect pedal connected to that loop is active in the signal chain. Conversely, when a switch is unlit, the loop is bypassed, and the effect pedal is removed from the signal path. This visual feedback makes it easy to see which loops are active at a glance.
A "LEARN" button is also prominently featured on the front panel. This button is crucial for saving presets. When pressed, the LEARN button blinks, indicating that the ML5 is in learn mode, ready to receive a Program Change (PC) message from a MIDI controller. Once a PC message is received, the button flashes quickly, confirming that the current configuration of engaged loops has been saved as a preset. This allows users to recall complex effect setups with a single MIDI command.
Side Panel Features:
The side panel of the ML5 provides the MIDI input and output connections. The "MIDI IN" port is where the ML5 receives MIDI messages from a MIDI controller, enabling it to respond to commands for engaging loops and recalling presets. The "MIDI OUT" port allows MIDI messages to flow through from the ML5 to other MIDI-compatible devices in a chain. It's important to note that the ML5 itself does not generate any MIDI messages; it acts as a pass-through for MIDI data.
Back Panel Features:
The back panel is where all audio connections are made, along with the power input.
- "IN": This is the starting point of the audio chain. The main audio input from the instrument or preceding pedalboard section connects here.
- "OUT": This is the end point of the audio chain. The final processed audio signal exits here to the amplifier or next stage in the signal path.
- "SENDS [A] to [E]": These are the outputs from each of the five audio loops. Users connect the "SEND" jacks to the inputs of their individual effect pedals.
- "RETURNS [A] to [E]": These are the inputs for each of the five audio loops. Users connect the outputs of their effect pedals to the corresponding "RETURN" jacks. This completes the loop for each effect, allowing the ML5 to switch them in and out of the signal path.
- "9VDC": This is the power input. The ML5 requires a 9VDC center-negative power supply, with a minimum current rating of 160mA.
Usage Features:
Saving a Preset:
Saving a preset is a straightforward process:
- Select Loops: Users first choose which audio loops they want to be active for a particular preset by pressing the corresponding switches (A-E) on the front panel. The illuminated switches indicate engaged loops.
- Enter Learn Mode: Press the "LEARN" button. It will start blinking, signaling that the ML5 is in learn mode.
- Send Program Change: From a MIDI controller, send a Program Change (PC) message of choice. The LEARN button will flash quickly to confirm that the selected loop configuration has been saved to that specific PC message. This allows the user to recall this exact setup by sending the same PC message from their MIDI controller.
Global Settings - MIDI Channel:
The ML5's MIDI channel can be configured to ensure it receives messages from the correct controller.
- Accessing MIDI Channel Settings: Hold down Switch E while powering up the ML5. Once powered up, release Switch E. The LEARN button will flash quickly and continuously.
- Setting Options:
- Omni Mode (Switch A): Pressing Switch A sets the ML5 to receive messages on all MIDI channels.
- Specific Channels (Switches B-E): Pressing Switches B, C, D, or E sets the ML5 to MIDI channel 1, 2, 3, or 4, respectively.
- Learn MIDI Channel (Send PC/CC Message): Sending a PC or Control Change (CC) MIDI message to the ML5 through a particular MIDI channel will set the ML5 to receive messages on that specific MIDI channel.
Muted Switching:
The ML5 is designed to minimize switching noise. However, some pedals, particularly those with internal charge pumps, might still produce noise or a "pop" sound when engaged or disengaged. The ML5 offers a muted switching function to address this.
- Accessing Muted Switching Settings: Hold down Switch D before powering up the ML5. Once the LEARN button is lit, release Switch D. The LEARN button will blink continuously, and any loops currently programmed for muted switching will have their blue LEDs illuminated.
- Editing Muted Loops: From this state, users can select the loops they wish to mute during switching by pressing their respective switches. Once the desired loops are selected, press the LEARN button to save these settings. This ensures that the audio signal is momentarily muted only when those specific loops are being switched, preventing unwanted noise.
Muted Switching Timing:
The timing of the mute can also be adjusted.
- Accessing Muted Switching Timing Settings: Hold down Switch C before powering up the ML5. Release Switch C once the LEARN LED lights up and starts blinking.
- Adjusting Delay: Users can select between the shortest delay (Switch E) and the longest delay (Switch A) for the mute function, allowing for fine-tuning based on their specific pedal setup.
PC Toggle:
The PC Toggle feature allows the ML5 to alternate between active and bypass states for a set of loops when receiving a specific PC message.
- Accessing PC Toggle Settings: Hold down Switch B before powering up the ML5. The LEARN LED will blink to acknowledge the setting.
- Functionality: If, for example, loops A, B, and C are active, and a PC message configured to engage these loops is sent, those loops will instead bypass. By default, this feature is disabled.
- Note: For early batches of ML5s (serial number less than #10020), this feature was permanently enabled. Users who prefer to disable it can contact Morningstar for a replacement chip.
MIDI Implementation Mode:
The ML5 offers two distinct MIDI implementation modes, applicable to ML5s built from 2020 onwards.
- Accessing MIDI Implementation Mode Settings: Hold down Switch A before powering up the ML5. The LEARN LED will blink to acknowledge the setting.
- Mode 1 (Default):
- CC 0: Values 0-63 bypass all loops; values 64-127 engage all loops.
- CC 1-5 (Loops A-E): Values 0-63 bypass the individual loop; values 64-127 engage the individual loop.
- CC 6-10 (Loops A-E): Any value toggles the individual loop on and off.
- Mode 2:
- CC 9: Values 0-63 bypass all loops; values 64-127 engage all loops.
- CC 20-24 (Loops A-E): Values 0-63 bypass the individual loop; values 64-127 engage the individual loop.
- CC 25-29 (Loops A-E): Any value toggles the individual loop on and off.
Maintenance Features:
Factory Reset:
The ML5 includes a factory reset function to restore all settings to their default values.
- Performing a Factory Reset: Hold down Switches A, C, and E simultaneously while powering up the ML5. This action will erase all saved preset settings and reset the MIDI channel to 1. This is useful for troubleshooting or starting fresh with a new configuration.