Do you have a question about the Morphy Richards Latitude 48970 and is the answer not in the manual?
Appliance suitable for children 8+ and those with reduced physical/sensory abilities with supervision.
Do not run mixer for longer than 10 mins; switch off and cool down for 3 mins to prevent overheating.
Ensure attachments stop rotating before lifting the mixer head to prevent injury.
Covers location, surfaces, flames, cable routing and strain for safe operation.
Covers moving parts, electrical shock, damaged cords, misuse, unplugging, hot liquids, and sharp blades.
Details voltage, fuse replacement, and the requirement for the appliance to be earthed.
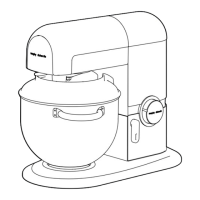
Detailed list of all parts and components of the Morphy Richards Latitude Stand Mixer.
Clean all removable parts in warm soapy water and dry thoroughly before the first use.
Lift the head unit by pressing the release lever; it will lock upright with an audible click.
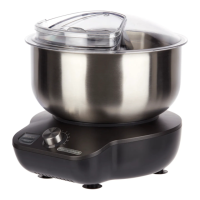
Place the mixing bowl into the base unit recess and turn clockwise to lock it securely.
Insert the attachment onto the drive shaft and twist anticlockwise to lock it via the attachment pin.
Add ingredients to the mixing bowl, ensuring not to exceed the maximum quantity of 1.5kg.
Press the release lever and lower the head unit until it locks in position with an audible click.
Plug the stand mixer into the mains power outlet.
Use the speed selector to start the mixer, increase speed, or use the pulse function for short bursts.
Turn off the mixer, lift the head unit, and remove the attachment from the drive shaft.
Unlock and remove the mixing bowl by twisting it anticlockwise from the base unit.
Do not operate continuously for more than 10 minutes; allow a 3-minute cool-down period.
Do not overfill the bowl (max 1.5kg). Be careful with hot food as the bowl can become hot.
Prevents splashing and allows ingredient addition during mixing via a specific opening.
Ensure no attachments are fitted and the head unit is lowered before placing the mixing bowl.
Lift the blender cover off the back of the head unit using both hands.
Add ingredients to the blender jug, place the lid and filler cap securely.
Place the blender jug in the socket and twist anticlockwise to lock it into position.
Connect to mains, select speed 1 or pulse setting to start the blender.
Switch off, allow the motor to stop, then unlock and remove the blender jug.
Details on Dough Hook, Beater, and Whisk attachments and their specific uses.
Advice on blender operation, ingredient addition, cleaning, and capacity limits.
Guidance on cleaning the main unit and attachments, emphasizing safety precautions.
Provides contact numbers for customer support, spares, and online resources.
Information on extending the standard 2-year guarantee to 5 years by registering online.
Details on the standard 2-year guarantee, proof of purchase, and fault reporting.
Lists conditions under which Morphy Richards is not liable to repair or replace goods.
States the company's policy of continuous improvement and the right to change specifications.
| Brand | Morphy Richards |
|---|---|
| Model | Latitude 48970 |
| Category | Mixer |
| Language | English |