EasyManua.ls Logo

Motorola LUX85CONNECT - User Manual

Motorola LUX85CONNECT
12 pages
Print Icon
To Next Page IconTo Next Page
Loading...
MODELS:
LUX85CONNECT,
LUX85CONNECT-2,
LUX85CONNECT-3,
LUX85CONNECT-4
UK EN
QUICK START GUIDE
For a full explanation of all features and instructions, please refer to the User’s Guide.
(available for download from www.motorolastore.com).
1. Contents Inside Box
x 2
Baby Unit
(Camera)
Magnetic
Mount
Parent Unit Power Adapters Quick Start
Guide
Top Clamp Bottom Clamp Gooseneck 4-Poles with
stand base
WARNING:
Strangulation hazard. Children have STRANGLED in cords. Keep this cord out
of the reach of children (more than 1 metre away). Do not remove the tags from
the AC Adapters. Only use the AC Adapters provided.
Question and Answer IconNeed help?

Do you have a question about the Motorola LUX85CONNECT and is the answer not in the manual?

Summary

Contents Inside Box

Setting up your Digital Video Baby Monitor

Connecting the Power Supply for the Baby Unit

Connects the baby unit to power for operation.

Fixing magnetic mount on the wall

Instructions for securely mounting the camera unit on a wall.

Setting up your Digital Video Baby Monitor

Connecting the Power Supply of the Parent Unit

Connects the parent unit to power for charging and operation.

Desktop Stand of the Parent Unit

Guide to setting up the parent unit for desktop use.

Setting up the Baby Unit for Wi-Fi internet viewing

Install Hubble Connected App

Steps to download and install the mobile application for remote viewing.

View on Compatible Smartphones, Tablets and Computers

How to access the live camera feed using the app and web portal.

Installation of Cot mount

Cot Mount Assembly and Attachment

Steps to assemble and attach the cot mount to the crib.

Top Clamp Orientation for Mounting

How to adjust the top clamp for vertical or horizontal mounting on crib rails.

Installation of Cot mount

Securing the Cot Mount Poles

Instructions for inserting and securing the support poles using clamps.

Choking Hazard Safety Warning

Critical safety warning about small parts and potential choking hazards for children.

Installation of Cot mount

Gooseneck and Camera Unit Installation

Steps for installing the flexible gooseneck and attaching the camera.

Final Setup and View Adjustment

Connecting power and adjusting camera view via the parent unit.

General Information

Contact Customer Service

Contact details for customer support and assistance.

Limited Warranty Information

Overview of the product's limited warranty terms and conditions.

General Information

Warranty Limitations and Coverage

Details on what the warranty covers, its duration, and limitations.

General Information

Warranty Exclusions

Specific conditions and scenarios that are not covered by the warranty.

Obtaining Warranty Service

Procedures and requirements for submitting a warranty claim or requesting service.

General Information

Product Disposal and CE Declaration

Information on environmentally responsible disposal and regulatory compliance declarations.

Overview

This document provides a quick start guide for the Motorola Digital Video Baby Monitor, outlining its contents, setup procedures, basic operations, and warranty information.

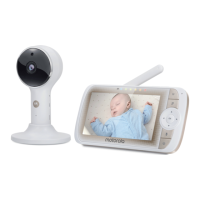
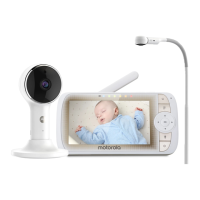
The device is a digital video baby monitor system designed to allow parents to monitor their baby remotely. It consists of a Baby Unit (camera) and a Parent Unit, along with various accessories for mounting and power. The system offers both local monitoring via the Parent Unit and remote viewing via Wi-Fi® internet viewing through a compatible smartphone, tablet, or computer.

Function Description:

The core function of this device is to provide real-time video and audio monitoring of a baby. The Baby Unit, equipped with a camera, captures video and audio from the baby's room. This feed is then transmitted to the Parent Unit for local viewing and listening. Additionally, the system supports Wi-Fi® connectivity, enabling remote access to the camera feed through the Hubble Connected App on smart devices or a web browser on a computer. This dual monitoring capability ensures that parents can keep an eye on their baby whether they are at home or away.

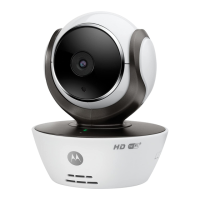
The Baby Unit features a camera that can be tilted and panned remotely from the Parent Unit, allowing for adjustment of the viewing angle to cover different areas of the crib or room. It also includes a microphone to pick up the baby's sounds.

The Parent Unit serves as the primary interface for local monitoring. It has an LCD screen to display the video feed from the Baby Unit and speakers to play the audio. The Parent Unit also includes controls for various functions, such as adjusting camera tilt and pan, volume control, and accessing menu options. A talk-back function allows parents to speak to their baby through the Baby Unit's speaker.

The Wi-Fi® internet viewing feature extends the monitoring capability beyond the home network. By connecting the Baby Unit to a Wi-Fi® network and using the Hubble Connected App, parents can view the live camera stream from anywhere with an internet connection. This feature requires a compatible smartphone or tablet (iOS 9.0, Android™ 5.0 or higher) and a minimum upload bandwidth of 0.6 Mbps.

Usage Features:

The baby monitor system is designed for ease of use, from setup to daily operation.

Setup:

  1. Power Supply Connection: Both the Baby Unit and Parent Unit require power adapters. The Baby Unit connects directly to a power socket using its supplied DC5V/1000mA adapter. The Parent Unit also uses a 5VDC/1000mA adapter and includes a rechargeable Lithium-ion battery (2000mAh) for portable use, providing up to 5 hours of operation. It is recommended to charge the Parent Unit for at least 16 hours before first use.
  2. Magnetic Mount Installation: The Baby Unit can be mounted on a wall using a magnetic mount. This involves marking screw holes, installing wall anchors (not provided), fastening mounting screws (not provided), and positioning the cable behind the base before attaching it to the wall.
  3. Desktop Stand for Parent Unit: The Parent Unit has a built-in stand ring that can be moved downward and rotated 90 degrees to set up a desktop stand.
  4. Cot Mount Installation: A cot mount with cable management is included for optimal viewing. This involves joining four poles and a support base. The top clamp of the cot mount can be adjusted for vertical clamping on the top rail or horizontal clamping on the slats of the crib. The camera unit is then inserted into the gooseneck extension, which is installed into the top post of the cot mount. The power adapter for the camera unit is connected, and the gooseneck can be adjusted for the desired viewing angle. The Parent Unit allows for different zoom factors (1x, 1.5x, or 2x) to optimize the view.
  5. Wi-Fi® Internet Viewing Setup: To enable remote viewing, users need to install the Hubble Connected App on their smart device by scanning a QR code or downloading it from the App Store or Google Play™ Store. After opening the app, users create a Hubble account and follow in-app instructions to connect their device. They can then log in to their account via the app or a web browser to access the live camera stream.

Basic Operation of Keys:

  • ON/OFF button (Parent Unit): Press and hold to switch the Parent Unit on or off.
  • UP/DOWN buttons (Parent Unit): Tilt the camera image upward or downward; adjust menu settings when the menu is active.
  • LEFT/RIGHT buttons (Parent Unit): Pan the camera image left or right; access menu options when the menu is active.
  • MENU button (Parent Unit): Open menu options or exit the menu.
  • OK button (Parent Unit): Confirm a selection.
  • VIDEO button (Parent Unit): Turn the LCD screen on or off.
  • TALK button (Parent Unit): Press and hold to talk to the baby.
  • Volume button (Parent Unit): Press -/+ to select the volume level.
  • RESET button (Parent Unit): Press and hold with a small pin to reset the unit.
  • PAIR button (Baby Unit): Press and hold to pair with the Parent Unit or for Hubble Wi-Fi® Setup.

Maintenance Features:

The manual emphasizes several important safety and maintenance considerations:

  • Strangulation Hazard: A critical warning highlights the strangulation hazard posed by cords. Users are instructed to keep cords out of reach of children (more than 1 meter away) and not to remove tags from AC Adapters. Only the provided AC Adapters should be used.
  • Power Adapter Usage: Only the supplied power adapters (DC5V/1000mA for Baby Unit, 5VDC/1000mA for Parent Unit) should be used to ensure proper functioning and safety.
  • Choking Hazard: During installation, particularly for the cot mount, a warning about small parts and choking hazard is given. Parents are advised to exercise caution and keep children under 5 away from the installation area.
  • Warranty Information: The product comes with a limited warranty from Binatone Electronics International LTD. The warranty covers defects in materials and workmanship under normal consumer usage. Consumer products are covered for one year from the original purchase date, while consumer accessories are covered for ninety days. Repaired or replaced products/accessories are covered for the balance of the original warranty or ninety days, whichever is longer.
  • Exclusions from Warranty: The warranty does not cover normal wear and tear, abuse and misuse (improper operation, storage, accidents, contact with liquids, extreme heat, commercial use, etc.), use of non-Motorola branded products/accessories, unauthorized service or modification, altered products (removed/altered serial numbers, broken seals, mismatched parts), or communication service failures.
  • Obtaining Warranty Service: To obtain service, customers need to contact customer service, provide the product/accessory, original proof of purchase, a completed warranty card (if included), a written description of the problem, and their address and telephone number.
  • Disposal of the Device: At the end of its life cycle, the device should not be disposed of with normal household waste. It should be taken to a collection point for the recycling of electrical and electronic equipment, contributing to environmental protection.

The manual also provides contact information for customer service in the UK and ROI for warranty and support inquiries. It clarifies that the terms and conditions in the guide constitute the complete warranty agreement.

Motorola LUX85CONNECT Specifications

General IconGeneral
ConnectivityWi-Fi
Two-Way CommunicationYes
Night VisionYes
Remote Pan, Tilt, ZoomYes
Two-Way AudioYes
Temperature SensorYes
Display Size5 inches
DisplayColor LCD
RangeUp to 1000 feet
Power SourceRechargeable Battery
Additional FeaturesLullabies, Room Temperature Display

Related product manuals