MFH-DGS-D50IR
2
1
Unlock the two latches to open the camera cover.
Insert 4 fresh C Cell alkaline batteries into the battery compartment.
Place the batteries so the positive (+) and negative (-) polarities are
lined up correctly as indicated in the battery compartment.
Close the camera cover. When the battery indicator turns “Green”,
replace the batteries with fresh C cell alkaline batteries.
SET DATE AND TIME
In SETUP mode, the LCD will show the time. Press ENTER and the
hour will ash. Press Up( ) or Down( ) to select the proper hour,
then press ENTER again and the minute will ash. Press Up( ) or
Down( ) to select the proper minute. Press ENTER again, AM or PM
will ash. Press Up( ) or Down( ) to select the Day and Night
accordingly. Press ENTER to conrm the selections.
After setting up the time, press SELECT and the LCD will show the
year. Press ENTER and the year will ash. Press Up( ) or Down
( ) to select the proper year and press ENTER again to conrm.
After setting up the year, press SELECT and the LCD will show the
date. Press ENTER and the month will ash. Press Up( ) or Down
( ) to select the proper month, then press ENTER again and the day
will ash. Press Up( ) or Down( ) to select the proper day, then
press ENTER again to conrm.
6
INFRARED (IR) AIM
The camera can be aimed using the
infrared detection system. Slide the
MODE switch to IR AIM position.
Press and hold the ON/OFF button until
“Ir” is displayed on the LCD panel.
The IR aiming mode is now active.
Wave your hand in front of the camera.
The STATUS light will turn red every time
motion is detected. Find your desired target.
Note: The camera will shut down automatically after 2 minutes to save
battery life.
44
ON/OFF button
Turn the unit ON or OFF. To turn ON you must press and hold the
ON/OFF button until the LCD display activates.
MODE SWITCH
Depending on the position of the switch,
there are 3 possible functions: IR AIM,
SETUP and AUTO.
EVENT DELAY SWITCH
Depending on the position of the switch,
there are 4 event delay time can be set: 1
min, 5mins, 10mins and 30mins.
STATUS
BATTERY
RESOLUTION SWITCH
Depending on the position of the switch, there is one video option:
VID and two images resolution options: HI and LO
UP( ) OR DOWN ( ) BUTTON
Used to change the settings within the
SETUP mode.
SELECT BUTTON
Make selections in SETUP mode.
ENTER BUTTON
Conrm the selection in SETUP mode.
SD MEMORY CARD PORT
Insert SD card for memory with the metal
contact facing down. A SD card is required in order for the camera to
capture images/videos.
STATUS INDICATOR
To indicate a motion is detected in IR AIM
mode.
BATTERY INDICATOR
-To indicate the batteries are low, please
replace batteries with fresh batteries.
4
SETUP MODE
To change digital camera settings, the MODE switch has to be in the
SETUP position.
AUTO MODE
Turn the MODE switch to the AUTO position, press and hold the
ON/OFF button to switch on the camera. In the AUTO mode, the LCD
display shows the time(Fig1) and then counts down for 10 sec(Fig2).
The LCD goes off and the camera is STANDBY for capturing.
If a motion is detected, the camera will wake up and show the
time(Fig3). While a picture or video clip is capturing, the LCD shows
“SNAP”. After the capturing process is nished, it will show the
number of pictures or video clips remain(Fig4). Then the camera will
be in STANDBY mode again.
Fig1 Shows Time
AM
10:30
AM
10:30 0231
10
Fig3 Shows TimeFig2 Count down
10 sec
Motion detected &
Capture picture
Fig4 NO. of Pictures
remain
5
MEMORY FULL
In the AUTO mode, if the LCD shows “0000”, it means that the
memory is full. The camera will shut off automatically to save battery
life. Please insert an empty SD memory card for memory space.
LOW BATTERY
If the BATTERY indicator turns green, it means that the battery is low.
Please replace batteries with fresh batteries.
MOUNTING CAMERA
Use the mounting strap included to
mount the camera securely in the
desired location.
10
10
8
17
9
16
11
15
14
13
12
9
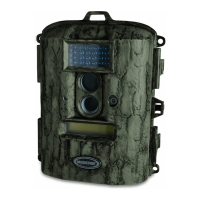
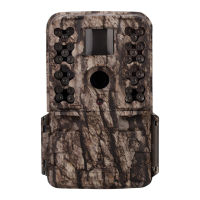
D50IR MODEL CAMERA
8. POWER ON/OFF BUTTON
9. FUNCTION SWITCHES
• MODE (IR AIM, SETUP, AUTO)
• DELAY (1, 5 , 10, 30 MINS)
• RESOLUTION (VID, HI, LO)
10. STATUS INDICATOR
11. BATTERY INDICATOR
16. BATTERY COMPARTMENT
17. 12-VOLT EXTERNAL POWER
PORT
(This camera is compatible
with the Moultrie Powerpanel
accessory to extend your
battery life. Please visit our
website at
www.moultriefeeders.com
for more information
12. SELECT BUTTON
13. CHANGE BUTTONS
(UP /DOWN )
14. ENTER BUTTON
15. SD MEMORY CARD SLOT
NOTE: Product label is inside the carmera cover.
3
GENERAL OPERATION
1. Automatic AUTO mode records images/videos using infrared
detection. ALWAYS LEAVE THE MODE SWITCH IN THE AUTO
MODE OR THE CAMERA WILL NOT OPERATE.
2. Setup SETUP mode for setting up Date and Time as described in
previous section.
3. IR Aim IR AIM mode for helping you to aim the camera towards
the object. Please consult the section 6. OPERTAION – AIMING
for detail description.
NOTE: When left inactive for more than 2 minutes in SETUP and IR
AIM mode, the camera will automatically shutdown. The camera will
need to be restarted to resume operation in SETUP and IR AIM mode.
EVENT DELAY
There are 4 different delay settings: 1 MIN., 5 MIN, 10 MIN. or 30
MIN.. Slide the DELAY SWITCH to the position of your selection.
When the game camera is in AUTO mode, it will work according to
your selected event delay.
IMAGE QUALITY AND VIDEO
There are 3 different capture settings: Video (VID), High (HI) and Low
(Lo). Please refer to the section 7 MEMORY – STORAGE/CAPCITY for
the description of each setting. Slide the RESOLUTION SWITCH to
the position of your selection. When the game camera is in AUTO
mode, it will work according to your selected capture setting.
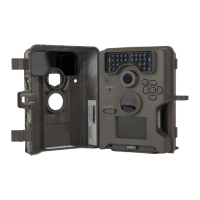
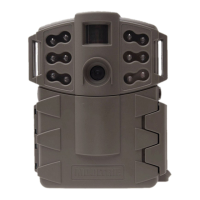
1. IR LEDs
2. CAMERA LENS
(COLOR SENSOR)
3. CAMERA LENS
(BLACK & WHITE SENSOR)
4. PIR SENSOR
5. LCD STATUS DISPLAY
6. LOCKABLE LATCHES
7. WEATHER-RESISTANT CASE
8
9
D50IR MODEL CAMERA
Operational Modes: Auto – Automatic operation
Setup – Set Date and Time
IR Aim – Infra Red Aiming object
Video: 10 seconds AVI clips
Picture Resolution (pixels): LO/HI
(See Section7, Memory • Storage / Capacity)
Format: JPEG – still images and AVI – video clips
Max. External SD Memory: UP to 16GB (optional)
Infrared Sensor: Passive, activated when motion is detected
Infrared Sensor Range: 30 ft. / 22° width
Flash: IR LEDs
Flash Range: 5 ft. - 30 ft.
Image Output: Record in SD card
Event Delay: 1 MIN., 5 MIN, 10 MIN. or 30 MIN.
LCD Display Panel: Displays Date/Time Setup and Images/
Videos Count
Power Supply: 4 Alkaline C Cells batteries
Duty Cycle: 30 days average with 4-C Cell batteries
Adjustable mounting: Mounting Strap
CAMERA – SPECIFICATIONS
14 25
7
6
3
6
7
Your camera supports external SD memory card ONLY (NO internal
memory available). The LCD shows “0000” if NO SD memory card
is inserted in AUTO mode. The camera cannot capture without
external memory.
Please inserts a SD memory card.
D50IR MODEL CAMERA
2
TURN POWER ON AND OFF
Open the camera cover. Slide the MODE switch to the SETUP
position. Press and hold the ON/OFF button until the time appear on
the LCD display. If you want to turn the unit off, simply press the
ON/OFF button again. The LCD shows “OFF” and then goes off.
NOTE: If there is no activity for 2 minutes, the camera will
automatically shut off to conserve battery life.
Time
10:30 2009 131
Press
“SELECT”
AM
Year Month & Date
D50IR Manual 18-Mar-2010