Do you have a question about the Moultrie Feeder Activator and is the answer not in the manual?
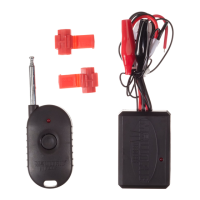
The Moultrie Feeder Activator is a remote activation system designed to allow users to remotely trigger their wildlife feeder motors from a distance of up to 300 feet. This system comprises two main components: a Receiver, which is mounted inside the wildlife feeder, and a Handheld Transmitter. When the activation button on the Handheld Transmitter is pressed, it sends a signal to the Receiver, which then activates the feeder motor for a duration of five seconds. The Transmitter is powered by an onboard battery, while the Receiver draws power from the feeder's main battery, ensuring seamless integration with existing feeder setups.
This versatile Feeder Activator is compatible with most wildlife feeders, provided they meet specific requirements. First, the feeder's battery contacts (positive and negative) must be exposed and accessible to allow for the connection of the Feeder Activator's power wires, which are equipped with alligator clips for easy attachment. Second, the two wires running between the feeder's circuit board and the motor must also be accessible, as these are necessary for connecting the Feeder Activator's motor wires. For Moultrie feeder kits, there are specific wires labeled "Feeder Activator Connection" that are designated for this purpose, simplifying the installation process. The Feeder Activator can even be used with metal feeder enclosures, as long as the Antenna Wire can be routed outside the box to ensure proper signal reception.
To begin using the Feeder Activator, users must first complete the wiring of the Receiver. For non-Moultrie kits, the process involves disconnecting the feeder battery and then connecting the Receiver's Red Motor Wire into one of the provided connectors. The positive wire running from the feeder's circuit board to the motor is then slid into the side of the same connector. This positive wire may be red, marked "positive," or simply not identified, in which case either wire can be selected. Once the wires are in place, pliers are used to squeeze the metal contact tab down until it is flush with the plastic surface, and the plastic cover is snapped shut. This entire process is then repeated for the Black Negative Wire.
For Moultrie feeder kits, the installation is streamlined. Users locate the separate wires labeled "Feeder Activator Connection +/-" and follow the same steps as for non-Moultrie kits to install the receiver wires onto these designated activator wires. This method prevents any compromise to the existing wiring between the timer circuit board and the motor on the feeder kit.
After wiring, checking the connections is crucial. The battery is connected to the feeder and then to the Receiver. The Red Wires are connected to the positive terminal (+), and the Black Wires to the negative (-) terminal. Upon proper connection, the Status Light on the Receiver will blink once. Pressing the button on the remote should then activate the feeder motor. If the light does not blink or the motor does not spin when the transmitter is pressed, the wire connections should be swapped.
Once the wiring is confirmed, the Receiver needs to be mounted. This involves removing the protective cover from the double-sided tape on the back of the Receiver and positioning it on a clean and dry surface inside the feeder. The black Antenna Wire should be routed inside the plastic feeder enclosure, ensuring it is not folded or in contact with the motor. If the feeder is in a metal enclosure, the Antenna Wire must be routed outside the box in an area inaccessible to varmints to maintain signal integrity.
To operate the unit, simply hold the Activation Button on the Handheld Transmitter. The feeder motor will run for five seconds, dispensing feed.
The Feeder Activator is designed for straightforward maintenance. The Handheld Transmitter is powered by an onboard battery, which will need replacement when its power diminishes. The Receiver, drawing power from the feeder's main battery, will continue to function as long as the feeder battery is adequately charged. Regular checks of the battery connections and the Status Light on the Receiver can help diagnose any operational issues. If the Status Light does not blink or the motor fails to activate, re-checking the wire connections and ensuring they are correctly assigned (positive to positive, negative to negative) is the first step. The design of the connectors with metal contact tabs and plastic covers helps secure the connections, but periodic inspection for wear or loosening is advisable, especially in outdoor environments. The ability to route the antenna wire outside metal enclosures helps protect it from damage and ensures consistent performance. Should any questions arise, Moultrie's service department is available for support, and product registration at www.moultriefeeders.com/warranty-form activates the 1-year warranty, providing peace of mind for users.
| Type | Remote control |
|---|---|
| Power Source | Battery |
| Battery Quantity | 1 |
| Compatibility | Moultrie Feeders |
| Function | Activates feeder |
| Range | Up to 300 feet |
| Features | Compact design |