EasyManua.ls Logo

Mountain Models P-51 Mustang User Manual

Mountain Models P-51 Mustang
33 pages
To Next Page IconTo Next Page
Page #1 background imageLoading...
Page #1 background image
1
Copyright 2005-2011 Mountain Models
www.MountainModels.com
P-51 Mustang
1/12 Scale Electric Park Flyer
Wingspan: 37”, Wing Area: 254 sq. in., Weight: 15 to 19.5 oz
Instructions Version 1.61, July 27, 2011
LIABILITY RELEASE
In that Mountain Models has no control over the final assembly or material used for final assembly, no
liability shall be assumed or accepted for any damage resulting from the use by the user of the final
user-assembled product. By the act of using the user-assembled product, the user accepts all resulting
liability. If the buyer is not prepared to accept the liability associated with the use of this product, the
buyer is advised to return the kit immediately in new and unused condition.
THIS PRODUCT IS NOT INTENDED FOR CHILDREN 12 YEARS OF AGE OR YOUNGER
Warning: This product may contain chemicals known to the State of California to cause cancer or birth
defects or other reproductive harm
Question and Answer IconNeed help?

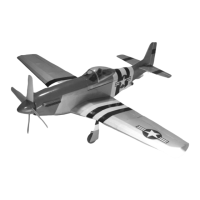
Do you have a question about the Mountain Models P-51 Mustang and is the answer not in the manual?

Mountain Models P-51 Mustang Specifications

General IconGeneral
BrandMountain Models
ModelP-51 Mustang
CategoryToy
LanguageEnglish

Summary

LIABILITY RELEASE

Kit Contents

Recommended Items for Finishing

Suggested Electronics

Power System Options

General Information

Assembly Advice

FUSELAGE ASSEMBLY

Fuselage Side Panel Construction

Assembling the left and right fuselage sides over the plans using thin CA.

Magnet and Former Installation

Attaching the rare earth magnet to F6 and assembling fuselage formers F2, F10, F7.

TAIL FEATHERS ASSEMBLY

Vertical Stabilizer Components

Assembling V1, V2, V3, V7, and V6 parts for the tail structure.

Horizontal Stabilizer Components

Assembling V8, V9, V4, and ribs R1-R4 for the horizontal stabilizer.

WING ASSEMBLY

Spar and Rib Assembly

Assembling spars W1/W2 and attaching W3 ribs and W3R plywood parts.

W5 Rib and Retract Mount Installation

Installing W5 ribs and retract mounts into the wing structure.

AILERON ASSEMBLY

Left Aileron Construction

Assembling the left aileron using parts A6, A3, A2, and A1.

Right Aileron Construction

Repeating steps for the right aileron to create a mirror image assembly.

FIXED GEAR ASSEMBLY

Wire Bending and Gear Mount Assembly

Bending landing gear wires and assembling gear mount components.

SANDING PROCEDURES

Fuselage and Wing Sanding

Sanding fuselage stringers and wing leading edge for smooth finish.

RETRACT INSTALLATION

Retract Wire Bending and Securing

Bending retract wires and securing them in the retract units.

COVERING APPLICATION

Fin and Fuselage Covering

Covering the vertical fin and fuselage, ensuring proper alignment.

ADDITIONAL ASSEMBLY STEPS

Control Horn Installation

Sliding elevator, rudder, and aileron control horns into their respective slots.

PLASTICS PREPARATION AND FINISHING

Cowling and Radiator Assembly

Trimming, sanding, and assembling the cowling and radiator scoop components.

ELECTRONICS INSTALLATION

Motor, ESC, and Stick Installation

Mounting motor/gearbox, ESC, and securing motor stick in fuselage.

Servo and Mount Installation

Installing servo mounts and servos in the fuselage structure.

CONTROL SURFACE THROWS

Aileron, Elevator, Rudder Throws

Recommended throws for ailerons, elevator, and rudder.

YOUR FIRST FLIGHT GUIDE

Pre-Flight Checks and Balancing

Taking pictures, checking controls, and balancing the model for flight.

Related product manuals