EasyManua.ls Logo

MR.LONGARM Smart Bulb Changer Kit - User Manual

MR.LONGARM Smart Bulb Changer Kit
3 pages
Print Icon
To Next Page IconTo Next Page
Loading...
Mr.$LongArm$Smart$Bulb$Changer$Kit$Instructions$
$
Mr.$LongArm$bulb$changers$and$bulb$changing$extension$poles$are$non-conductive$
which$means$they$won’t$conduct$electricity$as$long$as$they$are$completely$dry.$
Having$said$that$you$shoul d$always$turn$off$your$light$s witch$before$changing$any$
bulb!$Also,$use$safety$goggles$when$changing$light$bulbs$just$in$case$one$breaks$
while$you$are$working$with$it,$better$safe$than$sorry!$
$
The$Smart$bulb$changer$kit$fits$incandescent,$spotlight$and$floodlight$bulbs$youll$
have$one$handle$and$three$different$sized$cups.$To$change$cups$simply$pull$the$lock$
clip$at$the$top$of$the$handle$out$and$the$cup$and$pin$will$lift$off$the$top$of$the$handle.$
Now$insert$the$desired$cup$size$and$replace$the$lock$cl ip.$Be$sure$not$to$loose$the$pin$
as$it$controls$the$suctio n$when$using$the$bulb$changer.$
$
$
$
$
Typically$the$small$red$cup$is$for$incandescents,$the$medium$blue$cup$is$for$
spotlights$and$the$large$ye llow$cup$is$for$floodlights$and$larger$spotlight$bulbs.$$
$
Question and Answer IconNeed help?

Do you have a question about the MR.LONGARM Smart Bulb Changer Kit and is the answer not in the manual?

Summary

Smart Bulb Changer Kit Introduction

Safety Precautions

Always turn off the light switch and use safety goggles when changing bulbs for safety.

Kit Components and Cup Changing

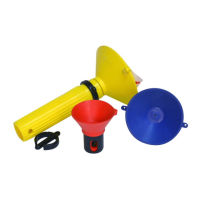
The kit includes a handle and three cups. Change cups by pulling the lock clip and replacing it.

Cup Usage Guide

Small red cup for incandescents, medium blue for spotlights, and large yellow for floodlights.

Operating the Smart Bulb Changer

Attaching Handle to Extension Pole

Securely attach the bulb changer handle to your extension pole using the lock clip or by tightening firmly.

Preparing for Suction

Adjust pole height, clean the cup, and ensure the pin is engaged for proper suction.

Removing the Old Bulb

Align changer, lift to bulb, attain suction, unscrew bulb counter-clockwise, and lower carefully.

Installing the New Bulb

Attach new bulb to changer, lift to fixture, screw clockwise, and release suction by pulling handle.

Troubleshooting Stubborn Bulbs

Manual Removal

For corroded or over-tightened bulbs, manual removal might be necessary before installing a new bulb.

Overview

The Mr. LongArm Smart Bulb Changer Kit is a tool designed for safely and efficiently changing light bulbs, particularly those in hard-to-reach locations. The kit includes a handle, three different sized suction cups, a lock clip, and a pin, all designed to work with Mr. LongArm extension poles.

Function Description:

The primary function of the Mr. LongArm Smart Bulb Changer Kit is to facilitate the removal and installation of various types of light bulbs without the need for a ladder, by using an extension pole. It achieves this through a suction mechanism that securely grips the bulb. The kit is specifically designed to handle incandescent, spotlight, and floodlight bulbs. The non-conductive nature of Mr. LongArm bulb changers and extension poles ensures electrical safety, provided they are completely dry. Users are strongly advised to turn off the light switch before changing any bulb and to wear safety goggles in case a bulb breaks.

Important Technical Specifications:

  • Non-Conductive Materials: The bulb changers and extension poles are made from non-conductive materials, reducing the risk of electrical shock when dry.
  • Interchangeable Suction Cups: The kit includes three different sized cups to accommodate various bulb types:
    • Small red cup: Typically for incandescent bulbs.
    • Medium blue cup: For spotlights.
    • Large yellow cup: For floodlights and larger spotlight bulbs.
  • Lock Clip Mechanism: A lock clip secures the chosen suction cup to the handle.
  • Suction Pin: A crucial pin controls the suction mechanism, ensuring a secure grip on the bulb.
  • Compatibility: Designed to attach to Mr. LongArm extension poles, particularly those with a drilled hole for a lock clip to prevent loosening. Mr. LongArm's heavy-duty poles feature a "lok-thread" for a secure attachment.

Usage Features:

  1. Attaching to Extension Pole:
    • For Mr. LongArm non-conductive extension poles with a drilled hole: Screw the bulb changer handle clockwise onto the threaded end of the pole, aligning the hole in the handle with the hole in the pole's threaded end, then insert the lock clip. This prevents loosening during bulb removal.
    • For other non-conductive poles: Screw the handle on clockwise very firmly to prevent unscrewing. Mr. LongArm's heavy-duty poles have a "lok-thread" to maintain tightness.
  2. Selecting and Attaching Suction Cup:
    • Pull out the lock clip at the top of the handle.
    • Lift off the current cup and pin.
    • Insert the desired cup size (red for incandescent, blue for spotlights, yellow for floodlights/larger spotlights).
    • Replace the lock clip, ensuring the pin is not lost as it controls suction.
  3. Preparing for Bulb Removal:
    • Adjust the extension pole to the appropriate height.
    • Ensure the inside of the selected cup is clean; wiping it with a damp cloth is recommended as moisture aids suction.
    • Verify that the pin is engaged, closing the hole in the cup, which is essential for suction.
  4. Removing a Bulb:
    • Align the bulb changer directly below the bulb.
    • Lift it up to the bulb and push to create suction.
    • Once a good suction is confirmed, unscrew the light bulb by turning the handle to the left.
    • Carefully lower the bulb.
    • To release the suction: Hold the bulb and cup, then pull down on the handle. This disengages the pin and releases the bulb.
  5. Installing a New Bulb:
    • Hold the new bulb in your hand.
    • Push the bulb changer up to the bulb to attain suction, ensuring it's secure.
    • Raise the bulb up to the fixture.
    • Screw the bulb in place by turning the handle to the right, avoiding over-tightening.
    • To release the suction: Pull down on the handle, which disengages the pin and releases the bulb.

Maintenance Features:

  • Cleaning: The inside of the suction cup should be kept clean, and wiping it with a damp cloth is recommended before use to enhance suction.
  • Pin Management: It is crucial not to lose the pin, as it is integral to the suction mechanism.
  • Troubleshooting Corroded/Over-tightened Bulbs: In cases where a bulb is corroded in place or over-tightened, manual removal may be necessary. However, the bulb changer should still be effective for installing the new bulb.

MR.LONGARM Smart Bulb Changer Kit Specifications

General IconGeneral
BrandMR.LONGARM
ModelSmart Bulb Changer Kit
CategoryBattery Charger
LanguageEnglish