4.
Belt Tension
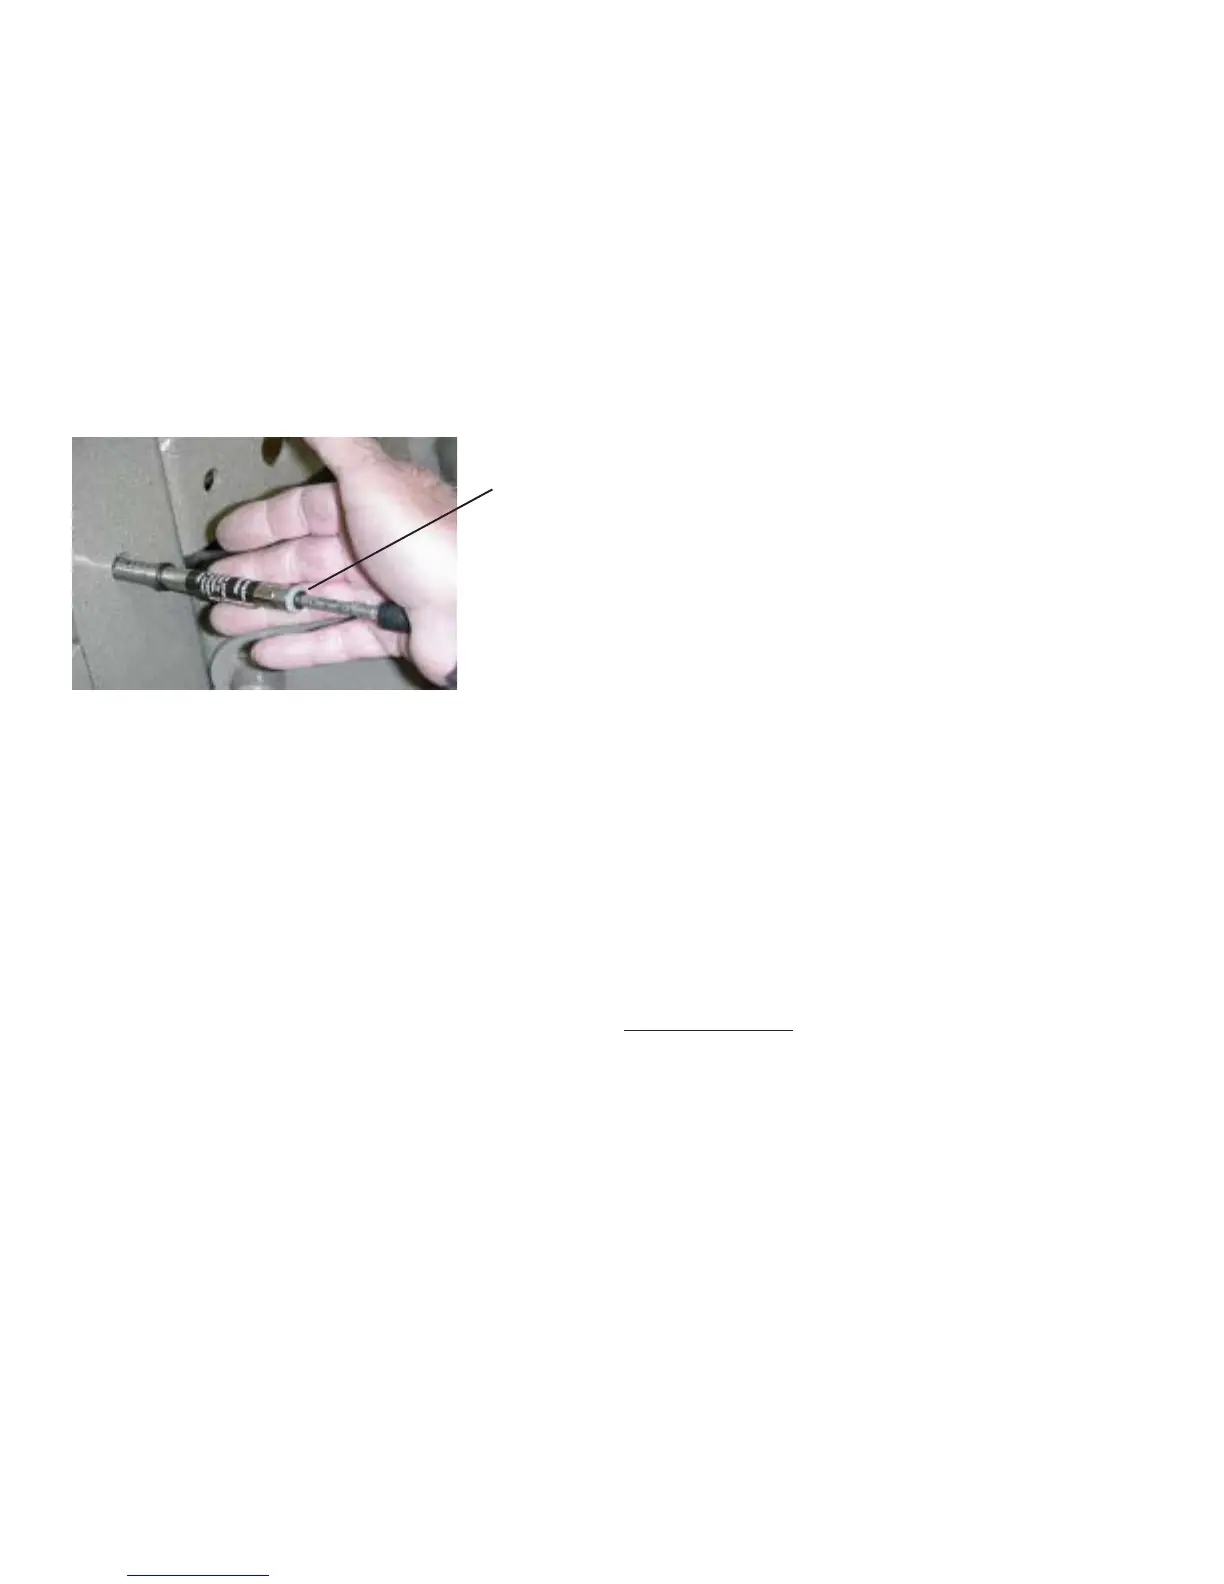
You can check the belt tension without removing the clutch
cover. Simply remove the side access plug on the right side of
the casting. Set the tension O-ring nearest your hand against the
gauge tube as shown. With the tool inserted into the access
hole, and tension tool in your palm, observe the scale alongside
the tension gauge and pick a point on the casting for reference.
The objective is to depress the belt in its center a distance of 1/
4” and then note how many pounds, as indicated by how far the
small O ring moved on the scale that it took to move the belt the
1/4”. New belts are tensioned at 20 to 21 pounds. Used belts
should measure 12 to 16 pounds. If less than 12 pounds, tension
the belt.
A belt tension kit can be purchased from Mud Buddy. It contains
the instructions, silicone sealer, tension tool and casting bolt hex
wrench. 801.352.8011
Belt Replacement Procedure
Additional information and more photos are available on the Mud
Buddy website customer page at www.mudbuddy.com
The belt is tensioned by removing the casting top clutch cover
and by loosening the four engine face bolts, then the four rear
casting bolts and the tension bolt. This allows the outdrive to
move in the slotted holes, up and down. The belt tension
adjustment bolt is located on the rear, bottom inside of the
aluminum outdrive. We highly recommend you place thread
penetrating oil on the adjustment bolt threads 24 hours prior to
adjusting the belt. A corroded bolt (especially if run in salt water)
can jam and even break. Do not remove the engine and casting
slide bolts, just loosen them a turn or two to allow the aluminum
outdrive to slide in the bolt slots.
Now, tighten the belt by turning the adjustment bolt. Check
tension each time you turn the bolt one turn. It does not take
much to tension the belt.
Tighten the engine face bolts, rear casting bolts and adjustment
bolt jam nut. Lubricate the rear adjustment bolt to prevent
corrosion.
Run the engine a couple minutes and re-check the belt tension.
Tension again if needed.
Belt Replacement
Remove the top sprocket cover.
Loosen the engine and rear casting bolts and the rear adjustment
bolt.
Squeeze the belt to raise the drive casting. Tighten any one of
the four rear slide bolts to hold the casting upward which
provides slack in the belt and facilitates easy belt installation.
Remove the lower outdrive casting.
Clean the silicone sealer off the drive cover and outdrive face on
the Lite, Hunter and Sport models. A scouring pad works well.
Do not scrape. Place a thin bead of silicone on the casting
halves. Newer models and the Mini outdrives have an 0-ring
gasket. Place sealer around each of the bolt holes.
Place a new belt on the lower sprocket and slip the belt up and
over the top sprocket, being careful so you don’t wipe the
silicone sealer from the bottom of the casting. Ensure the
outdrive O-ring is in the slot.
Sport, Lite and Hunter Models: Place a few drops of Loctite 243
inside each of the outdrive bolt holes. Insert the bolts into the
outdrive and tighten snugly, but loose enough to allow the drive
to move upward slightly. Now tension the belt lightly which will
cause the propeller outdrive to rise to the top of the bolt holes.
Now tighten the propeller outdrive to 240 inch pounds.
Tension the belt as described herein. Turn the propeller to ensure
the belt and sprockets are engaged.
The drive is designed to be waterproof and you should seal the
outdrive bolt threads. We recommend you remove each of the
lower rear slide adjustment bolts, one-by-one, and place Permatex
or thread sealer on the threads. Replace and tighten snugly.
Remember, remove the bolts one at a time.
Winter Driving Tips
It is not uncommon for the Kohler, Kawasaki and large block
Vanguard motors to experience carb icing when operated below
30 degrees. Turn the large block Vanguard and Kawasaki air
cleaner cover inlet towards the muffler to draw in warm air. Also,
throttles can freeze and water/ice can get into your fuel causing
all sorts of frustrations and breakdowns. Spray silicone on the
cables often in freezing weather.
Throttle Adjustment Tip
Tape or tie down the throttle lever. Loosen the throttle cable
clamp on the rear of the engine and gently pull on the cable until
the throttle bottoms out. Tighten down the throttle cable holder.
The engine should idle between 1200 and 1450, and should run
between 3950 to 4050 at full throttle out of the water.
small O ring
 Loading...