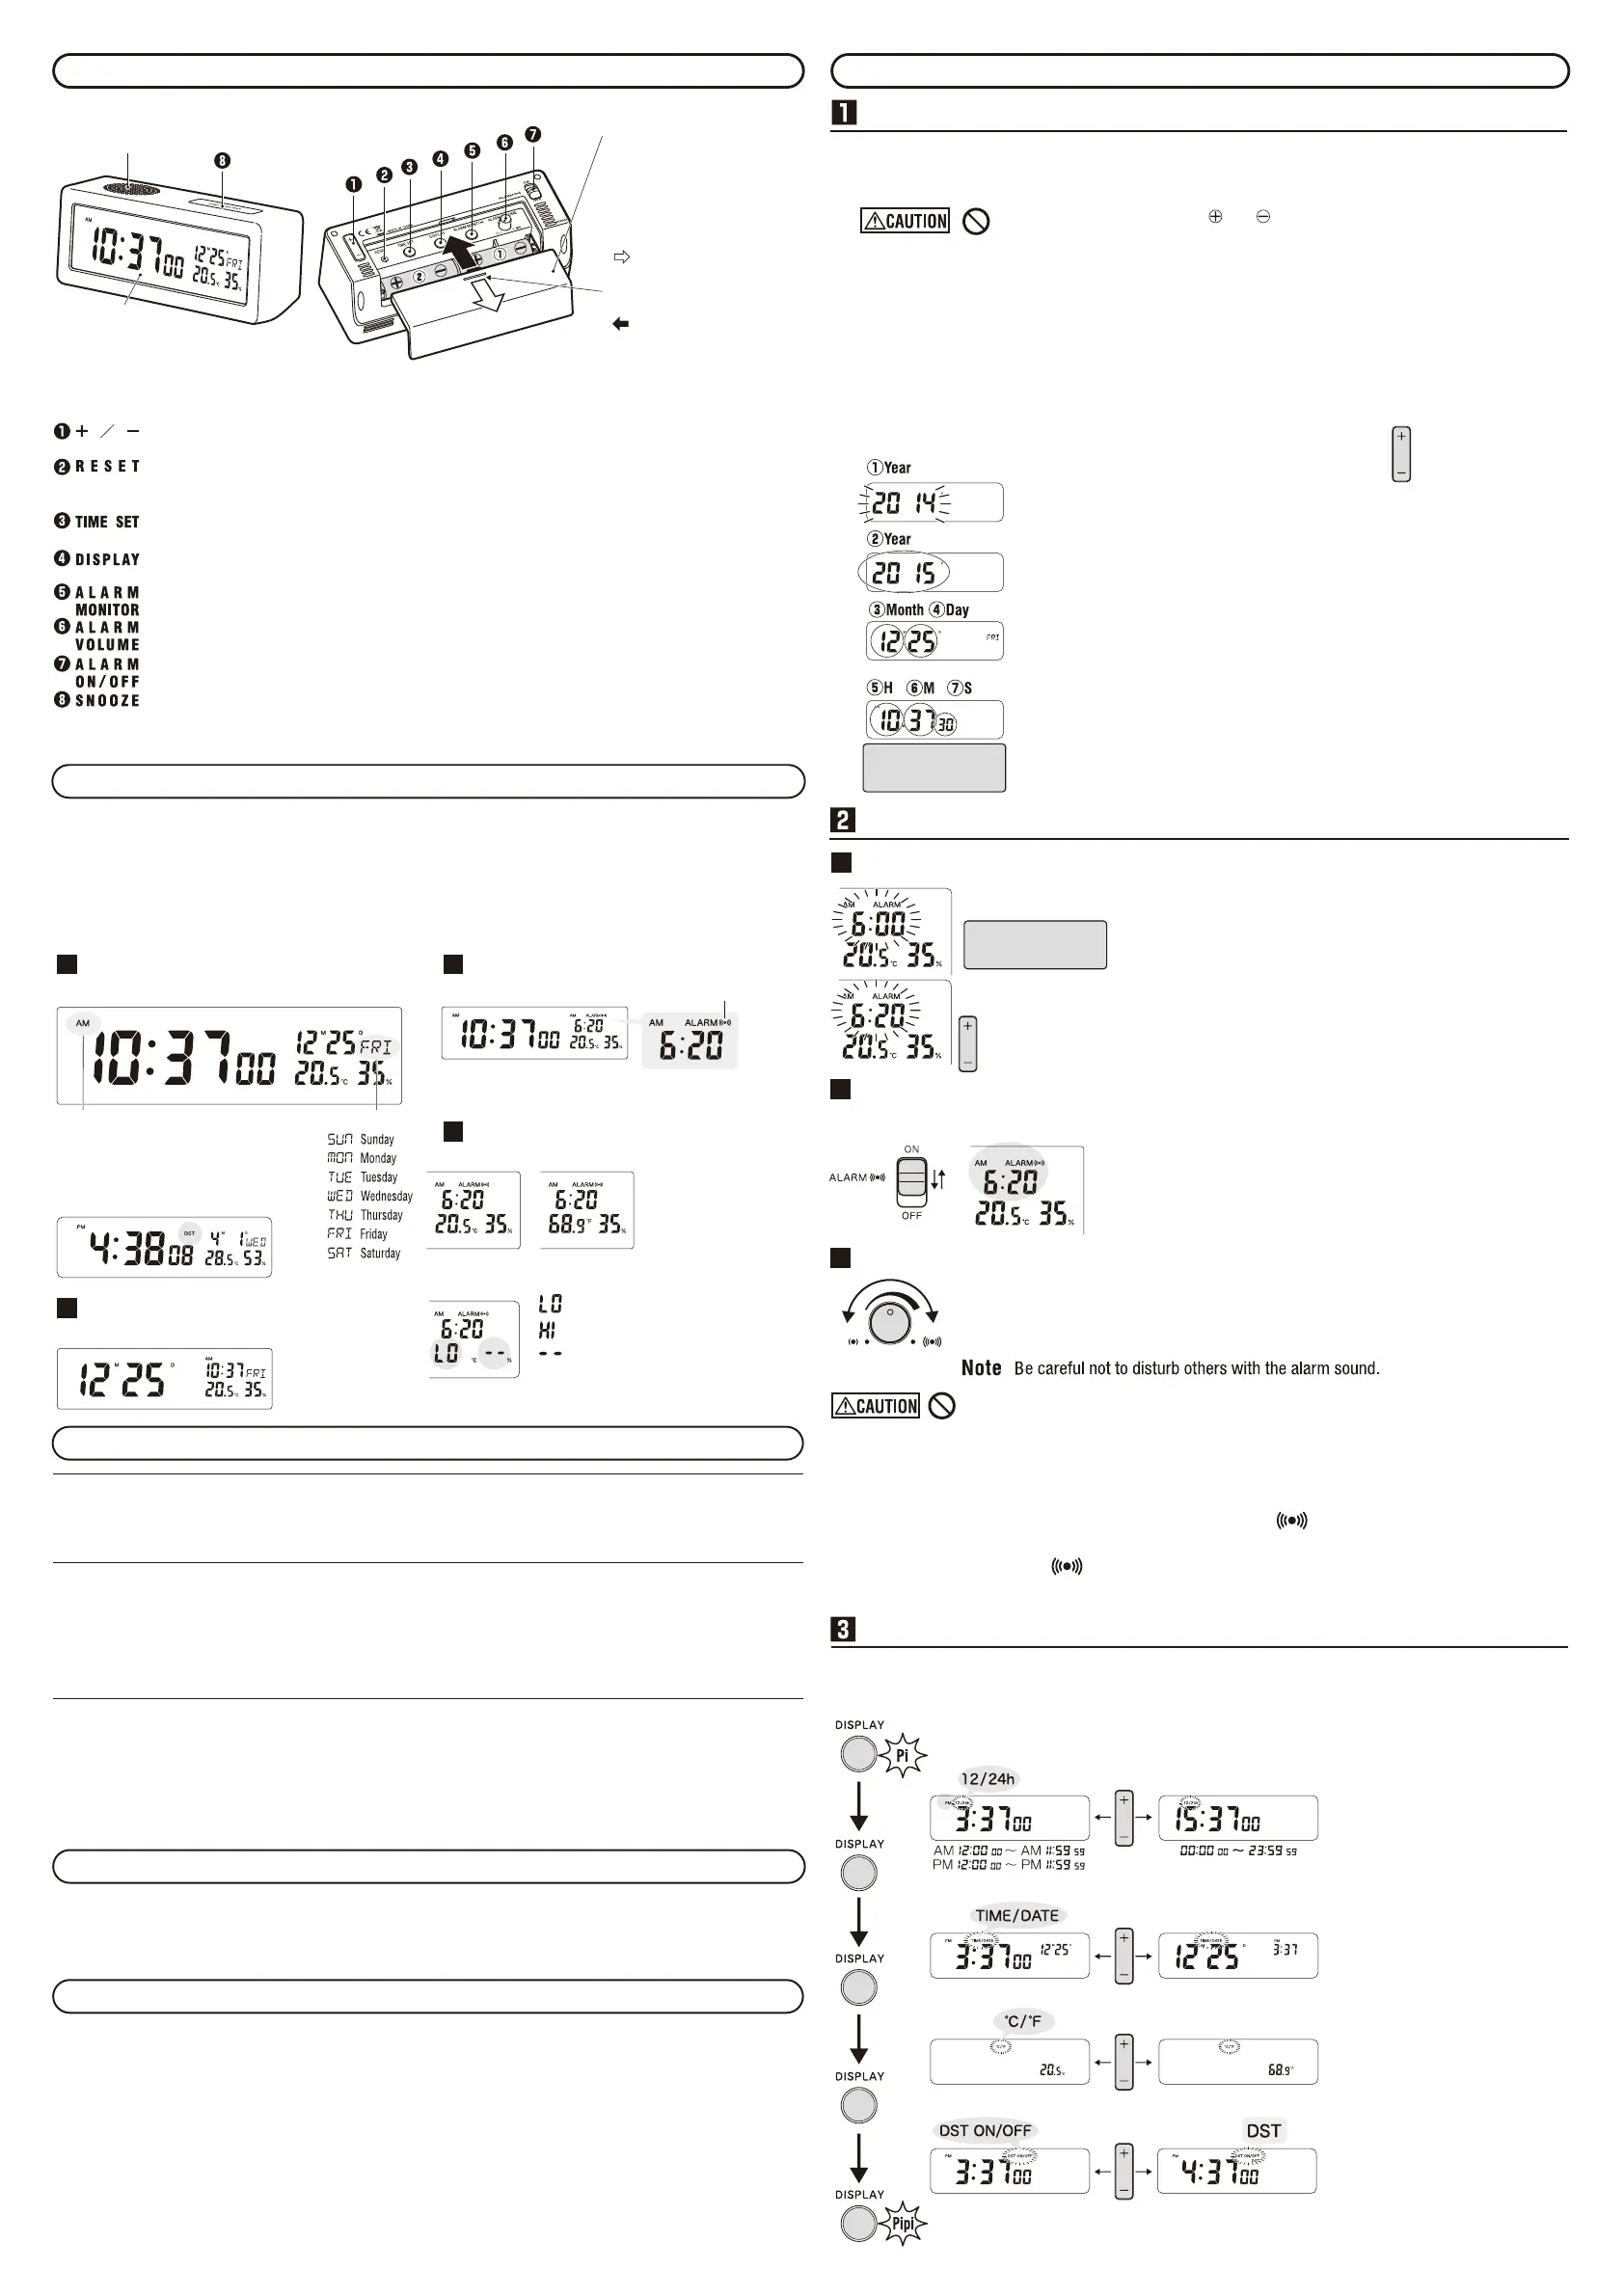
How to Use
To insert the batteries and set the date/time (when replacing the batteries)
*Electronic sound "Pi-" will beep when batteries are inserted or the RESET button is pressed.
①Insert 2 AA batteries.
② Press RESET
To avoid malfunction, make sure to press this right after inserting batteries.
③Following the example, set the year, month, day and time (hour, minute,
seconds) in that order.
Use the year/month/day and time (hour/minute/seconds) button to set.
Adjust the display by pressing the + or - button while it is flashing,
then press the TIME SET button.
Example To set 24/10/2015 AM10:37:30
Do not insert the battery with and reversed.
Doing so may cause battery leakage or heating, resulting in a malfunction or injury.
Press and
release
Forward by 1
Reverse by 1
Press and
hold
Fast forward
Fast rewind
① Press TIME SET for about 2 seconds until the year
flashes.
The electronic sound "Pi-" will beep.
② Set the year with + or - then press TIME SET.
③ Set the month with + or - then press TIME SET.
④ Set the day with + or - then press TIME SET.
⑤ Set the hour with + or - then press TIME SET.
⑥ Set the minutes with + or - then press TIME SET.
⑦ Set the seconds with + or - then press TIME SET.
When the electronic sound "Pipi" beeps, the display
is set and the clock will start.
• If the button is not
pressed within 30
seconds, setting
function will end and
"Pipi" will beep.
When using the 12-hour-clock
display, please set the time after
checking the AM/PM display.
Setting the alarm time
To use the alarm function
① Turn the ALARM ON/OFF switch to OFF.
② Press + or - after which the alarm time will flash.
③ Press + or - to set the alarm time.
④ If the button is not pressed within 5 seconds, setting
function will end.
When using the 12-hour-clock
display, please set the time after
checking the AM/PM display.
Press and
release
Forward by 1
Reverse by 1
Press and
hold
Fast forward
Fast rewind
Setting the alarm switch
When it is ON, the alarm time will be displayed and the alarm will sound at the set time.
Alarm will
sound
To stop or
turn the alarm off.
Note
When the ALARM ON/OFF switch is ON, the alarm will sound
everyday. Please turn it OFF when not using the alarm.
Alarm volume control and trial listening
Pressing the ALARM MONITOR will sound the alarm.
Turn the ALARM VOLUME to the desired volume.
To turn off the alarm sound, press any button except for the RESET button.
Low High
■Auto-stop Function (Automatic shut-off alarm)
When left unattended, the alarm will automatically switch off after about 2 minutes.
■Snooze function (Alarm is off but will still sound)
By pressing the SNOOZE button while the alarm is sounding, will flash and the alarm will sound
again in about 5 minutes. This function can be repeated 7 times. Pressing the SNOOZE button the 8th
time will end the alarm, and will be displayed.
○When the alarm function is on, pressing the ALARM MONITOR will not work.
Switching display screen
By pressing the DISPLAY button, you can change the 12/24 HR time, TIME/DATE Main display, temperature
unit and Summer time, in that order. Please set according to the example below.
○
The electronic sound will beep
when switching displays
function has started and ended.
○When setting the display, if the
button is not pressed for 30
seconds, the setting function
will end. The electronic sound
"Pipi" will beep.
○When choosing Summer time,
DST will display and the time
displayed will be 1 hour ahead
of the current time.
The alarm time will not change.
To start changing the display.
12 HR
Select with +/-
24 HR
Time Main Display
Celsius (°C)
Normal Time
Date Main Display
Fahrenheit (°F)
Summer Time
Setting function has ended.
Do not let the alarm sound at a high volume near your ears.
It may cause hearing damage.
The illustrations are for use as operating instructions and may differ from the actual product.
To select the display of the alarm time or to set the time and date manually.
This will reset the settings to 12:00 AM 1/1/2014, alarm at 6:00 AM, 12 HR display, Celsius
temperature display and standard time display. Use a thin stick such as a toothpick to press.
To set the time and date.
To change the display between time, time/date, Celsius/Fahrenheit, and Summer time.
To sound the alarm. To stop the alarm, press any button except for the RESET button.
To adjust the alarm volume.
ON - To turn the alarm on at the set time. OFF - To turn off the alarm.
When pressed while the alarm is sounding, it will stop at 5 minute intervals.
It is the same button to press for the light, so the liquid display will light up when this button is pressed
and for 3 seconds after it is pressed.
* To avoid the clock from falling, place on
a horizontal, stable location with
minimal vibration.
When changing batteries or
operating the clock, remove
the back cover, and replace
when finished.
Removing the Cover
Push this part while sliding it
towards the direction of the arrow.
Attaching the Cover
When inserting battery ①,
insert it into slot ② first, then
slide it to the right.
Speaker
Back Cover
LCD
Name and function of each part
Getting to Know the display
◎Depending on the angle you look at the liquid display, it may appear faint or blurry.
◎
There is an option to have the main display set as the time or the day/month, where it will be displayed larger.
There is also the option to display in 12 HR or 24 HR time. Refer to ■
3
Switching display screen
◎The alarm will be displayed as it's displayed in the time display.
◎When inserting batteries, pressing the RESET button will set the main display as the time in 12 HR time.
Month/DayCurrent time (Hours,minutes,seconds)
Time Main Display
day of week
In 12 HR time, AM or PM is displayed.
When Summer Time is set, DST will be displayed.
Month/Day Current time (Hours,minutes)
Day/Month Main Display
Alarm time (Hours, minutes)
When Alarm is ON
Alarm Mark
◎Time Main Display is set.
◎Day is not displayed.
Temperature/Humidity Display
Within Range of Measurement
Refer to
■
3
Changing the
display for changing between
Celsius and Fahrenheit.
Fahrenheit display will round
down to 1 decimal point.
Celsius Humidity
Fahrenheit Humidity
Out of Range of Measurement
Temperature Humidity
Lower than -9.9 °C (+14.1 °F) Less than 20 %
Higher than 50 °C (+122 °F) Greater than 95 %
Unable to measure
Humidity can be measured when the temperature
is between 5 to 50 °C (+41 to +122 °F).
Monitor Status: When ALARM MONITOR is pressed to test the alarm sound.
Day/Time Display Status: Normal status when day/time is displayed.
Alarm Status: When alarm is sounding or is temporarily off during snooze.
Date/time Setting: Setting the date/time. Refer to
■
1
To insert the batteries and set the date/time
(when replacing the batteries)
Alarm Time Setting: Setting the alarm. Refer to
■
2
To use the alarm function.
Display Setting: Setting the 12/24 HR time display, time/date main display, temperature unit, Summer
time. Refer to
■
3
Switching display screen.
Clock status and operation
◎When the alarm is on, it is not possible to change the setting for Date/Time or Alarm Time. Turn the ALARM
ON/OFF switch to OFF before doing so.
◎
When setting the date/time, it is not possible to change to other settings or statuses. Also, when changing
settings, changing the alarm to ON or OFF will not show on the display. Only when you have finished changing
the settings, the display will change.
Temperature And Humidity
LCD Illuminators
The light will turn on whilst the SNOOZE button is pressed and for 3 seconds after it is pressed. Please view the
display from the front while it is lit up. If viewed from other directions, the display will appear faint or not visible.
This product is for general home or office use indoors.
Placing it in an area with direct sunlight, near cooling/heating appliances, humidifiers or dehumidifiers
will make it harder to detect the room's humidity.
As the sensor is located inside the body of the clock, it will take time for the display to reflect the measurement.
Also, depending on the height it is placed, the temperature and humidity may differ. The measurement of
humidity is affected by air flow so the display may differ or not change depending on good or bad air flow in the
same room.
* It cannot be used for monitoring precise temperature or humidity or for commercial purposes.
 Loading...