Do you have a question about the MX Neptune Showers Solo and is the answer not in the manual?
Ensure model number, power rating, serial number, and date of purchase are available.
Department will advise on replacement parts or on-site engineer visits.
Customer or representative must be present during an engineer's visit.
Charges apply for non-product related faults or if access is denied.
Fees apply for visits and parts when the product is no longer under guarantee.
Shower installation must conform to IEE Regulations and Water Council bylaws.
Connect to 15mm cold water mains, not tank supply without booster.
Minimum recommended pressure is 15 lb/sq in (1 Bar).
Avoid frost exposure; do not use plumbers jointing compound.
Explains how flow rate affects temperature and seasonal variations.
Discusses stabiliser valve and causes of temperature changes.
Recommends regular cleaning to remove scale and debris.
Check water supply, avoid connections affected by other appliances.
An isolating valve must be fitted into the water supply for servicing.
Position unit away from spray, at shower head height, not immersed.
Steps for marking, drilling, and attaching the unit securely.
A double check valve must be fitted with flexible accessories.
The shower unit plumbing must precede electrical wiring.
Connect 15mm pipe, flush pipework to remove debris.
Position unit squarely, tighten connections, and check for leaks.
Permanently connect via a double pole linked switch.
Table provided to help choose correct cable based on kW rating and distance.
Connect live (L), neutral (N), and earth (E) terminals correctly.
Ensure terminals are tight, cable secured, and earth continuity.
Align 'D' flat on knobs with their respective spindles.
Secure the cover using the two provided fixing screws.
Turn flow control anti-clockwise fully before switching on for fast fill.
Switch power on, set selector to LOW to fill unit with water.
Tips for accurate wall marking and drilling, use tape to prevent wandering.
Steps for fitting the lower and top brackets to the wall.
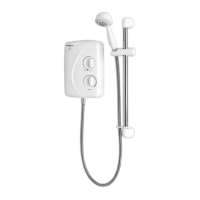
Fit the rail, height adjuster, and attach the flexible hose securely.
Ensure power selector is STOP and electrical supply is isolated.
Turn temp control to cold, then power to LOW to check water flow.
Adjust temperature by rotating the bottom control knob.
Test the HIGH setting to verify correct operation and temperature rise.
Adjust temperature and flow; note that flow rate changes with temperature.
Turn on wall switch; the 'Power' neon indicator will illuminate.
Choose between 'Low' power for economy or 'High' power.
Alter temperature by adjusting water flow via the control knob.
Turn the top power selector knob to the STOP position.
Switch off the pull-cord or wall-mounted switch.
The 'Power' neon indicator illuminates when the unit is switched on and water is flowing.
Clean showerhead periodically to remove limescale and debris.
Rub thumb over surface whilst shower is running to break scale deposits.
Activate self-clean probes by rotating the lever clockwise.
Soak stubborn scale deposits in a proprietary limescale remover.
Do not operate the shower unit if the sprayhead or hose becomes damaged.
Beware of a slug of hot water expelled for first few seconds when restarting.
One year against defects from faulty materials or workmanship, if installed correctly.
Misuse, damage, or effects of scaling are not covered by the guarantee.
Product must not be modified or repaired except by an authorised person.
Guarantee is valid only within the UK and does not cover commercial use.
| Brand | MX |
|---|---|
| Model | Neptune Showers Solo |
| Category | Bathroom Fixtures |
| Language | English |