Do you have a question about the Myenergi Harvi and is the answer not in the manual?
Securely clip CT around the cable with the arrow pointing towards the consumer unit. Pass the CT wire through the harvi cable grip.
Connect CT wires to the harvi inputs (+/-). Wait for the status LED to flash green, indicating power draw.
Press the pair button. The LED will flash blue for channel, then red for pairing mode. Ensure the master device is configured.
Navigate myenergi settings, enter passcode, and select Pairing Mode. Match the serial number and add the harvi device.
Hold the pair button until the LED indicates the channel. Cycle and release to select. Ensure all devices use the same channel.
Access CT config via Settings > Advanced. Disable wired CT inputs and enable harvi CTs. Configure for 3-phase if applicable.
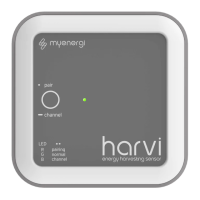
The harvi is a clever little device designed to enable myenergi devices to be installed without the need for a directly connected current transformer (CT) for measuring grid and/or generation power. Instead, the CT is connected to the harvi. A key feature of the harvi is that it requires no external power source; the energy harvested from the CT itself is used to transmit the measurement signal to your other myenergi device. This eliminates the need for batteries or a separate power supply, simplifying installation and reducing maintenance.
For installation, the harvi can be wall-mounted. It is capable of having up to three CTs connected simultaneously, allowing for multi-point power measurement. Multiple harvi devices can also be used on a single site if needed.
Before starting the installation, ensure the CT is securely clipped around the cable to be monitored. The arrow sticker on the CT should point in the direction of normal current flow, which is typically towards the consumer unit. The harvi has a cable grip on its back; simply pass the CT wire through the top hole and push down to lock it into place. Connect one, two, or three CTs to the CT input(s) on the harvi. The red wire should be connected to the (+) terminal, and the black wire to the (-) terminal of the harvi device. Once there is power being drawn on the chosen live tail, allow up to two minutes for the status LED to start flashing green.
Pairing the harvi with a myenergi device is a straightforward process. Briefly press the pair button on the harvi. By default, the LED should flash blue once, indicating that the harvi is on channel 1. If a different channel is required due to interference or other reasons, the channel can be changed (see "Optional: Changing Channel" below). After the initial blue flash, the LED will flash red, indicating that the harvi is in pairing mode. Before proceeding, ensure that the myenergi device you are pairing the harvi to is set as "Master." Then, on the myenergi device, navigate to Settings > Advanced > "enter passcode" > Linked Devices > Pairing Mode. The harvi should appear on the screen within a few seconds. Verify that the serial number displayed on the screen matches the number on the front of the harvi device, and then press (✓) or (+) to add the harvi device. It's important to note that if you are pairing the harvi to a network of already paired devices, it should only be paired with the 'Master' device.
The harvi offers an optional feature for changing its channel. The default channel is 1, and typically, this will not need to be changed. However, if there is another device causing interference on a particular channel, you might need to adjust it. To change the channel, press and hold the pair button until the LED flashes blue. The LED will then flash rapidly to indicate the current channel number, cycling from 1 to 8. To select a new channel, continue to press and hold the button; the current channel will cycle through 1 to 8, indicated by the LED. Once the desired channel is indicated, immediately release the button. After changing the harvi's channel, ensure all other myenergi paired devices are set to the same channel by going to Settings > Advanced > "enter passcode" > Linked Devices > Channel. A crucial point for older myenergi devices (those with serial numbers starting with '1') is that only channels 1, 3, and 4 can be used, with the exception of Australian installations.
After pairing, the harvi needs to be configured through the myenergi device. The function of the CTs connected to the harvi is also configured via the myenergi unit. On the myenergi 'Master' device, go to Settings > Advanced > CT config. Disable the relevant CT input(s) for that device to ensure the unit uses the harvi CT instead of a wired CT. Then, navigate to “Advanced Settings” > “Linked Devices” > “Devices.” Highlight the harvi device and press (✔) or (+). Configure the CTs according to your specific installation. Refer to the manual for your specific myenergi device for detailed configuration instructions. If the harvi is to be used in a 3-phase installation, ensure you set the harvi to “three phase.” This setting will automatically configure all three CT inputs to the same input source (e.g., grid, generation). If used in a 3-phase setup, make sure that the Net Phases setting on your myenergi device is turned on. When connecting CTs, always refer to the GOLDEN CT RULES found in all myenergi device manuals.
For technical support, if you encounter any issues with your harvi during or after installation, you can contact the technical support team by scanning the provided QR Code. This ensures you receive the quickest solution to any problems.
| CT inputs | 3 inputs |
|---|---|
| measurement range | 25W to 15kW |
| energy harvesting range | 0.2A to 65A |
| accuracy | 2.0% typical |
|---|---|
| transmission rate | 1s @ 1A+, <10s @ 0.5-1A, <30s @ <0.5A |
| frequency | 868 MHz |
|---|---|
| protocol | proprietary protocol |
| mounting location | Indoor only |
|---|---|
| operating temperature | -30°C to +50°C |
| dimensions | 98 x 98 x 36 mm |