EasyManua.ls Logo

myTouchSmart Simple Set 26892 - User Manual

myTouchSmart Simple Set 26892
1 page
Print Icon
Loading...
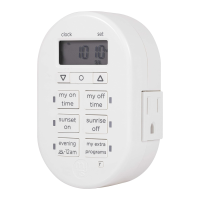
II. Preset schedules
There are 3 pre-programmed times that run individually
or simultaneously. Choose from the following:
“evening” (5pm-12am)
“morning” (5am-8am)
“all night” (6pm-6am).
When a preset or custom program
is chosen, the blue LED indicator
light will turn on.
If a preset schedule does not fit your
needs, a custom on/o time can be
used to modify the preset. Example:
Using “evening” (5pm-12am) and
adding a “my o time” of 10pm will
create a 5pm-10pm timer schedule.
III. Countdown
This feature turns the light on for
a set period of time and turns
it o when time expires. Press
“countdown,then use up ( ) and
down ( ) arrows to set from 1
minute to 24 hours. Once you reach
your desired time setting, simply
walk away and the timer will begin
counting down. Your last time setting
will be remembered the next time
you use the countdown feature.
Note: When daylight savings time
occurs use the up ( ) and down
( ) arrows to adjust the time
by 1 hour.
This device complies with part 15 of the FCC and Industry Canada license-exempt RSS stan-
dard(s). Operation is subject to the following two conditions: (1 this device may not cause harm-
ful interference, and (2) this device must accept any interference received, including interference
that may cause undesired operation.
FCC NOTE: The manufacturer is not responsible for any radio or TV interference caused by
unauthorized modifications to this equipment. Such modifications could void the user’s authority
to operate the equipment.
NOTE: This equipment has been tested and found to comply with the limits for a Class B digital
device, pursuant to Part 15 of the FCC Rules. These limits are designed to provide reasonable
protection against harmful interference in a residential installation. This equipment generates,
uses and can radiate radio frequency energy and, if not installed and used in accordance with
the instructions may cause harmful interference to radio communications. However, there is
no guarantee that interference will not occur in a particular installation. If this equipment does
cause harmful interference to radio or television reception, which can be determined by turning
the equipment o and on, the user is encourage to try to correct the interference by one or more
of the following measures:
• Reorient or relocate the receiving antenna.
• Increase the separation between the equipment and receiver.
• Connect the equipment into an outlet on a circuit dierent
from that to which the receiver is connected.
• Consult the dealer or an experienced radio/TV technician for help.
CAN ICES-3(B)/NMB-3(B)
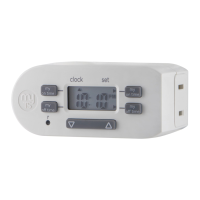
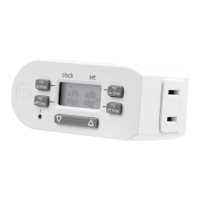
1. Setup
If no numbers are visible on-screen, plug timer into an
outlet and let timer charge for 1 hour. Once charged,
press the reset (
r
) button in the lower right corner
using a toothpick or pencil.
2. Set the time
Use up ( ) and down ( )
arrows to set current time,
take note of AM or PM time.
3. Programming
Options
Set your custom on & o time
and/or pick any of the presets
that suit your schedule!
I. Choose your custom on/o times
Press “my on time,” then use up
( ) and down ( ) arrows to
set on time. Press “my o time,
then use up ( ) and down
( ) arrows to set o time.
(If you set the “my on time”
earlier than the current time,
it will not turn on until the next
day at the time scheduled. Use
the Countdown to turn on the
timer if needed immediately.)
When using “my on” and “my
o” times make sure the blue
light is lit next to the button. The
blue lights will only illuminate when
plugged into a wall outlet.
MADE IN CHINA
Distributed by Jasco Products Company LLC, 10 E. Memorial Rd., Oklahoma City, OK 73114.
This Jasco product comes with a 1-year limited warranty.
Visit www.byjasco.com for warranty details.
Questions? Contact us at 1-800-654-8483 between 7:00AM–8:00PM CST.
RISK OF ELECTRIC SHOCK
PLUG DIRECTLY INTO AN
ELECTRICAL OUTLET
DO NOT USE IN WET LOCATIONS
FULLY INSERT PLUG
USE INDOORS ONLY
UNPLUG TIMER BEFORE CLEANING
KEEP CHILDREN AWAY
RISK OF FIRE
DO NOT USE TO CONTROL APPLIANCES
THAT CONTAIN HEATING ELEMENTS
(COOKING APPLIANCES, HEATERS,
IRONS, ETC.)
DO NOT EXCEED ELECTRICAL RATINGS
DO NOT USE WITH EXTENSION CORDS
26892-P1 VERSION 01 10/11/16
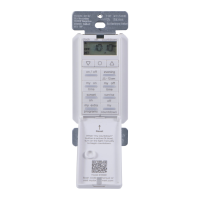
Specifications:
125V 50/60 Hz
15A 1875W General Purpose/Resistive
10A 1250W Tungsten
1/2 HP
Works with dimmable
LED and CFL bulbs.
Indoor Digital
Simple Set
Plug-In Timer
WARNING
GE 53116
Question and Answer IconNeed help?

Do you have a question about the myTouchSmart Simple Set 26892 and is the answer not in the manual?

Overview

This document describes the myTOUCH SMART Simple Set Plug-In Timer, an indoor digital timer designed for easy scheduling of electrical devices.

Function Description:

The myTOUCH SMART Plug-In Timer allows users to set custom on/off times for connected appliances or choose from pre-programmed schedules. It also features a countdown function to turn devices on for a set period. The timer is intended for indoor use and is designed to be user-friendly with its simple setup and programming options.

Important Technical Specifications:

  • Voltage: 125V
  • Frequency: 50/60 Hz
  • General Purpose/Resistive Load: 15A, 1875W
  • Tungsten Load: 10A, 1250W
  • Motor Load: 1/2 HP
  • Compatibility: Works with dimmable LED and CFL bulbs.
  • Certification: cULus listed (GE 53116)
  • FCC/Industry Canada Compliance: This device complies with Part 15 of the FCC Rules and Industry Canada license-exempt RSS standard(s), ensuring it meets regulatory requirements for electromagnetic compatibility.

Usage Features:

Setup:

  • Initial Power-Up: If the screen is blank, plug the timer into an outlet and allow it to charge for 1 hour.
  • Reset: After charging, press the reset button (a small circular button) located in the lower right corner of the timer using a toothpick or pencil to activate the display.

Setting the Time:

  • Use the Up (▲) and Down (▼) arrows to adjust the current time. Pay attention to the AM/PM indicator to ensure accuracy.

Programming Options:

The timer offers both custom and preset scheduling options.

I. Custom On/Off Times:

  • Setting "My On Time": Press the "my on time" button. Use the Up (▲) and Down (▼) arrows to set the desired turn-on time.
  • Setting "My Off Time": Press the "my off time" button. Use the Up (▲) and Down (▼) arrows to set the desired turn-off time.
  • Important Note for Custom Times: If the "my on time" is set to an hour earlier than the current time, the timer will not activate until the next day at the scheduled "my on time."
  • Visual Indicator: When "my on" and "my off" times are active, a blue LED light will illuminate next to the corresponding button. These blue lights only illuminate when the timer is plugged into a wall outlet.

II. Preset Schedules:

The timer includes three pre-programmed schedules that can run individually or simultaneously:

  • "evening": 5pm-12am
  • "morning": 5am-8am
  • "all night": 6pm-6am
  • Activation: When a preset schedule is selected, the blue LED indicator light for that preset will turn on.
  • Modifying Presets: If a preset schedule doesn't perfectly fit your needs, you can combine it with a custom "my off time" to modify it. For example, selecting "evening" (5pm-12am) and then adding a "my off time" of 10pm will create a schedule that runs from 5pm to 10pm.

III. Countdown Feature:

  • Functionality: This feature turns the connected device on for a specified duration and then automatically turns it off when the time expires.
  • Setting Countdown: Press the "countdown" button. Use the Up (▲) and Down (▼) arrows to set the duration, which can range from 1 minute to 24 hours.
  • Activation: Once the desired time is set, the timer will automatically begin counting down.
  • Memory Function: The last countdown setting used will be remembered for future use.

Daylight Savings Time Adjustment:

  • To adjust for daylight savings, use the Up (▲) and Down (▼) arrows to change the time by 1 hour.

Maintenance Features:

Cleaning:

  • Unplug the timer from the electrical outlet before cleaning.

Safety Warnings (RISK OF ELECTRIC SHOCK):

  • Plug directly into an electrical outlet.
  • Do not use in wet locations.
  • Fully insert the plug into the outlet.
  • Use indoors only.
  • Unplug the timer before cleaning.
  • Keep children away from the device.

Safety Warnings (RISK OF FIRE):

  • Do not use to control appliances that contain heating elements (e.g., cooking appliances, heaters, irons).
  • Do not exceed the specified electrical ratings (15A, 1875W General Purpose/Resistive; 10A, 1250W Tungsten; 1/2 HP).
  • Do not use with extension cords.

Troubleshooting (FCC Interference):

If the device causes harmful interference to radio or television reception:

  • Reorient or relocate the receiving antenna.
  • Increase the separation between the equipment and receiver.
  • Connect the equipment into an outlet on a circuit different from that to which the receiver is connected.
  • Consult the dealer or an experienced radio/TV technician for assistance.

Warranty and Support:

  • Warranty: This Jasco product comes with a 1-year limited warranty.
  • Website: Visit www.byjasco.com for warranty details.
  • Customer Support: For questions, contact Jasco Products Company LLC at 1-800-654-8483 between 7:00 AM and 8:00 PM CST.

myTouchSmart Simple Set 26892 Specifications

General IconGeneral
BrandmyTouchSmart
ModelSimple Set 26892
CategoryTimer
LanguageEnglish

Related product manuals