EasyManua.ls Logo

myTouchSmart SunSmart 35150-1 - User Manual

myTouchSmart SunSmart 35150-1
1 page
Print Icon
Loading...
Sunset On: Press “sunset on” button and the sunset time will flash on the
screen. Use arrows ( ) to adjust time (time can be adjusted up to 1
hour in either direction) and press Set ( ). Days of the week will then
flash on screen. Use arrows ( ) to select the correct day options and
press Set ( ).
Sunrise O: Press “sunrise o” button and the sunrise time will flash on
the screen. Use arrows ( ) to adjust time (time can be adjusted up to
1 hour in either direction) and press Set ( ). Days of the week will then
flash on screen. Use arrows ( ) to select the correct day options and
press Set ( ).
II. Preset schedules
Evening Preset: This option will turn the light on at sunset and o at
12am. When the “evening ( -12am)” button is pressed, the sunset time
will flash on the screen. Use arrows ( ) to adjust time (time can be
adjusted up to 1 hour in either direction) and press Set ( ). Days of the
week will then flash on screen. Use arrows ( ) to select the correct
day options and press Set ( ).
III. Extra programs
This option oers 7 additional on/o programs. When the “my extra
programs” button is pressed “1 ON” will flash on screen but no time will be
displayed, only “--:--.” Press Set ( ) to select program “1 on” and the “--:--”
will flash on screen. Use arrows ( ) to select time and press Set ( ).
Days of the week will then flash on screen. Use arrows ( ) to select the
desired days of the week and press Set ( ). Program 1 On (“1 ON”) is
now set. To go to the next program, use the arrows ( ) and press
SET ( ) on the next program you want to set. Repeat these steps for
Program 1 O (“1 OFF”), Program 2 On (“2 ON”), Program 2 O (“2
OFF”), etc.
To skip through without setting, simply stop pressing buttons and the
display will revert to clock mode after 10 seconds. You can also use the
arrows ( ) to scroll through the options without setting a time. After
Program 7 O (“7 OFF”), the menu will start over with Program 1 On
(“1 ON”). The LED indicator light will remain on if any of the additional
programs are set.
To delete one of the extra programs: Use arrows ( ) to scroll
time back to between 11:59pm and 12:00am. The display will show
“--:--” to confirm the program has been deleted. No additional steps are
needed. The display will revert back to clock mode after 10 seconds.
IV. Days of the week options order
Days of the week options will display in the following order when
using the arrow unless you are using the settings in “my extra programs.” In this case, they
will begin with the last On time that was set.
M thru Su — all days of the week
M thru F
Sa, Su
1. Setup
If no numbers are visible on-screen, plug timer into an outlet and let
timer charge for 1 hour. Once charged, press the reset (
r
) button
in the lower right corner using a toothpick or pencil.
Note: If no buttons are pressed for 10 seconds during the intial set
up of the timer or when setting additional programs, timer will go
back to Clock Mode. To re-enter programming mode, press and
hold Set ( ) button for 3 seconds.
Upon reset, clock should be blinking. Use up ( ) and down ( )
arrows to set current time (take note of AM or PM time) and press
Set ( ).
“YEAR” will flash on screen. Press Set ( ) and it will show “2017.”
Use arrows ( ) to change year if needed and press Set ( ).
“MON” will flash on screen. Press Set ( ) and it will show “01.
Use arrows ( ) to select current month and press Set ( ).
“DAY” will flash on screen. Press Set ( ) and it will show “01.
Use arrows ( ) to select current day and press Set ( ).
“ZONE” will flash on screen. Press Set ( ) and it will show “NOR”,
followed by “CENT,” “SOU,” “HI” and “ALAS.” Use arrows ( ) to
select correct region (zone) and press Set ( ). See figure below.
“DST” (Daylight Saving Time) will flash on screen. Press Set ( ) and it
will show “ON” on the left of the screen. Press Set ( ) again to leave
DST on or use arrows to change to “OFF” before pressing Set ( ).
Note: Choose DST ON if your local area observes Daylight Saving
Time. The timer will automatically adjust backwards and forwards an
hour. Choose DST OFF if your local area does not observe Daylight
Saving Time.
2. Programming options
Note: If the LED next to any button is illuminated, that indicates that
the program is active. To deactivate, press the button again.
I. Choose your custom on/o times
My On Time: Press “my on time” button and the clock will begin
blinking. Set desired on time and press Set ( ). Days of the week will
then flash on screen. Use arrows ( ) to select the correct day(s)
and press Set ( ).
My O Time: Press “my o time” button and the clock will begin
blinking. Select desired o time and press Set ( ). Days of the week
will then flash on screen. Use arrows ( ) to select the correct day
options and press Set ( ).
MADE IN CHINA
Distributed by Jasco Products Company LLC, 10 E.
Memorial Rd., Oklahoma City, OK 73114.
This Jasco product comes with a 1-year limited warranty.
Visit www.byjasco.com for warranty details.
Questions? Contact us at 1-800-654-8483 between
7:00AM–8:00PM CST.
RISK OF ELECTRIC SHOCK
PLUG DIRECTLY INTO AN
ELECTRICAL OUTLET
DO NOT USE IN WET LOCATIONS
FULLY INSERT PLUG
USE INDOORS ONLY
UNPLUG TIMER BEFORE CLEANING
KEEP CHILDREN AWAY
RISK OF FIRE
DO NOT USE TO CONTROL APPLIANCES
THAT CONTAIN HEATING ELEMENTS
(COOKING APPLIANCES, HEATERS,
IRONS, ETC.)
DO NOT EXCEED ELECTRICAL RATINGS
DO NOT USE WITH EXTENSION CORDS
35150-1 VERSION 01 09/12/17
Specifications:
125V 50/60 Hz
15A 1875W General
Purpose/Resistive
10A 1250W Tungsten
1/2 HP
Works with dimmable
LED and CFL bulbs.
Indoor Digital
SunSmart™
Plug-In Timer
WARNING
Patent pending
U.S. Pat 9,320,122
MTS53000
FCC Statement
This device complies with Part 15 of the FCC and Industry Canada license-exempt RSS standard(s). Operation is
subject to the following two conditions: (1 this device may not cause harmful interference, and (2) this device must
accept any interference received, including interference that may cause undesired operation.
FCC NOTE: The manufacturer is not responsible for any radio or TV interference caused by unauthorized
modifications to this equipment. Such modifications could void the user’s authority to operate the equipment.
NOTE: This equipment has been tested and found to comply with the limits for a Class B digital device, pursuant to
Part 15 of the FCC Rules. These limits are designed to provide reasonable protection against harmful interference in
a residential installation. This equipment generates, uses and can radiate radio frequency energy and, if not installed
and used in accordance with the instructions may cause harmful interference to radio communications. However,
there is no guarantee that interference will not occur in a particular installation. If this equipment does cause
harmful interference to radio or television reception, which can be determined by turning the equipment o and on,
the user is encouraged to try to correct the interference by one or more of the following measures:
• Reorient or relocate the receiving antenna.
• Increase the separation between the equipment and receiver.
• Connect the equipment into an outlet on a circuit dierent from that to which the receiver is connected.
• Consult the dealer or an experienced radio/TV technician for help.
CAN ICES-3(B)/NMB-3(B)
My on/o time
Set custom on/o time
Clock vs. set mode indicator
Reset button
Clears all current times and schedules —
resets timer to factory settings
Up and down arrows
Scroll to set current time and scroll
to schedule program
Evening preset
Set on/o time to dusk - 12am
AM/PM indicator
Sunset on/sunrise o time
Set on/o time to sunset/sunrise
or +/- 1hr
My extra programs button
Oers seven additional on/o
programs
Set button
Press to select various options
Day of week indicator
Su thru Th
F, Sa
Su thru Sa — each day of the week separately
NORTH
ALASKA
HAWAII
NORTH
CENTRAL
CENTRAL
SOUTH
SOUTH
Question and Answer IconNeed help?

Do you have a question about the myTouchSmart SunSmart 35150-1 and is the answer not in the manual?

Overview

This document describes the SunSmart™ Plug-In Timer, a digital timer designed for indoor use to automate the on/off times of various electrical appliances.

Function Description

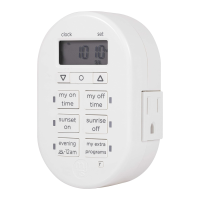
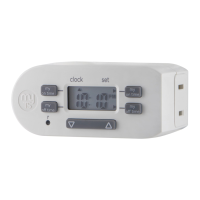
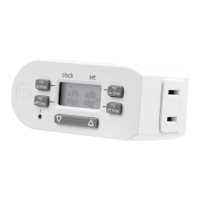
The SunSmart™ Plug-In Timer allows users to set custom on/off times for connected devices, as well as utilize preset schedules based on sunrise and sunset. It features a clock with AM/PM and day of week indicators, enabling precise scheduling. The timer can store up to seven additional on/off programs, offering flexibility for various household needs. It automatically adjusts for Daylight Saving Time based on the selected geographical zone (North, Central, South, Hawaii, Alaska), ensuring accurate timing year-round.

Usage Features

Initial Setup:

Upon plugging in the timer, if no numbers are visible, it needs to charge for 1 hour. After charging, a reset is required using a toothpick or pencil in the lower right corner button. If no buttons are pressed for 10 seconds during initial setup or program setting, the timer reverts to Clock Mode. To re-enter programming, press and hold the Set button for 3 seconds.

Setting Current Time and Date:

After a reset, the clock will blink. Use the up (△) and down (▽) arrows to set the current time, paying attention to AM/PM, then press Set (O). To set the year, "YEAR" will flash, showing "2017." Press Set (O), use the arrows to adjust if needed, and press Set (O) again. For the month, "MON" will flash, showing "01." Press Set (O), use the arrows to select the current month, and press Set (O). For the day, "DAY" will flash, showing "01." Press Set (O), use the arrows to select the current day, and press Set (O).

Setting Geographical Zone:

"ZONE" will flash, showing "NOR" (North), followed by "CENT" (Central), "SOU" (South), "HI" (Hawaii), and "ALAS" (Alaska). Use the arrows to select the correct region and press Set (O). This setting is crucial for accurate sunrise/sunset calculations.

Daylight Saving Time (DST) Adjustment:

"DST" will flash, showing "ON" on the left. Press Set (O) to keep DST on, or use the arrows to change it to "OFF" before pressing Set (O). If your local area observes DST, choose "ON" for automatic adjustments.

Programming Options:

An illuminated LED next to any button indicates an active program. Pressing the button again deactivates it.

Custom On/Off Times:

  • My On Time: Press the "my on time" button. The clock will blink. Set the desired on time using the arrows and press Set (O). Then, select the desired day(s) of the week using the arrows and press Set (O).
  • My Off Time: Press the "my off time" button. The clock will blink. Set the desired off time using the arrows and press Set (O). Then, select the desired day(s) of the week using the arrows and press Set (O).

Sunset/Sunrise Schedules:

  • Sunset On: Press the "sunset on" button. The sunset time will flash. Use the arrows to adjust the time (up to 1 hour in either direction) and press Set (O). Select the desired day(s) of the week using the arrows and press Set (O).
  • Sunrise Off: Press the "sunrise off" button. The sunrise time will flash. Use the arrows to adjust the time (up to 1 hour in either direction) and press Set (O). Select the desired day(s) of the week using the arrows and press Set (O).

Evening Preset:

This option turns the light on at sunset and off at 12 AM. Press the "evening (✗-12am)" button. The sunset time will flash. Use the arrows to adjust the time (up to 1 hour in either direction) and press Set (O). Select the desired day(s) of the week using the arrows and press Set (O).

Extra Programs (1-7):

The "my extra programs" button offers seven additional on/off programs. When pressed, "1 ON" will flash, showing "--:--". Press Set (O) to select "1 on," and "--:--" will flash. Use the arrows to set the time and press Set (O). Select the desired day(s) of the week using the arrows and press Set (O). To set subsequent programs (e.g., "1 OFF," "2 ON," "2 OFF"), use the arrows to navigate and press Set (O). To skip setting a program, stop pressing buttons; the display will revert to clock mode after 10 seconds. The arrows can also be used to scroll through options without setting a time. After "7 OFF," the menu loops back to "1 ON." An LED indicator light will remain on if any extra programs are set.

Deleting Extra Programs:

To delete an extra program, use the arrows to scroll the time back to between 11:59 PM and 12:00 AM. The display will show "--:--" to confirm deletion. The display will revert to clock mode after 10 seconds.

Days of the Week Options Order:

Days of the week options display in a specific order when using the up (△) arrow, unless in "my extra programs" mode, where they start with the last On time set. The order is: M thru Su (all days), Su thru Th, M thru F, F, Sa, Sa, Su, and then each day of the week separately.

Maintenance Features

Reset Button: The reset button clears all current times and schedules, restoring the timer to its factory settings. This is useful for troubleshooting or starting fresh with programming. Unplugging for Cleaning: Always unplug the timer from the electrical outlet before cleaning to prevent electric shock. Children Away: Keep children away from the timer, especially during cleaning or maintenance.

myTouchSmart SunSmart 35150-1 Specifications

General IconGeneral
Model Number35150-1
ProgrammableYes
DisplayLCD
TypeTimer
FeaturesSunSmart technology

Related product manuals