Do you have a question about the NANLITE PavoTube II 30X and is the answer not in the manual?
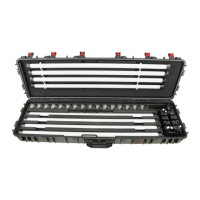
Specifications for PavoTube II 15X, 30X, and 60X models.
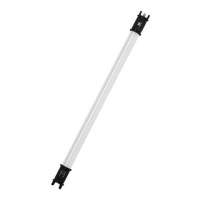
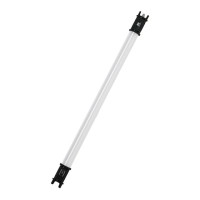
Detailed description of the fixture's parts, buttons, and ports.
Instructions for connecting the fixture to power and its battery operation.
Connecting and controlling the fixture using a DMX console.
How to turn on the fixture and navigate modes using the MODE button.
Adjusting DIM, CCT, and G/M parameters in CCT mode.
Adjusting DIM, HUE, and SAT parameters in HSI mode.
Selecting and adjusting special effects within Effect mode.
Important safety measures for handling and using the fixture.
Guide to identify and resolve common fixture malfunctions.
The Nanlite PavoTube II 15X/30X/60X RGBWW LED Pixel Tube Light is a versatile lighting solution designed for professional photo and video production. This user manual outlines its features, usage, remote control capabilities, and maintenance guidelines.
The PavoTube II series offers a comprehensive range of lighting modes, including CCT (Correlated Color Temperature), HSI (Hue, Saturation, Intensity), EFFECT, and PIXEL FX. These modes allow users to achieve a wide array of creative lighting effects and precise color control. The CCT mode enables adjustment of color temperature from 2700K to 12000K, along with green/magenta shift control. The HSI mode provides full control over hue, saturation, and intensity, allowing for the creation of vibrant and dynamic colors.
The EFFECT mode includes a variety of built-in special effects such as Hue Loop, CCT Loop, INT Loop, CCT Flash, HUE Flash, CCT Pulse, Hue Pulse, Storm Auto, Storm Manual, Police Car, TV, Paparazzi, Candle/Fire, Disco, Bad Bulb, Firework, Explosion Auto, Explosion Manual, and Welding. These effects can be triggered manually or set to loop, offering flexibility for different scenarios. The PIXEL FX mode further expands creative possibilities with effects like HUE LOOP, CCT LOOP, INT LOOP, MULTICOLOR, FADE, SCROLL, and RAINBOW, allowing for intricate pixel-based lighting designs.
The device features a clear display for menu and option navigation, making it easy to switch between modes and adjust settings. Physical buttons for MODE, increase/decrease settings ("+" and "-"), TRIGGER, Power Switch, SWITCH, and LOCK provide intuitive control. The TRIGGER button is specifically designed for activating STORM MANUAL and EXPLOSION MANUAL effects. A LOCK button is included to prevent accidental changes to settings during operation, which can be long-pressed to engage or disengage.
For connectivity, the PavoTube II is equipped with a 1/4-20 mount receiver for attaching various accessories. It includes a DC power socket for external power input and a USB Type-C port for firmware updates. Additionally, a DMX interface allows for DMX signal input and output via an adapter cable, enabling integration into professional lighting setups.
The PavoTube II offers flexible power options. It can be powered by connecting it to a power adapter for continuous operation. The built-in battery automatically takes over once charged and the power adapter is unplugged, providing portability and convenience for on-location shoots. Eyebolts are provided for easy installation and mounting of the light fixture.
Remote control is a key feature of the PavoTube II series, supporting 2.4G, DMX, RDM, and built-in Bluetooth. Before using remote control, the channel needs to be set on the fixture.
For DMX remote control, the fixture connects to a DMX/RDM console using a DMX adapter cable. The manual provides detailed wiring diagrams for DMX IN and DMX OUT connections, emphasizing the importance of correct pin connections (Pin1, Pin2, Pin3 for DMX signal, Pin4, Pin5 are connectionless). It also advises against internal pins contacting the inner case or each other. The fixture is compatible with the DMX512 (1990) control signal. For optimal DMX performance, a DMX terminator (not included) should be connected to the DMX output of the last fixture in a chain to prevent interference. The terminator involves a 120Ω resistor across Pin 2 and Pin 3 in an XLR plug. DMX reference guides are available for download from the manufacturer's website or via a QR code provided in the manual.
For 2.4G remote control, the fixture's channel must match that of the 2.4G remote controller or the APP via a transmitter box (both sold separately). The fixture supports both V1.0 and V2.0 wireless protocols, with V2.0 recommended for WS-RC-C1 or WS-RC-C2 remote controllers.
RDM (Remote Device Management) functionality allows for control and monitoring of the fixture via a console with RDM capabilities, connected through a DMX adapter cable. The UID format of the fixture is specified, including serial number, model identification (PavoTube II 15X, 30X, 60X), and manufacturer information.
The device's menu system allows for various settings adjustments. Users can switch between CH (channel), LANGUAGE, DMX MODE, DMX PIXEL, WIRELESS PR, BLUETOOTH RESET, and VERSION. Language settings include English and Chinese. DMX MODE allows selection between CCT 8bit and CCT 16bit, while DMX PIXEL enables setting the desired number of DMX pixels. Bluetooth can be reset through the menu, which automatically returns to the main menu after completion. The VERSION menu displays the current firmware version of the fixture.
The manual provides important safety precautions and notices to ensure the longevity and safe operation of the PavoTube II. Users are advised to inspect the package for damage upon receipt and contact the dealer or manufacturer if any is found. It is crucial to use only power cables that are in good condition and to handle them carefully when plugging or unplugging. Before installation, verifying that the power supply voltage is compatible with the fixture's specifications is essential. The light should be turned off when not in use or during cleaning.
For cleaning, a soft cloth with a neutral detergent should be used to wipe off dirt, avoiding abrasive or strong detergents. The fixture should be operated in environments where it is not at risk of getting wet or exposed to extreme temperatures. Specific operating temperature limits are provided: PavoTube II 15X and 30X should not exceed 45°C, and PavoTube II 60X should not exceed 40°C. Storing or using the fixture near high heat sources is discouraged.
The PavoTube II 60X should not be mounted on an LS-FL-1/4 stand. Users are strictly advised not to disassemble the fixture or attempt repairs themselves. Any required maintenance should be performed by suitably qualified professionals in strict compliance with the instructions in the manual.
A general fault detection and diagnosis section is included to help users troubleshoot common issues. For example, if the fixture doesn't boot up, users should check power connections and voltage. If DMX control isn't working, DMX address settings and XLR cable connections should be verified. If the display is on but there's no light output, checking intensity settings or if the light is in storm/welding mode is recommended. For flickering lights, ensuring the fixture is not in extreme temperatures or EFFECT mode is suggested. If issues persist after troubleshooting, users are advised to contact their place of purchase.
The manual also states that future firmware releases may add new lighting effects and functionalities, with updates available on the manufacturer's website.
| Model | PavoTube II 30X |
|---|---|
| Category | Lighting Equipment |
| Type | LED Tube Light |
| Shape | Tube |
| Light Source | LED |
| TLCI | 98 |
| Dimming | 0-100% |
| RGB | Yes |
| Power | 30W |
| Control | DMX |
| Power Source | Battery |
| Battery Type | Li-Ion |
| Effects | 15 built-in effects |
| Mounting Options | T12 Mount |
| CRI | ≥95 |
| Battery Life | Up to 1 Hour at 100% Brightness |