Do you have a question about the Naomi Home Taylor and is the answer not in the manual?
Product contains small parts, sharp points/edges. Keep unassembled items away from children and animals.
Follow on-product/carton warnings. Do not remove labels. Keep children under 3 from using the cabinet.
To reduce tip-over risk: install restraint, do not place TV on product, prevent climbing or hanging.
Supervise children under the intended age. Prohibit horseplay, jumping, or climbing on the unit.
Check components, use level surfaces, use hand screwdrivers, clean with damp cloth.
Provides a visual overview of the assembly process without replacing detailed instructions.
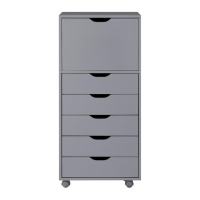
Lists all cabinet parts, assembly hardware, and required tools for successful assembly.
Select screws and dowels. Position panels 3 and 4 to the base panel 3, attaching with hardware.
Insert cam bolts and dowel pins into panels 3 and 4. Repeat for other side panels.
Attach panel 4 to panel 3 using dowel pins and cam bolts. Insert screws for stability.
Insert screws and wheel assemblies into the base. Attach horizontal supports for stability.
Stand up panels 3 and 4. Install side panel 5 along the grooves on both sides.
Insert cam bolts and dowel pins into the top panel 1 and the side panels. Attach to the main structure.
Insert cam bolts and dowel pins into drawer support parts 7 and 8. Attach drawer slides.
Install drawer bottom 11 into grooves. Attach drawer sides 8 and 9. Secure with screws.
Insert drawer slides into the cabinet sides. Install completed drawers into the drawer table structure.
Confirms cabinet assembly is complete and provides fields for product packaging details.
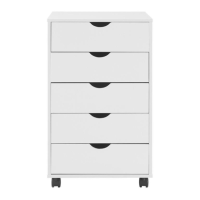
| Product Type | Dresser |
|---|---|
| Material | Wood |
| Color | White |
| Number of Drawers | 6 |
| Style | Modern |