Do you have a question about the Naomi Home Roxy and is the answer not in the manual?
Choking hazard warning for small parts, sharp points, and edges in unassembled state. Keep parts away from children and animals.
Follow warnings on table/carton. Do not remove warning label. Do not allow children under 3 to use the table. Do not use substitute parts.
Children have died from tip-over. Always install restraint, never put TV on product, never let children climb, never open more than one drawer.
Supervise children regarding access and climbing. Prohibit horseplay and jumping. Improper use can cause tip-over or injury.
Lists Phillips screwdriver (medium, not included) and Allen wrench (included). Advises against using power screwdrivers or drills.
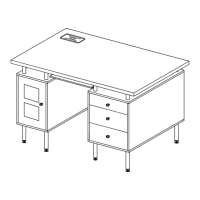
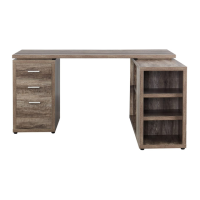
Attach cam bolts (B) to table top (1) and insert dowel pins (D) into shelf supports (4, 5) to prepare for assembly.
Install bottom shelf (6) to the right side (2), attach shelf supports (4, 5) with cam bolts (F) and long bolts (E), and secure with cam locks (C).
Insert middle shelf (7) between shelf supports (4, 5). Secure with long bolts (E) into side (3) and middle shelf (7), and cam bolts (F) into shelf supports (4, 5).
Insert cam locks (C) into bottom holes of side pieces (3, 2) and into bottom shelf (6) to secure the structure.
Install table top (1) onto the assembled base (2,3,4,5) and secure it using cam locks (A).
Lift the table top (1) to serve as a desktop. Insert plugs (G) into top sides of supports (3) and shelves (4,5) for stability.
Section to record product details such as model, color, shipment reference, and date.
| Brand | Naomi Home |
|---|---|
| Model | Roxy |
| Category | Indoor Furnishing |
| Language | English |