Do you have a question about the Napier ROOFTOP TENT and is the answer not in the manual?
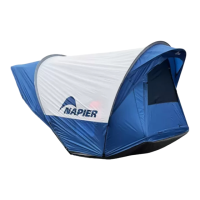
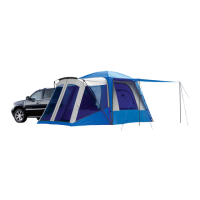
This document describes the Napier Rooftop Tent, a portable shelter designed for outdoor camping that mounts directly onto a vehicle's crossbars. It offers a convenient and elevated sleeping solution, keeping campers off the ground and away from potential ground-level hazards.
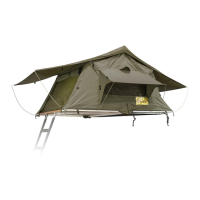
The Napier Rooftop Tent serves as a temporary, elevated sleeping and living space for outdoor enthusiasts. It is designed to be easily deployed and packed away, providing a quick and comfortable camping setup. The tent's primary function is to offer shelter from the elements, including rain, wind, and sun, while providing a secure and comfortable sleeping platform. By mounting on a vehicle's roof, it elevates the sleeping area, which can offer advantages such as improved ventilation, reduced exposure to ground moisture and insects, and a better vantage point. The design incorporates a sturdy base, a durable fabric tent body, and an integrated ladder for access. It also includes features like awnings for windows, providing additional shade and weather protection. The tent is intended for use in various outdoor environments, from established campsites to more remote locations, as long as the vehicle has appropriate crossbars installed.
Campsite Selection: Before setting up, users are advised to select a campsite carefully. Key considerations include avoiding areas with overhead power lines and tree limbs to prevent damage or hazards. It is also crucial to turn off the vehicle's engine and engage the parking brake to ensure stability and safety during setup and use.
Pre-Installation Setup (First-Time Use): The initial setup involves several steps performed on the ground or a flat surface before mounting the tent on the vehicle. This includes aligning mounting tracks with pre-drilled holes in the tent base, securing them with bolts and nylon locking nuts. The ladder brackets are then fastened to the tent base, and the ladder itself is attached using bolts, washers, and a nylon lock nut. Finally, the black cover is attached by feeding its fabric portion into a rounded channel on three sides and then zipping it over the tent. These initial steps are only required for the first-time use and do not need to be repeated or disassembled afterward.
Attaching to Vehicle Cross Bars: Once the initial setup is complete, the tent is ready to be installed on the vehicle. This process requires assistance to lift the tent onto the vehicle's crossbars. The mounting tracks on the tent base must be perpendicular to the crossbars, and the tent should be centered. Users should note that the tent's hinge placement determines which side it will open on. Channel sliders and steel mount plates are assembled with steel bolts and then slid through the mounting tracks. These bolts, with channel sliders, are placed on the inner side of the roof rack bar. Steel mounting plates are used at each of the four corners where the rack bars and mounting tracks cross, and the bolts are secured with nylon lock nuts. After positioning and securing all eight bolts, plastic end caps are attached to the ends of the mounting tracks, gently tapped into place if necessary.
Tent Setup (Deployment): To deploy the tent for use, the travel cover is unzipped, and Velcro ladder straps are released. Any straps across the tent are undone. The ladder is then disengaged and fully extended, ensuring it is parallel to the ground. Using the ladder, users press downwards until it meets the ground, at which point the tent base should be horizontal and the tent fully upright. The ladder should be at approximately a sixty-degree angle. The ladder height is then adjusted using locking levers to achieve the desired height and secured. For awnings, gold metal rods are inserted into grommet holes on the corners of each awning/window, and the other end of the rod is inserted into fabric slits in the tent skirt at a 45-degree angle until snug.
Tent Take Down (Packing Away): When finished camping, the tent needs to be packed away. If the rainfly is wet, it should be opened once at home to dry out completely. To begin, four black bungee cords are hooked into eight plastic rings inside the tent (two above each window, two beside the lower part of each window) and clipped horizontally from window to window. This helps pull the sides in when folding the tent closed. All gold metal rods are removed, and all corners of the awning and rainfly are fastened. The ladder is then pushed up to close the tent, retracted, and secured with a Velcro strap. The four Velcro straps on each side of the tent are fastened, and the zip cover is placed over the tent. Finally, the two long-looped straps on each side of the ladder are fastened.
Cleaning and Storage: After each use, the tent should be cleaned and dried thoroughly before storage. This prevents mold, mildew, and deterioration of the fabric. Once clean and dry, the tent is folded over using the ladder, and the cover is zipped up. It is then secured with the tent tie straps and stored in a cool, dry place to maintain its condition and prolong its lifespan.
Warranty Information: Napier tents come with a one (1) year warranty from the purchase date, covering defects in improper workmanship. This warranty does not cover normal wear and tear, seam leakage through needle holes, or damage resulting from improper use, abuse, or alteration. Napier Outdoors reserves the right to replace or repair defective parts, using new or re-built parts at their discretion. Warranty claims can be submitted online, and proof of purchase (receipt) is required. If proof of purchase is not provided, or if the warranty period has ended, replacement parts can be purchased.
Ordering Replacement Parts: For ordering replacement parts, customers can contact Napier Outdoors by phone, visit their website, or email their customer service department. This ensures that users can maintain their tent in good working order even after the warranty period or for parts not covered by the warranty.
Safety Precautions: The manual emphasizes several critical safety precautions. Users are warned not to use candles, matches, or any open flames inside or near the tent, and cooking inside the tent is prohibited. Campfires should be built downwind and several meters away, and fully extinguished before leaving or retiring for the night. Extreme caution is advised when using fuel-powered lanterns or heaters, with a recommendation to use battery-operated lanterns whenever possible. Refueling lamps, heaters, or stoves inside the tent is forbidden, and all lanterns must be extinguished or turned off before sleeping. Smoking inside the tent is prohibited, as is storing flammable liquids. Adequate ventilation must be maintained at all times. The ladder must be set up securely on a dry, level surface. Nylon lock nuts should be tightened before and after long trips to ensure stability.
Warnings: Improper installation or use can lead to serious injury or death. Users must ensure the ladder is safely secured and follow all installation instructions carefully. Checking with the vehicle manufacturer for the roof rack's specified loading capacity is crucial. All flame and heat sources must be kept away from the tent fabric. While the tent is made with flame-resistant fabric (CPAI-84 compliant), it is not fireproof and will burn if in contact with a flame source. Applying foreign substances to the fabric can render its flame-resistant properties ineffective. To prevent carbon monoxide poisoning, cooking and using gas heaters inside the tent are strictly prohibited, as carbon monoxide is dangerous to health.
| Tent Type | Rooftop Tent |
|---|---|
| Capacity | 2-3 people |
| Waterproof Rating | 2000mm |
| Weight | 130 lbs |
| Seasons | 3-season |
| Tent Style | Hardshell |
| Mattress Included | Yes |
| Doors | 1 door |
| Rainfly | Included |
| Material | Polyester |
| Mattress | High-density foam |
| Ladder | Telescoping aluminum ladder |
| Windows | Mesh windows |
| Setup Time | 5 minutes |