EasyManua.ls Logo

Napier SPORTZ LINK 51000 User Manual

Napier SPORTZ LINK 51000
4 pages
To Next Page IconTo Next Page
Page #1 background imageLoading...
Page #1 background image
CAUTION
Keep all flame and heat sources away from the tent fabric.
The tent is made with flame-resistant fabric which meets
CPAI-84 specifications. This does not make it fireproof.
The fabric will burn if left in contact with any flame source.
The application of any foreign substance to the tent fabric
may render the flame-resistant properties ineffective.
To prevent carbon monoxide from entering the vehicle and
tent area, do not run the engine, do not cook inside the tent,
and do not use a gas heater in the tent. Carbon monoxide is
dangerous to your health.
Engine must be off and exhaust must be fully cooled before
tent installation and use.
Do not use candles, matches, or open flames of any kind in or
near the tent
Do not cook inside the tent
Build campfires downwind and several meters away from the
tent. Be sure to fully extinguish fires before leaving a
campsite or before retiring for the night
Exercise extreme caution when using fuel-powered lanterns
or heaters inside or around the tent. Use battery-operated
lanterns whenever possible
Do not refuel lamps, heaters, or stoves inside the tent
Extinguish or turn off all lanterns before going to sleep
Do not smoke inside the tent
Do not store flammable liquids inside the tent
NEVER run the vehicle engine when the tent is attached
Do not install the tent when the temperature is below
0ºC/32ºF or when your vehicle is wet, it may cause damage
Allow adequate ventilation inside the tent at all times
Do not attempt to drive the vehicle with the tent attached
CAMPSITE SELECTION
Select a smooth, level campsite clear of rocks,
branches, and other hard or sharp objects
Avoid areas with overhead power lines and tree limbs
Park the vehicle in the chosen campsite
Turn the engine off and engage the parking brake
WARNING
HOW TO STORE
WARRANTY INFORMATION
1. Clean and dry the tent
2. Fold all of the components into the tent
3. Roll the tent, using the pole bag as a guide
4. Secure with the tent tie straps and insert
into the carrying bag
5. Store in a cool, dry place
Napier tents have a one (1) year warranty period from the time of purchase against defects in improper
workmanship. Normal wear and tear, seam leakage through needle holes, and improper use, abuse, or
alteration are not covered under the warranty policy. Napier Outdoors will replace or repair defective parts.
Replacement parts may be new or re-built at Napier’s sole discretion. E-Warranty claim forms can be
completed online at www.napieroutdoors.com/warranty. Proof of purchase (receipt) must be provided. If you
do not provide proof of purchase, or if your warranty period has ended, replacement parts can be purchased.
To order replacement parts, contact Napier Outdoors at 800-567-2434 (9:00 am – 5:00 pm EST),
visit www.napieroutdoors.com, or email customerservice
@napieroutdoors.com
BEFORE
YOU BEGIN
instructions
LINK
MODEL 51000

Other manuals for Napier SPORTZ LINK 51000

Question and Answer IconNeed help?

Do you have a question about the Napier SPORTZ LINK 51000 and is the answer not in the manual?

Napier SPORTZ LINK 51000 Specifications

General IconGeneral
BrandNapier
ModelSportz Link 51000
TypeTruck Tent
Seasons3-season
MaterialPolyester
ColorGray
Water ResistanceWater-resistant

Summary

BEFORE YOU BEGIN

CAUTION

Safety warnings regarding fire, flammable liquids, and engine use.

WARNING

Alerts about tent fabric flammability and exhaust fume hazards.

CAMPSITE SELECTION

Guidance on choosing a safe and appropriate location for the tent.

HOW TO STORE

Instructions for cleaning and properly storing the tent.

WARRANTY INFORMATION

Details on the tent's warranty policy and how to make a claim.

PACKAGE CONTENTS

TENT SET UP

Step 1: Initial Placement

Set up your Napier Truck Tent per instructions provided in the carrying bag.

Step 2: Orienting the Tent

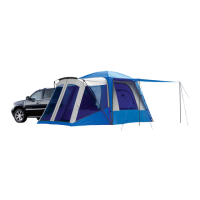
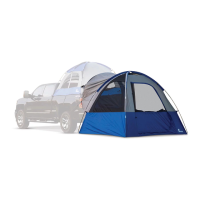
Lay out the Sportz Link Tent with the vehicle sleeve facing your truck's bed.

Step 3: Pole Assembly

Assemble tent poles by unfolding each section, noting 2 long and 1 short pole.

Step 4: Inserting Poles

Insert tent poles diagonally into sleeves, forming an X. Gently guide them.

Step 5: Creating the Arch

Insert pole ends into grommet holes and apply pressure to form tent arches.

Step 6: Attaching Clips

Attach the pole clips found on the tent structure to the assembled poles.

Step 7: Securing Ground Tent

From inside, unzip door/mesh and secure with T-straps.

Step 8: Engaging Vehicle Sleeve

Move tent towards tailgate, slip sleeve under bumper and over the entrance.

Step 9: Securing Vehicle Attachment

Attach bottom outside J-Hook strap to wheel well and tighten.

Step 10: Staking Tent

Stake down the tent through corner and entrance webbing loops.

ATTACHING THE RAINFLY

Step 11: Draping Rainfly

Drape rainfly over tent; ensure the 'Truck Tent Side' faces the truck.

Step 12: Securing Rainfly

Attach rainfly clips to bottom corners, tighten straps, and secure Velcro tabs.

Step 13: Installing Rainfly Pole

Insert rainfly pole into sleeve above door and into the grommet hole.

Step 14: Staking Guy Lines

Stake the rainfly guy lines securely to the ground.

Step 15: Installing Gear Loft

Place gear loft corner hooks into loops located on the tent ceiling.

Related product manuals