EasyManua.ls Logo

Natural Light Solar Attic Fan User Manual

Natural Light Solar Attic Fan
4 pages
To Next Page IconTo Next Page
Page #1 background imageLoading...
Page #1 background image
1
3
4
8
6
9
10
11
12
5
2
7
Note: Exploded view for illustrative purposes.
Unit comes pre-assembled.
1. (2) #8 Phillips Head Screws/Clip Assembly
2. Custom Solar Panel
3. Wire Lead
4. Adjustable Solar Panel Bracket
5. Aluminum Shroud
6. Custom DC Motor
7. Motor Isolation Bracket
8. Air Drive Precision Pitch Blade
9. 4” x 48” Stainless Steel Wire Mesh
10. Rugged 14 Gauge Shroud Support Bracket
11. (6) #6 x 1 1/2” Stainless Steel Phillips
Head Screws
12. Aluminum Flashing
1. Ensure normal safety precautions are taken when using tools and walking on roofs.
2. Do not cut any structural members in the house.
3. Measure twice and cut once.
Please take the time to read through the ENTIRE instructions prior to starting any work.
Components
IMPORTANT: Before Installing
Precautions
Reciprocating Saw
Marking Pen
String
Caulking Gun
Screw Gun
Ladders
Measuring Tape
Razor Knife
Tools Required
Inst allation Instructions
10821 North 23rd Avenue
P
hoenix, AZ 85029
800-363-9865
www.solaratticfan.com
Question and Answer IconNeed help?

Do you have a question about the Natural Light Solar Attic Fan and is the answer not in the manual?

Natural Light Solar Attic Fan Specifications

General IconGeneral
BrandNatural Light
ModelSolar Attic Fan
CategoryFan
LanguageEnglish

Summary

Installation Instructions

Before Installing

Important preliminary steps and advice before commencing the installation process.

Precautions

Essential safety guidelines to follow during tool usage and roof work.

Tools Required

List of necessary tools for performing the solar attic fan installation.

Components

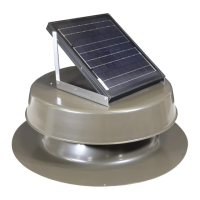
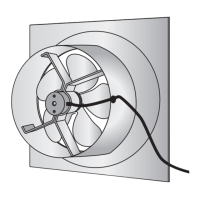
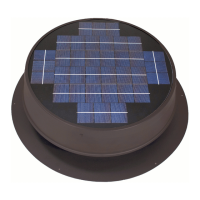
Overview of the parts included in the solar attic fan unit for installation reference.

Installation Pointers

Determine Location

Guidance on choosing the optimal south-facing roof location for the solar vent unit.

Mark Cutting Circle

Instructions for marking a 19-inch circle on the roof for the vent hole.

Cut Hole

Procedure for cutting the marked circle using a reciprocating saw, avoiding structural members.

Rafter Considerations

Advice on cutting around roof rafters based on construction spacing (16" or 24" on center).

Prepare Flashing Slits

Cutting slits in shingles and tar paper to accommodate the flashing.

Cut Roofing Nails

Cutting roofing nails at specific positions to allow flashing to slide underneath shingles.

Caulk Flashing Underside

Applying caulking material to the underside of the flashing for sealing.

Secure Flashing

Sliding flashing under shingles and securing it with screws at designated positions.

Seal Screw Heads

Caulking exposed screw heads at the 6:00 and 12:00 positions for weather protection.

Adjust Solar Panel

Loosening screws to adjust the solar panel for optimal sunlight collection and retightening.

Warranty Information

Warranty Coverage

Details the 25-year warranty on the housing, solar panel, and motor for the attic fan.

Registration

Instructions to complete and mail the registration card for proof of purchase and warranty.

Related product manuals