EasyManua.ls Logo

Nemco Fresh-O-Matic 6625B User Manual

Nemco Fresh-O-Matic 6625B
2 pages
To Next Page IconTo Next Page
Page #1 background imageLoading...
Page #1 background image
Operating and Maintenance Instructions
Model: 6625B Fresh - O - Matic ® Food Steamer
RETRO-FIT KIT INSTRUCTIONS
NEMCO FOOD EQUIPMENT 301 Meuse Argonne, Hicksville, OH 43526
Phone: (419) 542-7751 Fax: (419) 542-6690 Toll free: 1-800-782-6761
www.nemcofoodequip.com
1
48182-RETRO
4-2014
INTRODUCTION
1. Please read instructions before servicing this appliance.
2. When using electrical appliances, basic precautions should always be followed to reduce the risk of fire, electric shock
and injury.
SAFETY INSTRUCTIONS
1. Warning! All power must be disconnected at power source before any service procedure is performed.
2. This appliance is hot when in use & for a period of time after.
3. To disconnect appliance, turn controls off and remove plug from power source.
4. Do not operate any appliance with a damaged cord or plug.
5. Connect to properly grounded outlets only.
6. This appliance is equipped with a power cord with a three-blade plug. Plug ONLY into a matching three-blade outlet.
DO NOT cut or break off the third blade or attempt to use with a two-blade extension cord.
7. To prevent a possible fire, it is recommended that the unit is placed on a non-combustible surface.
8. This appliance has electrical parts. Do not use it in areas where gasoline, paint, or flammable liquids are used or
stored.
INSTRUCTIONS
1. Begin by removing existing control panel assembly by removing (2) screws from the bottom of the control panel.
2. Disconnect all wires from the control board set existing control panel assembly aside.
3. Remove the stainless steel tube between the tank and the pump.
4. Provided in the kit is a spray nozzle assembly and a compression nut. Both parts will not be needed. Evaluate the
heater plate to determine which component will need to be used. If the spray nozzle needs to be used remove entire
spray nozzle from the heater plate. If the compression nut is to be used, it should already have been removed with
the stainless steel tube.
5. Install the tubing into the fitting installed on the pump.
6. Install the tubing to the heater plate using either the spray nozzle assembly or compression nut.
7. Disconnect the heater wires along with the control board ground wire (this is the ground wire on the left side of the
steamer).
8. Using the control panel assembly and wire harness provided re-assemble the steamer. A wiring schematic has been
provided.
9. Once re-assembled test steamer to ensure proper functionality. NOTE: IF WATER LEVEL LIGHTS FAIL TO WORK
WHEN THE TANK IS INITIALLY FILLED, SLOWLY ADD TAP WATER TO THE TANK UNTIL THE LIGHTS BEGIN
TO WORK. ADD UP TO 1 CUP OF TAP WATER DO NOT OVERFILL.
Question and Answer IconNeed help?

Do you have a question about the Nemco Fresh-O-Matic 6625B and is the answer not in the manual?
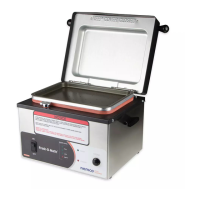
Nemco Fresh-O-Matic 6625B Specifications

General IconGeneral
Model6625B
TypeElectric Steamer
Voltage120V
MaterialStainless Steel
PhaseSingle
Amperage12.5A
Power1500 Watts

Summary

Safety Instructions

Power Disconnection Before Service

Ensure all power is disconnected from the source before performing any service.

Appliance Hot After Use

The appliance remains hot during and after use, posing a burn risk.

Appliance Disconnection Procedure

Turn controls off and remove the plug from the power source to disconnect.

Damaged Cord/Plug Warning

Do not operate the appliance if the cord or plug is damaged.

Grounded Outlet Requirement

Always connect the appliance to properly grounded outlets.

Three-Blade Plug and Outlet Use

Use only matching three-blade outlets and do not alter the plug.

Non-Combustible Surface Placement

Place the unit on a non-combustible surface to prevent fire hazards.

Flammable Area Restriction

Avoid using the appliance in areas with flammable liquids or vapors.

Retro-Fit Kit Installation

Remove Existing Control Panel

Remove the existing control panel and disconnect its wires.

Remove Stainless Steel Tube

Disconnect the stainless steel tube connecting the tank and pump.

Prepare Heater Plate Components

Evaluate and prepare the spray nozzle or compression nut for the heater plate.

Install Tubing on Pump

Connect the new tubing to the fitting on the pump.

Install Tubing on Heater Plate

Attach the tubing to the heater plate using the provided fitting.

Disconnect Heater Wires

Disconnect the heater wires and the control board ground wire.

Re-assemble Steamer

Re-assemble the steamer using the new control panel and wire harness.

Test Functionality and Water Level Lights

Test the steamer and add water slowly if water level lights do not work.

Wiring Schematic Diagram

Component Identification

Identifies key components like pump, heater plate, and control board.

Wiring Connections

Details electrical connections for power cord, switches, sensors, and components.

Control Board Rear View

Shows the rear view of the control board with terminal labels.

Revision Record

Tracks changes and revisions made to the wiring schematic.

Related product manuals