EasyManua.ls Logo

New England Arbors Camelot - User Manual

Default Icon
23 pages
Print Icon
To Next Page IconTo Next Page
Loading...
12 x 12 Flat Top
Louvered Pergola
ASSEMBLY GUIDE
Ver 1.1-101415
Model: Camelot
www.newenglandarbors.com
OPTIONAL ACCESSORIES:
s"OLT$OWN"RACKET+ITs0RIVACY7ALLs0ERGOLA0LANTER
(4 for Pergola)
Question and Answer IconNeed help?

Do you have a question about the New England Arbors Camelot and is the answer not in the manual?

Summary

Pergola Assembly Introduction

Getting Started and Setup

Initial advice, tool recommendations, and assembly environment setup.

Planning and Placement Advice

Location considerations and site preparation before assembly.

Product Usage Restrictions

Limitations on adding weight loads like swings or people.

Pergola Parts Identification

Illustrated Component List

Visual identification and labeling of all components included in the kit.

Pergola Material Breakdown

Parts Check and Customer Service

Instructions to check parts and contact customer service for missing items.

Additional Pergola Installation Needs

Included Hardware and Screws

Detailed list of all hardware provided with the pergola kit.

Recommended Materials to Purchase

List of optional and required materials to purchase separately.

Essential Tools for Assembly

A list of necessary tools required for building the pergola.

In-Ground Post Installation

Step 1: Layout and Stringlines

Measuring and marking post locations for a square installation.

Step 2: Post Setting and Concrete

Excavating holes, placing posts, and filling with concrete.

Bolt-Down Post Installation

Bracket Placement and Drilling

Marking, drilling, and securing bolt down brackets to surfaces.

Post Securing and Shimming

Placing posts in brackets and using shims for a level fit.

Vinyl Column Assembly and Mounting

Column Preparation and Joining

Inserting post guides, applying weld glue, and connecting column sections.

Column Securing to Posts

Sliding trims and fastening vinyl columns to the wood posts.

Main Support Beam Assembly

Joining Beam Sections

Assembling main support beam sections using joiners and end caps.

Aligning Beam Pre-Drilled Holes

Importance of aligning holes for correct post connection.

Main Support Beam Final Steps

Fastening Beams and Drilling

Securing beam joiners and drilling holes for structural integrity.

Rafter Assembly Preparation

Notching Wood Inserts

Preparing wood inserts by notching them to fit rafter slots.

Rafter Assembly Process

Inserting Boards and Bars

Installing louver boards into brackets and attaching pre-assembled louver bars.

Securing Rafters and Repeating

Fastening rafter joiners and repeating assembly for all rafters.

Support Beams and Rafter Placement

Attaching Main Support Beams

Raising beams onto posts, hand-tightening, then securing with screws.

Positioning and Spacing Rafters

Placing rafters onto beams, ensuring specific spacing for louvers.

Securing Structural Components

Fastening Rafters to Posts

Securing the rafters to the pergola posts with screws.

Fastening Beam-Rafter Intersections

Securing all intersections where beams and rafters meet.

Louver Assembly Guide

Identifying Louver Bar Types

Differentiating and laying out the various pre-assembled louver bar configurations.

Initial Louver Bar Layout

Arranging the twelve louver bar assemblies according to instructions.

Louver Boards and Bars

Inserting Louver Boards

Inserting louver boards completely into the assembly brackets.

Attaching Louver Bars & Repeating

Pressure fitting louver bars and repeating for all sections.

Louver Assembly Mounting Steps

Placing Louver Assembly on Brackets

Carefully lowering the louver assembly onto steel holder brackets.

Securing the Short Louver Bar

Fastening the short louver bar with nuts, noting adjustments needed.

Steel Bracket Installation

Positioning Steel Holder Brackets

Adjusting bracket position to ensure free louver operation.

Fastening Steel Brackets

Securing steel brackets to the louver assembly from top and bottom.

Completing Louver Assembly

Repeating Louver Rows

Continuing the louver installation for the remaining rows.

Installing Post Caps

Placing the final post caps on top of the pergola columns.

Turn Bar Holder Installation

Mounting the Holder to Post

Selecting a location and mounting the turn bar holder to a post.

Hanging the Turn Bar

Attaching the turn bar to the installed holder.

Pergola Operations and Care

Adjusting Louver Positions

Using the turn bar to change the angle of the louvers.

Troubleshooting Louver Issues

Tips for resolving difficulties with louver operation.

Snow Load Safety

Recommendation to keep louvers open during heavy snow.

Pergola Modification Guidelines

Shortening Pergola Dimensions

Guidelines for reducing the overall size of the pergola.

Cutting Beams and Boards

Instructions on how to cut beams and boards for modification.

Pergola Resizing Example

Example of Dimension Reduction

A specific example of resizing the pergola to new dimensions.

Overview

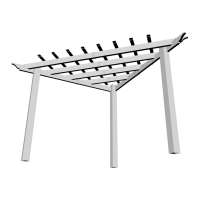
The device described in this manual is a 12 x 12 Flat Top Louvered Pergola, model Camelot, manufactured by New England Arbors. It is designed as an outdoor structure to provide shade and aesthetic appeal, featuring adjustable louvered panels on the roof.

Function Description:

The Camelot Pergola serves as a freestanding outdoor structure, offering a shaded area for relaxation or entertainment. Its primary function is to provide adjustable shade through its louvered roof system, allowing users to control the amount of sunlight filtering through. The louvered design enables the user to open or close the panels, adapting to varying weather conditions or personal preferences. It is designed to be installed either in-ground with pressure-treated wood posts embedded in concrete or mounted on an existing concrete or wood surface using bolt-down brackets. The structure is intended for static use and is not designed to support additional weight loads such as swings, people, or other objects.

Important Technical Specifications:

  • Dimensions:
    • Overall Footprint (outside of posts): 12 feet x 12 feet (144 inches x 144 inches or 340.4 cm x 340.4 cm).
    • Height (Maximum): 102 inches (90 inches to the bottom of the main support beams, 103.9 inches to the top of the pergola).
    • Post Spacing (center to center): 134 inches (341.3 cm).
    • Diagonal Distance (from corner of wood post to corner of wood post): 191 5/8 inches (486.7 cm).
    • Rafter Spacing (critical for louver placement): 42 inches between middle two rafters.
  • Materials:
    • Main Structure: Vinyl components (columns, beams, rafters, louver bars, post caps, trims, decorative end caps).
    • Internal Support: Pressure-treated 4x4 wood posts (for columns), 2x6x12 pressure-treated boards (for beams and rafters).
    • Louver System: Louver boards (84), steel holder brackets (36), louver turn bar (1), turn bar holder (1).
    • Hardware: Self-auguring stainless steel screws (various sizes: 5/8", 1 1/2", 2 1/2", 4"), 9" stainless steel bolt assembly with nuts and washers, vinyl weld glue.
  • Optional Accessories (Purchased Separately):
    • Bolt Down Bracket Kit (4 for Pergola): For concrete or wood surface installation.
    • Privacy Wall.
    • Pergola Planter.
    • Base Moldings.
  • Required Additional Materials (Not Included in Kit):
    • 4x4x8 or 4x4x12 Pressure-Treated Wood Posts (4).
    • Concrete Ready Mix (4 bags) for in-ground installation.
    • 2x6x12 Pressure-Treated Boards for Beams and Rafters (10).
    • For concrete surface mounting: 1/2" x 3 1/2" x 12" Wood Shims (32), 1/4" x 2 3/4" Cement Screws - Countersunk Head (12), 3/16" Concrete drill bit (minimum 3" long).
    • For wooden/composite deck mounting: 1/2" x 3 1/2" x 12" Wood Shims (32), 1/4" x ?" Bolts and Nuts - Countersunk Head (12), 1/4" Washers (12), 1/4" Wood drill bit (minimum 3" long).

Usage Features:

  • Adjustable Louvered Roof: The key feature is the louvered roof, which can be adjusted using a Turn Bar to control the amount of sun and shade. The Turn Bar slides between louver boards and turns in a circular motion to position them.
  • Freestanding Design: The pergola is designed to stand independently, allowing flexible placement in a garden or near a house without needing attachment to an existing structure.
  • Installation Versatility: Can be installed in-ground (requiring excavation and concrete) or mounted on existing concrete or wood surfaces using optional bolt-down brackets.
  • DIY Assembly: The kit is designed for assembly by two people with basic carpentry knowledge and tools. Components are designed for easy slipping and fitting, minimizing the need for excessive force.
  • Modification Capability: The dimensions of the pergola can be moderately modified using a circular saw with a fine-tooth blade to cut, shorten, or modify vinyl components. Guidelines are provided for shortening the pergola by adjusting louver board and beam lengths, emphasizing equal cuts for aesthetic symmetry.

Maintenance Features:

  • Durable Materials: Constructed with vinyl components, which are generally low-maintenance and resistant to weathering, rot, and insects.
  • Stainless Steel Hardware: Utilizes self-auguring stainless steel screws and bolt assemblies for corrosion resistance and long-term structural integrity.
  • Snow Load Precaution: In areas with heavy snow, it is critical to keep the louvers in the OPEN position to prevent snow accumulation, which could cause the louvers to buckle and collapse.
  • Troubleshooting for Louver Operation: If the louver operation becomes difficult, it may be due to over-tightened nuts. The manual advises troubleshooting by turning nuts one by one, checking for resistance, and loosening them slightly (a quarter turn at a time) to restore smooth operation.
  • Assembly Surface Recommendation: To prevent scratching during assembly, components should be placed on a non-abrasive surface (e.g., shipping box).
  • Pre-installation Checks: Before starting, it is crucial to consider the slope of the elevation, identify utility or sprinkler line locations, and check local building codes, ordinances, neighborhood covenants, or height restrictions.

New England Arbors Camelot Specifications

General IconGeneral
BrandNew England Arbors
ModelCamelot
CategoryGarden Houses
LanguageEnglish

Related product manuals