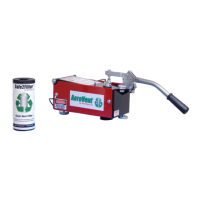
The AeroVent® Standard is an aerosol can recycling unit designed to puncture and drain used or mostly empty aerosol cans, facilitating their safe disposal and recycling. It is not intended for continuous processing of full cans or for use with spray adhesives or expanding foam sealant products.
Function Description:
The AeroVent® Standard unit is mounted on a 30 or 55-gallon recovery drum. It features an operating handle that, when pressed down, punctures the aerosol can and allows its contents to drain into the drum. The unit includes a Safe2Filter™ filter housing that threads into the drum's bung fitting, designed to capture fumes and ensure safe venting. A grounding cable is provided to prevent static discharge during operation, which is crucial given the flammable nature of collected liquids and vapors. The system is designed to minimize environmental impact by safely containing residual propellants and liquids from aerosol cans.
Important Technical Specifications:
- Compatibility: Designed for 2", 2.5", and 3" diameter aerosol cans, with interchangeable plunger blocks to match can sizes.
- Filter System: Utilizes a Safe2Filter™ filter element (Part #10004841, sold as a 2-pack #10004898) for fume filtration.
- Materials: Constructed with durable components, including a main base plate (Part #10004285), operating handle (Part #10004208), and cobalt points (Part #10003377) for puncturing.
- Grounding: Includes a grounding cable with clamp (Part #10003914) for static discharge prevention.
- Dimensions (Parts List):
- Main Base Plate: 10004285
- Support Foot (2 req): 10004262
- Operating Handle: 10004208
- Swivel Foot: 10004294
- Lid Handle: 10004195
- Lid Grommet: 10002410
- Plunger Block Kit (2", 2.5", and 3"): 10004248
- Trough Liner w/can stop: 10003970
- Trough Liner Grommet: 10001874
- Lid Gasket: 10004249
- Trough Bellow: 10003791
- Trough Spring: 10004257
- Cobalt Point: 10003377
- Safe2Filter Filter Element: 10004841
- Safe2Filter Filter replacement Package of 2: 10004898
- Grounding Cable w/clamp: 10003914
- Left Shroud: 10004286
- Right Shroud: 10004287
- Bellows Clamp (2 req): 10003794
- Set Screw 10-32 x 5/8": 10004167
Usage Features:
- Safety First: Emphasizes the critical importance of wearing appropriate personal protective equipment (PPE), including a respirator, especially when operating indoors or in poorly ventilated areas. Operation outdoors or in well-ventilated areas with the operator upwind of the exhaust port may negate the need for a respirator.
- Can Puncturing Process:
- Select the correct plunger block (2", 2.5", or 3") using the can guide.
- Lift the operating handle and open the lid.
- Ensure the can stop is in the front slots of the trough liner.
- Insert an aerosol can with the bottom pointing toward the clamp and against the forward stop.
- Close the lid and push down the operating handle until it "locks" into the "Puncture & Drain position."
- Allow 15-30 seconds for the can to drain. For mostly full cans, wait 45-60 seconds to ensure complete drainage.
- Lift the handle to the "unload" position and open the lid to remove the can.
- Grounding: Requires attachment of the grounding cable to a suitable grounding source (e.g., metal water pipe or grounding rod) before operation to prevent static discharge.
- Ventilation: Strongly recommends operating the unit outdoors or in a well-ventilated area.
- Waste Management: Advises keeping waste collection containers closed when not in use, in a cool, well-ventilated area, away from heat, sparks, and flames. No smoking near the unit or waste containers.
- Chemical Compatibility: Users must consult the Product SDS for specific chemical handling and safety instructions, especially when co-mingling multiple aerosols in the same collection drum. Caustics, pesticides, insecticides, and white metals should never be collected with other liquids and must be segregated.
- Drum Fill Level: The recovery drum should not exceed 70% (2/3) full to allow for proper draining and venting of fumes.
Maintenance Features:
- Lid Gasket (Part #10004249): Check before each use. Replace as necessary.
- Safe2Filter™ (Part #10004898 - 2 pack): Change monthly, or every 60 days or 600 cans. More frequent changes are required for full cans or cans with larger amounts of remaining liquids.
- Cobalt Points (Part #10003377): Check before each use. Replace as necessary.
- Replacement Procedure:
- Leave the unit mounted on the drum.
- Open the lid and remove the left and right shrouds.
- Loosen the bottom clamp on the bellows (no need to loosen the top clamp unless bellows are damaged).
- Remove the trough liner can stop. Gently pry bellows off lower bushings to rotate the assembly up and rest it against the lid.
- Loosen the setscrew with a 3/32" hex key, replace the point, and tighten the setscrew against the new point (do not use Loctite).
- Re-assemble in reverse order.
- Bellow (Part #10003791): Check every 180 days. Replace as necessary.
- Operating Clamp (Part #10004208): Check before each use. Lubricate regularly with light oil (e.g., 3-in-1, WD-40).
- Safe2Filter™ Replacement Procedure:
- Remove the filter lid by pulling upwards on the edge (or on the check valve).
- Lift off the filter element from the base.
- Install the new element onto the filter base.
- Replace the filter lid by pressing it into the top of the element.
- Dispose of the used filter element appropriately.
Warranty:
Newstripe, Inc. provides an 18-month warranty from the date of purchase, covering defects in materials and workmanship. This warranty does not cover damage from misuse, neglect, accident, improper operation, or normal wear and tear. Shipping damage is the responsibility of the carrier, and customers must note damages on the Bill of Lading. For warranty service, defective parts must be shipped prepaid to Newstripe, Inc. with a written description of the defect and proof of purchase, after obtaining a Return Materials Authorization number. The warranty is limited to replacement or repair of defective parts and does not cover incidental or consequential damages. Specific components like gasoline engines, compressors, pumps, and transaxles are covered by their respective manufacturer's warranties, with Newstripe extending coverage for 100% of the cost for the first 12 months and 60% for the remaining 6 months.