The Nexans Millitemp CDFR-003 is a programmable digital thermostat designed for regulating electric underfloor heating cables. It offers a temperature range of +5 to +40 °C (default) and can operate in two primary modes: constant temperature mode and event-based mode.
Function Description:
The thermostat's main function is to automatically regulate either the room or floor temperature. By default, it starts in constant temperature mode, utilizing its built-in room sensor. In this mode, the user can manually set the desired temperature at any given time.
When switched to event-based mode, the CDFR-003 controls the temperature according to a predefined program based on time and day. This mode allows for different temperature settings for weekdays and weekends, and at various times throughout the day (e.g., normal operation, day saving, evening operation, night saving). This feature is designed to optimize energy consumption by reducing output when comfort temperatures are not needed, leading to significant energy savings. The default program for weekdays includes normal operation at 06:00 (21°C), day saving at 09:00 (16°C), evening operation at 17:00 (21°C), and night saving at 22:00 (16°C). For Saturday and Sunday, the default program includes normal operation at 08:00 (21°C) and night saving at 22:00 (16°C), with day saving and evening operation deactivated by default. Users can customize these times and temperatures.
The thermostat is equipped with both a built-in room sensor (internal) and an external floor sensor. Temperature regulation can be based on either the floor sensor, the room sensor, or a combination of both. In combination mode, the floor sensor can be used to limit the floor temperature below a set maximum, while the room sensor regulates the temperature according to the desired set value.
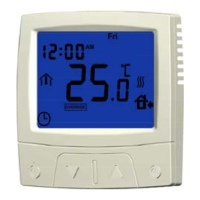
The display includes various symbols to indicate the thermostat's status and active functions, such as clock, measured or set temperature, room sensor active, floor sensor active, antifreeze active, heat indication, day of week, event/operation mode, timer, and indications for setting events/modes or adjusting general settings. An "OVERRIDE" symbol appears when the event mode is manually overridden by the user.
Important Technical Specifications:
- Rated voltage: 230 V~
- Own consumption: < 2 W
- Maximum load: 16A (approx. 3600W at rated voltage)
- Switch (ON/OFF): Electronic
- Temperature range (default): From +5°C to +40°C (+41°F to +104°F)
- Designed working temperatures for sensors: 1-50 °C (Room sensor), 1-80 °C (Floor sensor)
- Dimensions: 84x84x40mm (25 mm socket)
- Encapsulation: IP 21
- Length floor sensor cable: 3 m
- Cross section area, connecting wires: 0.5 mm² - 2.5 mm²
- Max. number of heating cables: 3
- Sensing element: NTC
- Display: LCD (blue backlighting)
- Norms/standards: IEC 60730-1 and IEC 60730-2-9, EMC Directive 89/336
- CE-marked: For indoor use only.
Usage Features:
- Switching modes: The thermostat can switch between constant temperature mode and event-based mode. This function is linked to the clock setting (sub-setting 11:CL). If the clock is disabled, it runs in constant temperature mode. Activating the clock (12h AM/PM or 24h) enables event mode.
- Adjusting temperature: In constant temperature mode, the set temperature can be adjusted using UP and DOWN buttons.
- Viewing sensor values: Users can view measured values of the floor (external) sensor by holding the CLOCK button for 3 seconds, and the room (internal) sensor by holding the ON/OFF button for 3 seconds. This feature is available if sub-setting 12:DF is set to 01.
- System settings: General settings can be accessed by turning the thermostat OFF, then pressing and holding UP and DOWN buttons for 5 seconds. This menu includes 12 sub-settings for various parameters like temperature unit (Celsius/Fahrenheit), calibration, antifreeze function, temperature limitations, sensor selection, and clock settings.
- Event mode programming: With the clock activated, users can customize the times and temperatures for the four events (normal operation, day saving, evening operation, night saving) for both weekdays and weekends.
- Manual override: In event mode, the user can manually set a new temperature using UP and DOWN buttons. The thermostat will enter "OVERRIDE" mode after 10 seconds and maintain this temperature until the next event starts. The override can be cancelled by pressing the CLOCK button once.
- Setting the clock: The clock can be set by simultaneously pressing DOWN and CLOCK buttons for 5 seconds (clock must be active via sub-setting 11:CL).
- Setting the timer: A daily timer function allows the thermostat to be active during a specific timeframe. This is accessed by holding UP and CLOCK buttons simultaneously for 5 seconds.
- Error messages: The display shows "E1" for a short-circuited sensor connection and "E2" for an open circuit at the sensor connection, indicating which sensor is faulty.
Maintenance Features:
- Maintenance-free: The thermostat is designed to be maintenance-free.
- Settings retention: All settings are remembered even if the power supply fails, thanks to EEPROM backup.
- Resetting: The thermostat can be reset to its original factory settings by turning it off, then holding ON/OFF and UP buttons simultaneously for 10 seconds. All LCD symbols will light up, and default data will be recovered.
Installation Instructions:
- Sensor placement: The external floor sensor should be embedded in the floor between heating cable loops, near the floor surface, preferably in a flexible conduit.
- Thermostat placement: The thermostat should be positioned approximately 1.6 m above the floor. If the room sensor is used, it must be placed where air can freely flow through its chassis, avoiding direct sunlight or draught.
- Electrical connections: Installation must be performed by an approved electrician in accordance with the National Electric Code. All heating cable circuits require a 30 mA ground fault circuit interrupter. Power must be disconnected before installation. Connections include heating cable to connectors 5 and 6, power supply (L and N) to connectors 4 and 7, and floor sensor to connectors 1 and 2. The heating cable's earth conductor must be connected to the building's earth.
- Assembly: The frontside (screen) and backside (socket) are separated for installation. Care must be taken when reattaching the frontside to ensure pins align correctly.
Warranty:
Nexans Norway offers a 2-year warranty on defects in material and workmanship under proper use and service. The warranty does not cover defects caused by faulty installation or improper use. Claims must be submitted in writing within 30 days of defect discovery, accompanied by a detailed description.