Do you have a question about the NEXCAM AXIS SC-360 and is the answer not in the manual?
Do not exceed 300lbs. Use only on level ground and flat surfaces. Ensure height adjustment D-pin is locked.
Avoid tipping, leaning back, pinching fingers, or modifying the product. Use only for intended purpose.
Always follow safe weapon/firearm handling practices. Failure to follow instructions can result in serious injury or death.
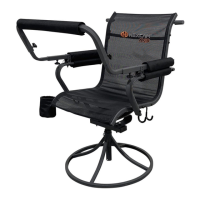
Visual guide identifying numbered components of the shooting chair, including the shooting rail and spring stopper.
Detailed list of all chair components, including Seat Fabric Frame, Armrest, Male Post, Seat Base, and Shooting Rail components.
Comprehensive list of all bolts, washers, locknuts, and spacers required for assembly, with dimensions and quantities.
Attach Seat Support and Backrest Support to Seat Fabric Frame using M6x30 bolts and washers. Ensure taller side of Seat Support faces front.
Mount Accessory Hooks to the outside of the Seat Fabric Frame using M6x40 bolts, washers, and locknuts.
Secure Armrests to the sides of the Seat Fabric Frame using M6x80 bolts and washers, including nylon washers.
Assemble Seat Frame onto Rocker Springs, ensuring curves face the chair's back, using M8x40 bolts and washers.
Place White Bushing Spacer onto male post, then insert into the Seat Base. Secure with M6x45mm bolt and locknut.
Attach Rear Shooting Rail Brace to Seat Fabric Frame using M6x75 bolt, washers, bushing, nylon washers, and locknut.
Connect Bent Up Shooting Rail Braces to the Front Shooting Rail Brace using Locking Knobs.
Insert Bent Up Shooting Rail Braces into Rear Shooting Rail Brace and tighten with Locking Knobs. Ensure secure fit.
Attach Shooting Rail Stoppers to the sides of the backrest frame using M8 locknuts.
Mount the Cup Holder onto the front side of the seat using steel washers and locknuts.
Use on level surfaces, ensure stability, adjust seat height and shooting rail for comfortable shooting positions.
Adjust vertical, horizontal, and angular settings for shooting or loosen for archery use and pin down to armrest.
Do not modify. Use only authorized parts. Store indoors in a clean, dry environment to prevent damage from elements.
Warrants against manufacturer defects for one year from purchase. Repair or replace defective parts. Contact support for claims.
Warranty void if product subjected to misuse, abuse, neglect, improper maintenance, or unauthorized modifications.
Contact NEXCAM Inc. for warranty issues, repairs, or parts via email at support@Nexcam.com or visit website.
The NEXCAM AXIS SC-360 Shooting Chair is a specialized piece of equipment designed for hunters, prioritizing safety, comfort, and stealth to enhance the hunting experience. It is constructed with high-quality materials to ensure durability and years of reliable use.
The primary function of the NEXCAM AXIS SC-360 Shooting Chair is to provide a stable, comfortable, and adjustable platform for hunters to achieve a steady shot. It is engineered to minimize movement and maximize the hunter's ability to remain concealed and prepared for critical moments. The chair is intended for ground use only and is not designed for elevated positions. Its various adjustable components allow users to customize their seating and shooting positions for optimal comfort and accuracy.
| Brand | NEXCAM |
|---|---|
| Model | AXIS SC-360 |
| Category | Indoor Furnishing |
| Language | English |