The Nexus Standard MP V3 is an analogue induction balance (IB) metal detector operating in the very low frequency (VLF) range, designed for use on all inland sites and tidal saltwater beaches. The "MP" in its name stands for Mineral Power, highlighting its capability to effectively suppress mineral interference, particularly in heavy mineral ground conditions and areas with strong magnetite. This makes it a top-tier IB-based metal detector within the Nexus product line for such challenging environments.
Function Description:
The detector is an all-purpose device capable of locating both small and large targets at extreme depths in normal soil conditions. It is engineered for high efficiency across various mineral soils and magnetite (black sand), outperforming other IB metal detectors in these conditions. The MP V3 offers two primary modes of operation: All-Metal and VCO Multi-tones. Professional users can leverage its deep-seeking Nexus technology for optimal results. The device is designed to detect the deepest targets, pushing the limits of induction balance technology.
Important Technical Specifications:
- Weight (main unit only): 1.0 kg (without batteries)
- Coil Case Construction: ABS plus Fibreglass or Carbon Fibre
- Audio Frequency: Custom tuned
- Audio Output: 6mm stereo headphone jack
- Power Supply: Up to 16V (10 AA alkaline batteries)
- Battery Life: Up to 12 hours (if only headphones are in use)
- Operating Modes: All-Metal, VCO Multi tones
- Optimum Temperature Range: -15° to +60°C
- Optimum Humidity Range: 0 to 85% RH
Usage Features:
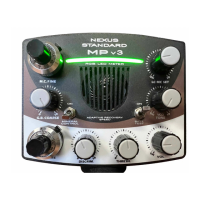
The Nexus Standard MP V3 features eight rotary control knobs and two toggle switches for comprehensive control.
- Battery Test Toggle Switch: Located on the front panel, this switch checks battery condition using the DDM. A full LED meter indicates 11.5V or higher, while no indication means 10.5V or less, requiring a charge.
- Volume and Power On/Off Switch: This knob controls the volume of the tone and responses and also serves as the power switch. It should always be used for volume adjustment, with any headphone volume control set to MAXIMUM.
- VCO Tone Control: This enables VCO multi-tones. It's recommended to set it to the middle or where the first green light on the LED meter is almost on.
- Fully anticlockwise: Prioritizes high tones, useful for identifying deep small non-ferrous targets in mineralized soils, and may make some iron targets sound non-ferrous.
- Fully clockwise (10): Low tones dominate, and small non-ferrous targets will sound at high frequency closer to the coil, reducing discrimination depth for some targets.
- RGB LED Meter: Utilizes LED technology for visual discrimination analysis in All-Metal and VCO Multi-tone modes. It indicates non-ferrous targets in three colors:
- Green: Lowest conductors (e.g., gold coins, small aluminum fragments).
- Orange: Medium conductors (e.g., lead, copper, bronze).
- Purple/White: Highest conductors (e.g., silver targets, very large metal targets).
- Discrimination Knob: Adjusts the discrimination level (0 to 10). Rotating clockwise increases the level, reducing sensitivity to ferrous (iron) targets. High settings can lead to missing good targets. Generally, it should be set as low as possible to avoid masking small and deep targets. For the MP V3, this control must be set to remove iron from RGB meter readings. Setting it to zero will indicate iron targets as low conductors (green).
- Ground Balance (Coarse and Fine): Controlled by two rotary knobs. The Coarse GB is a single-turn potentiometer, while the Fine control is a 10-turn potentiometer with a multi-turn dial and locking function. These are used to balance the detector to site-specific soil conditions.
- Threshold Knob: Sets the level of the audible threshold tone. In All-Metal Mode, an audible threshold is always used. If VCO Multi-tones are permanently engaged, the threshold should be set to silent.
- Mineral Control Section: Enabled by a toggle switch. When "On," the M.C. Fine control adjusts the detector's resistance to high minerals. The M.C. Fine control is disabled when the toggle switch is "Off."
- LC-MC SET Control: This rotary control turns the RGB meter on/off and sets the cut-off point between low and medium conductors. This allows users to prioritize certain target types (e.g., hammered gold coins as low conductors) while ignoring others.
Assembly and Preparation:
The detector comes boxed for quick assembly. Attach the lower stem poles to the top one, tighten collars, and secure the coil to the lower stem using the plastic bolt and friction washers. Insert the coil cable plug into the control box socket and tighten the knurled ring, ensuring the cable is not strained when wound around the stem. The center stem pole can be omitted for a shorter stem setup, useful in steep or confined areas. The detector uses a 10 AA battery holder (alkaline or rechargeable). A charging socket is provided. To insert/change batteries, remove three plastic thumb screws from the battery box lid, loosen the fourth, and turn the cover. Ensure batteries are correctly aligned and terminals make good contact. For headphones (recommended), connect them to the 6mm jack socket on the battery box.
General Operation and Set-Up:
The MP V3 is designed for experienced users. Proper tuning to site conditions is crucial for maximum depth and sensitivity.
- Initial Setup: Ensure no metal is near the coil. Tune away from other detectors or electronic interference. Turn on the detector; a tone will sound, and the RGB meter will flash before settling.
- Battery Check: Turn on the Battery Check. After checking, return the toggle switch to allow RGB to indicate metal targets (prolonged battery check drains batteries).
- Threshold Adjustment: Hold the coil above ground, adjust the Threshold knob for a faint audible tone. Set the Volume knob to a comfortable level (headphone volume to MAXIMUM).
- Ground Balance Procedure:
- Ensure no metal targets are in the tuning area.
- Position the coil about 3" (75mm) above and parallel to the ground.
- Raise the coil gently to 25 cm (10") and lower it back to 3" (75mm) several times. Observe if the threshold tone changes. After proper GB, there should be no residual tone change. Incorrect GB will cause strong false signals from ground minerals on the RGB meter.
- To set GB: Start with both GB controls at 0 (fully anticlockwise). While moving the coil up and down, slowly turn the Coarse GB knob clockwise until a very soft downward sound is produced. Then, fine-tune with the Fine GB control until no residual ground signal or a very soft signal remains in both up and down coil movements.
- The coil must be held parallel to the ground during GB tuning.
- In highly mineralized soils, Mineral Control may be needed for stable operation. Re-balance the ground after any change in Mineral Control levels.
- Discrimination Level Setting: Rotate the Discrimination knob clockwise to increase discrimination and reduce sensitivity to ferrous targets. To set effectively, pass a rusty iron nail (approx. 50mm) close to the coil. Rotate the Discrimination knob clockwise until the iron nail is rejected from the RGB meter in all positions. Then, check for small non-ferrous target detection without depth loss.
- Final Check: Re-check threshold and volume for comfortable levels.
Search Method:
Swing the coil smoothly from side to side, slightly above the ground, at a moderate to slow speed. All Metal mode with an audible threshold is recommended for detecting the deepest targets.
- Suggested Operating Heights:
- 13" DD coil: 4” (100 mm) minimum above ground.
- 10" DD coil: 3” (75 mm) minimum above ground.
- Larger coils require higher minimum distances.
- These heights prevent minor threshold changes from ground interference, which can inhibit deep target detection. Mineral Controls can remove residual ground noise, allowing the coil to be carried at any distance, though with some depth loss.
- Ensure the coil is swung evenly and parallel to the ground, without rising at the ends of the swing, for maximum coverage.
- Audio Response:
- All-Metal Mode: Both ferrous and non-ferrous targets cause a sudden increase in threshold tone intensity. Strong responses indicate large or shallow targets; weak responses indicate small or deep targets. The RGB meter can be used to analyze signals by observing color response during the audio signal.
- VCO Multi-tone Mode: Good non-ferrous targets produce a clear, well-defined, two-way, repeatable audio signal with a smooth rise in frequency. Ferrous targets lower the audio frequency and may sound erratic.
- Pinpointing: X-ing the coil across the signal, the strongest signal indicates the target position. The VCO can also indicate the exact position by listening for the maximum audible frequency rise. Allow space when digging to avoid damaging finds.
Tips:
Practice and experimentation are necessary for optimal results on different sites. Regular use helps users become proficient in locating deep and small targets. No detector can find what isn't there, or give a signal unless the coil passes directly over the target. Site conditions significantly affect depth and performance; heavily furrowed, broken ground, or thick stubble are difficult. Varying ground conditions may require frequent Ground Balance adjustments.
Maintenance Features:
- Handling: Metal detectors are precision instruments requiring careful handling. Avoid dropping, impacts, or violent shaking. Protect during transport.
- Weather: Do not use in very wet weather without protecting the control box and battery. The coil assembly is fully waterproof. If water enters any boxes, switch off, remove batteries, and dry slowly in a warm place.
- Cleaning: Remove mud and soil with a damp cloth or water only. Do not use detergents or abrasives, and avoid getting water in control boxes.
- Storage: Remove batteries for long-term storage or shipping. Avoid storing in areas with extreme temperatures, dust, moisture, or contaminants.
- Repairs: Do not attempt to modify or repair the detector yourself; use an authorized repair center.
Troubleshooting:
- Detector does not turn on: Check batteries; replace if old, ensure proper insertion and good electrical contact.
- Too many false signals: Check Ground Balance adjustment. If persistent, check for hot rocks or contaminants and use Mineral Control if necessary.
- Picking up too much Iron: Check Discrimination level and adjust according to recommendations.
- Search coil plugged in, but detector doesn't work: Ensure it's the correct search coil for your Nexus model. MP V3 coils are interchangeable only with coils manufactured for the MP range (MP V1, MP V2, MP V3).
- Control function not working: Ensure correct usage per the User Manual. If a control causes no response change, return the detector to your dealer for check/repair.
- Detector is unstable: Avoid using near electrical sources, other metal detectors, or electronic devices. Do not carry smartphones while using.
- Detector stopped working in rain: Nexus detectors are not waterproof/weatherproof. Turn off power, remove batteries, and dry in a warm place for a couple of days. If still not working, return to dealer for maintenance/repair.
- Batteries drain faster than expected: Check if the battery test toggle switch remained in the "on" position. Ensure batteries are in good condition.